Blogging Basics- Blog Header
/I’m back with some blogging knowledge. I like to pretend I know what I’m talking about. For those of you that don’t care about blog headers, there are some cute Ike photos ahead.
First impressions on your blog are important. There are a lot of blogs out there. You need to draw people in as soon as they click on your page. One easy way to do this is by having a nice blog header.
Do you need to spend $100 to have someone design one for you? Nope. You can DIY this one and use that $100 on something important. Like paint. Or fabric. Or chocolate.
Today I’m going to show you how to make a header using Picnik. Yes, the lovely free Picnik that is disappearing soon. I’m actually in denial about the whole thing. I think it’s one big April Fool’s day joke. I’m on to you Google. I have Photoshop Elements. I’m just too lazy to use it. Okay, I did use it on my current header but I also said a lot of swear words while making it. I used Picnik for my first header. And I made it without swear words. Anyone remember this?…
Memories.
Now it’s time for you to make your very own photo header.
Step 1: Head on over to Picnik and find the collage option. (It keeps moving on me. Oh my, I’ll never be able to learn PSE.)
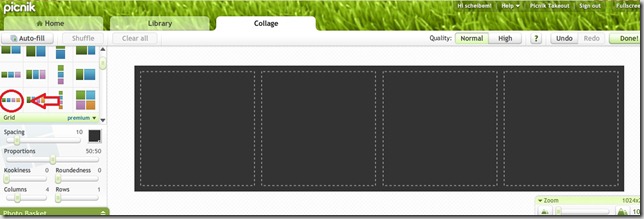
Step 2: Pick one of the rectangular collage options. I’ll choose the one with 4 photos.
Step 3: Upload the photos you want to use in your header, and drag and drop them in the frames where you want them. You can mess around with all of those fun buttons on the left. I think the proportions option is quite helpful. You can also change the background color here as well. Click “Done!” when complete.
Step 5: Next you will want to include your blog name in your header. Click on the "Text" button at the top of the page. Type your blog name in the box. You can select the font, size, and color at this time as well.
I wanted my title to have different fonts so I just created multiple text boxes.
Step 6: Click “Save and Share” at the top when you are finished.
Step 7: Change your file name and dimensions on this screen. ~94% is good for most blog widths. You may need to adjust this if yours looks a little off after uploading it to your blog. Click the “Save Photo” button and save the file to your computer.
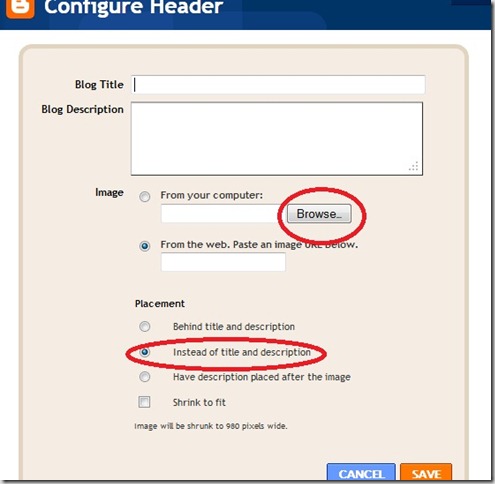
Step 8: My advice now continues in Blogger. I figure if you are taking advise from me you should be using a simple blog format like the lovely Blogger because I really should be giving layout advice. Click design from your dashboard. Next click the edit button next to the header.
Step 9: Next to "From your computer" click "browse”. Locate the file you previously saved to your computer to upload the photo. Once that is complete, make sure to select the button that says "Instead of title and description." Then click save.
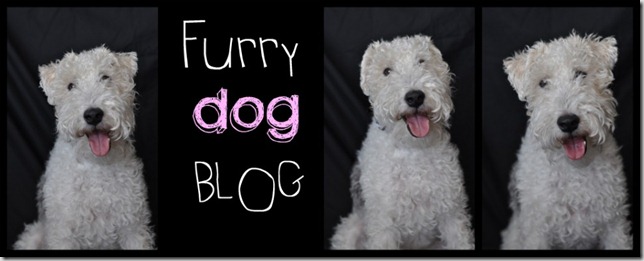
Step 10: Enjoy your pretty new blog header that took less than 5 minutes to make.
Okay, you might want to spend more than 5 minutes on it. The Furry Dog Blog doesn’t exist so I decided to not waste any more time than necessary on it. I’m going to use that time to comb the dog instead. So furry.
Anyone find this helpful? Who’s going to teach me PSE? Any good April Fool’s Day jokes out there? Who wants to brush my dog for me?


