Holiday Mantel 2013: Nutcrackers Galore

I'm starting off the 2013 holiday season by sharing our mantel.  

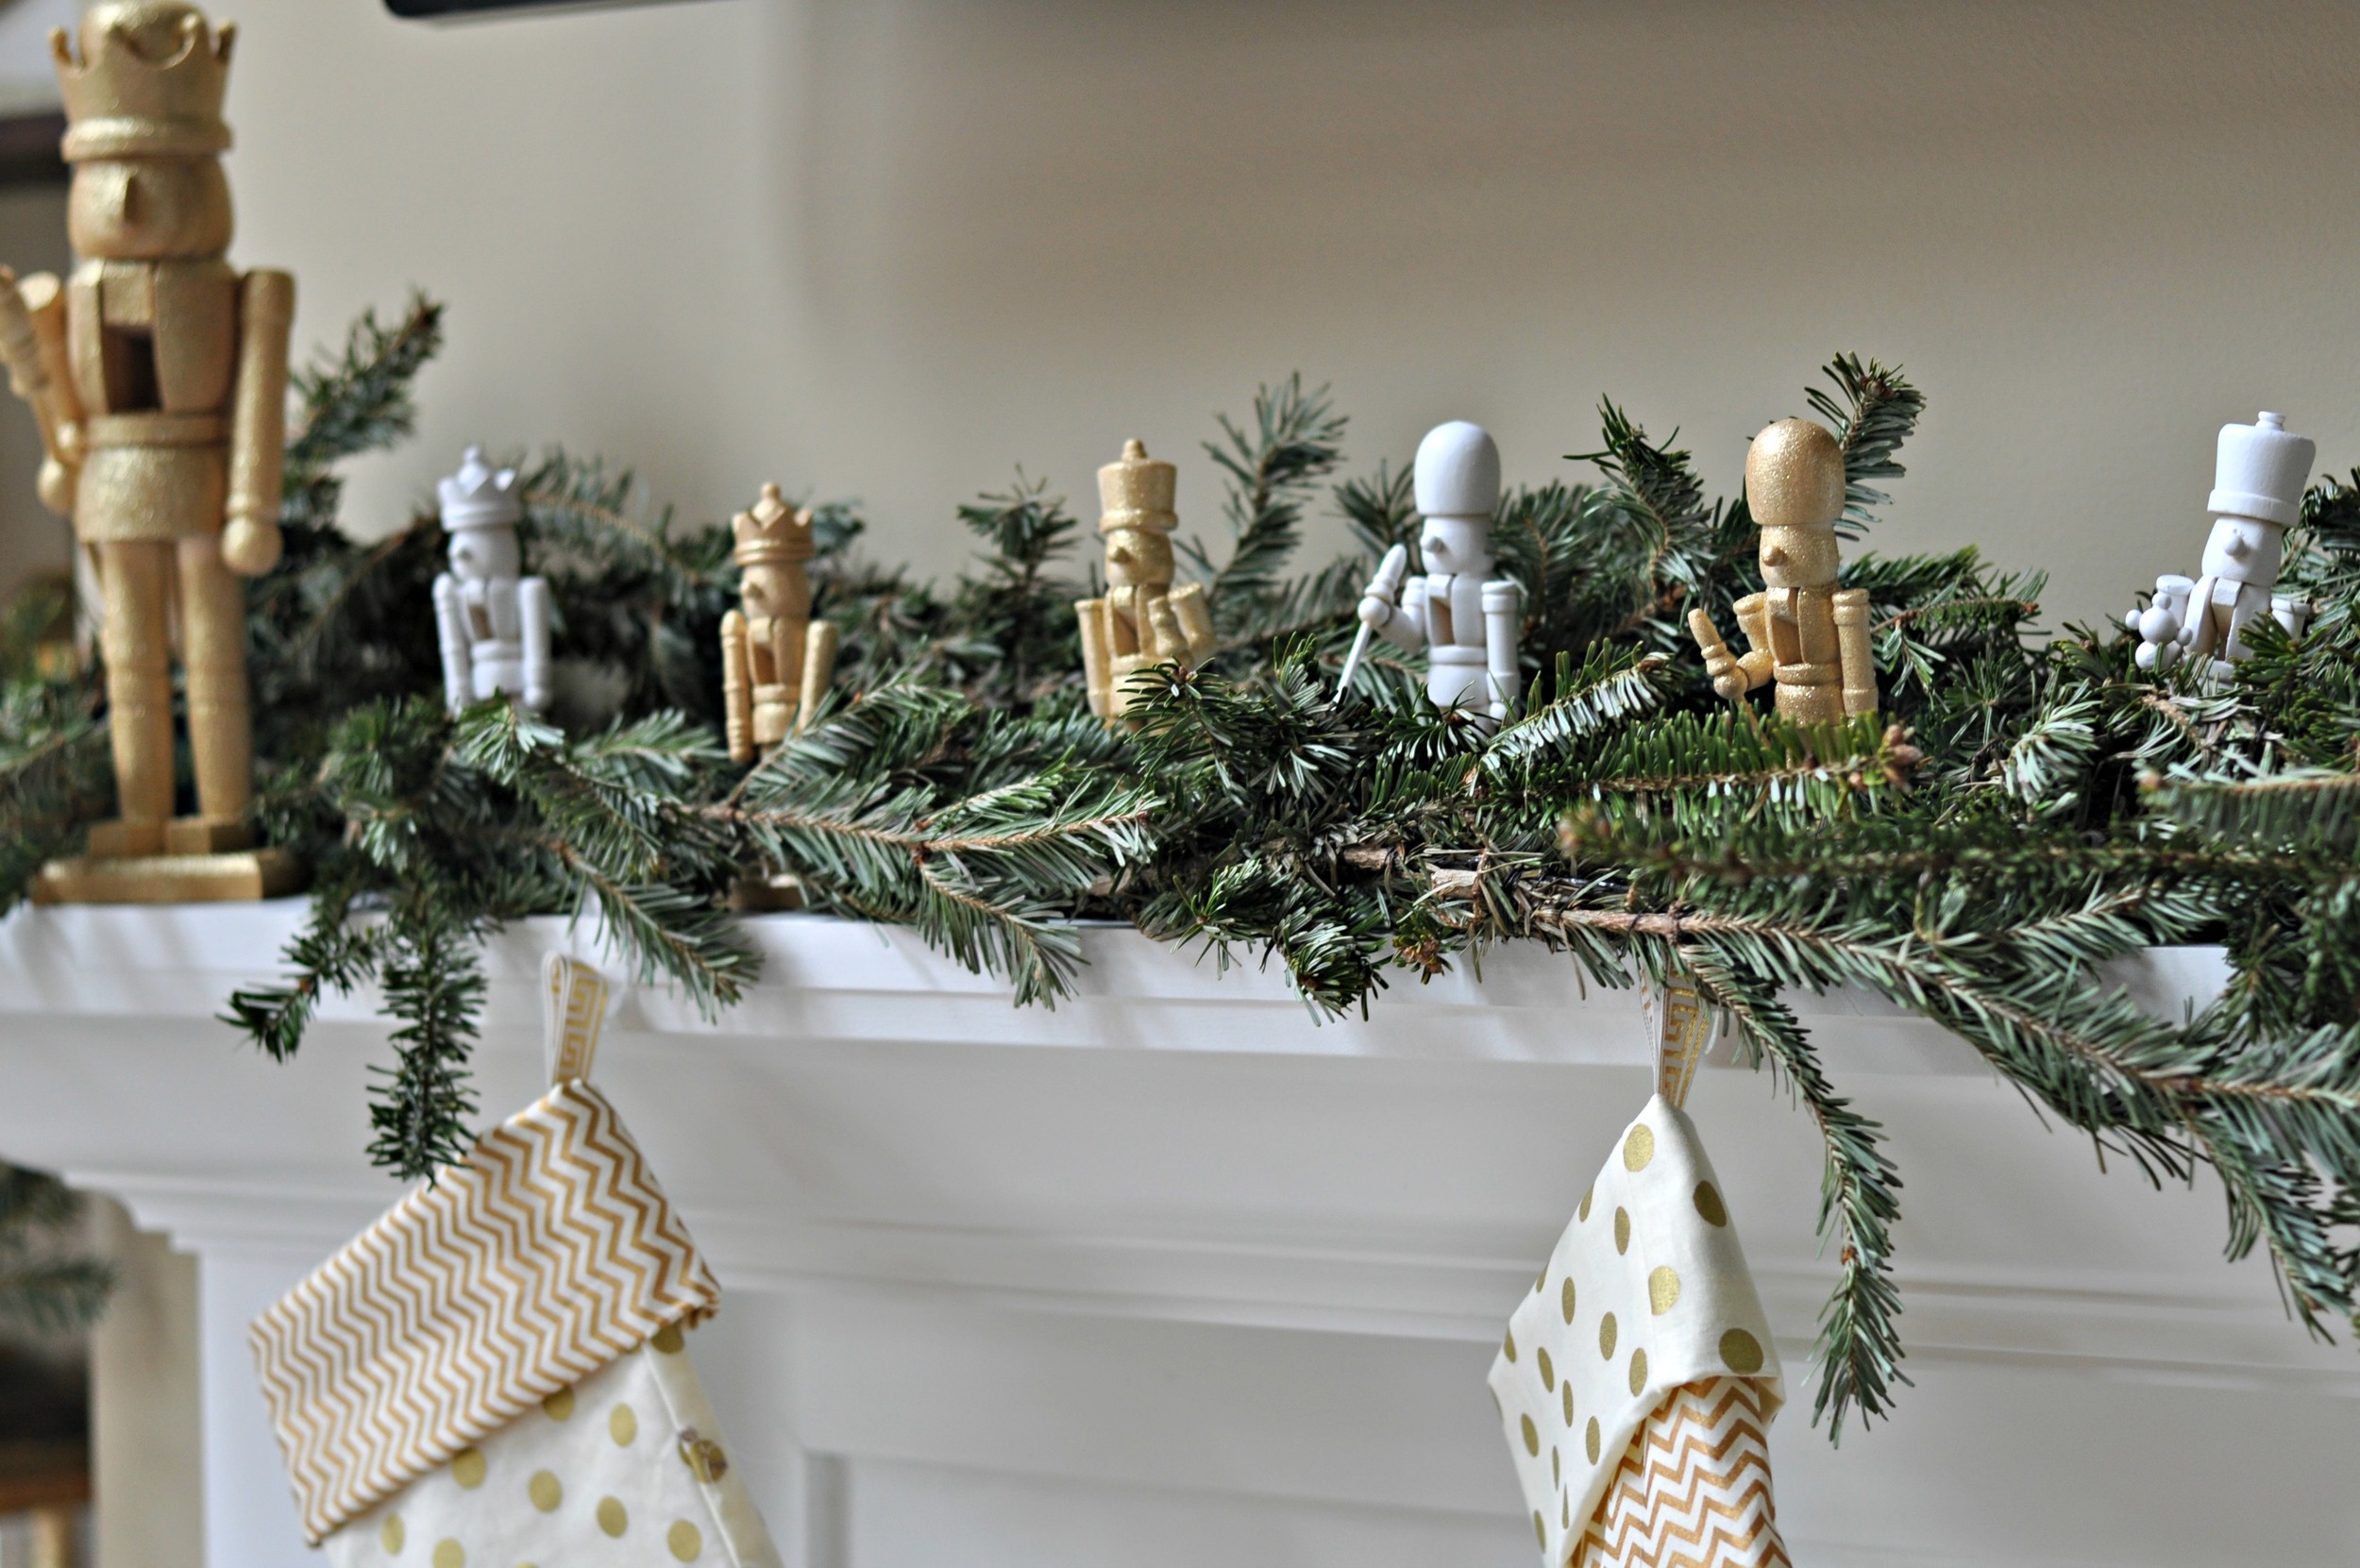
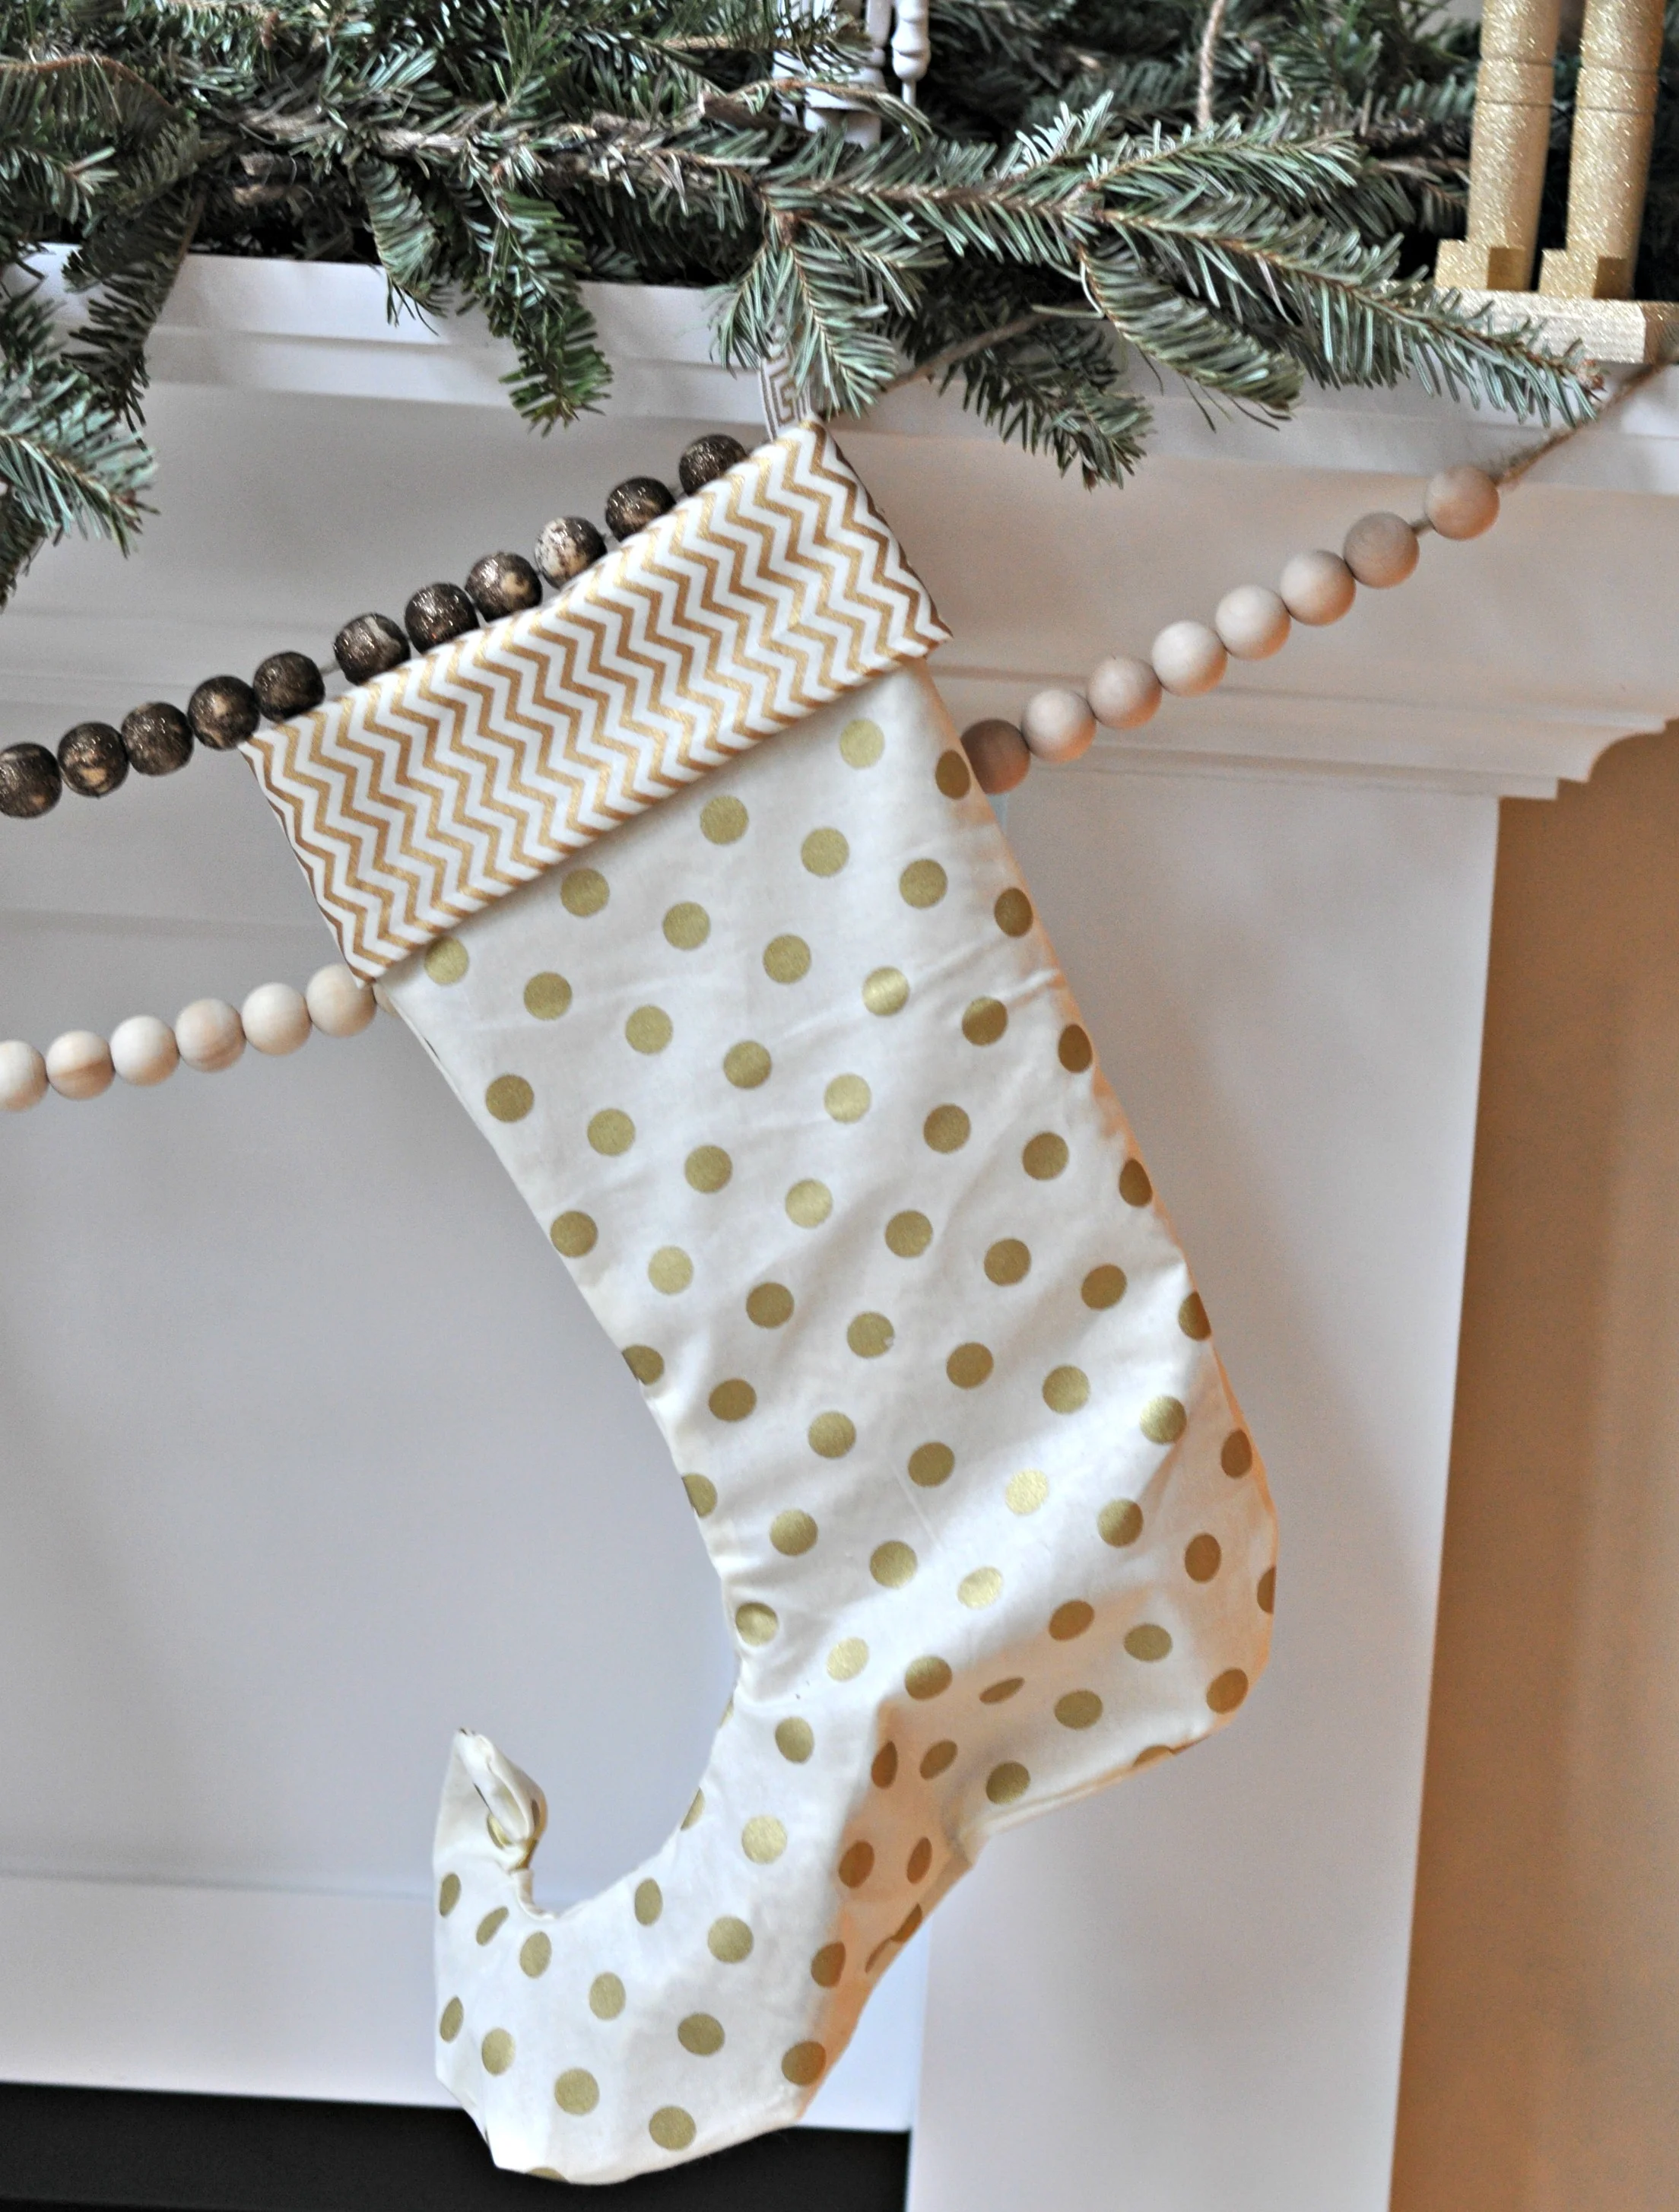
Our mantel that is full of glittery gold and white nutcrackers.  Along with some elf stockings, garland and wood beads.  A very cohesive mix.  (Or something that makes me sound like I know what I'm doing when in reality I just throw stuff on the mantel until it looks decent enough.)

Holiday Mantel 2013 Nutcrackers and Gold.jpg

I sure hope nutcrackers are friendly.  We have a whole army of them and I'm pretty sure they might murder us in our sleep some night.  These are the things that run through my head.  Totally rational thoughts. 

holiday mantel nutcracker.jpg
Holiday 2013 Mantel

I whipped up some elf stockings. I really liked the burlap stockings that I made last year.  Turns out that burlap makes Nate and I feel all icky. I couldn't risk death by burlap AND nutcrackers.  Safety first.

I'm kind of obsessed with the elf stocking look.  They are quirky.  I might put together a tutorial for these if I get my act together.   So probably not.

I also made some wood bead garland.  It was super easy.  Ike helped me make it.  Seriously. I might do a post on that too.

Holiday Mantel Elf Stockings.jpg
Holiday mantel elf stocking.jpg

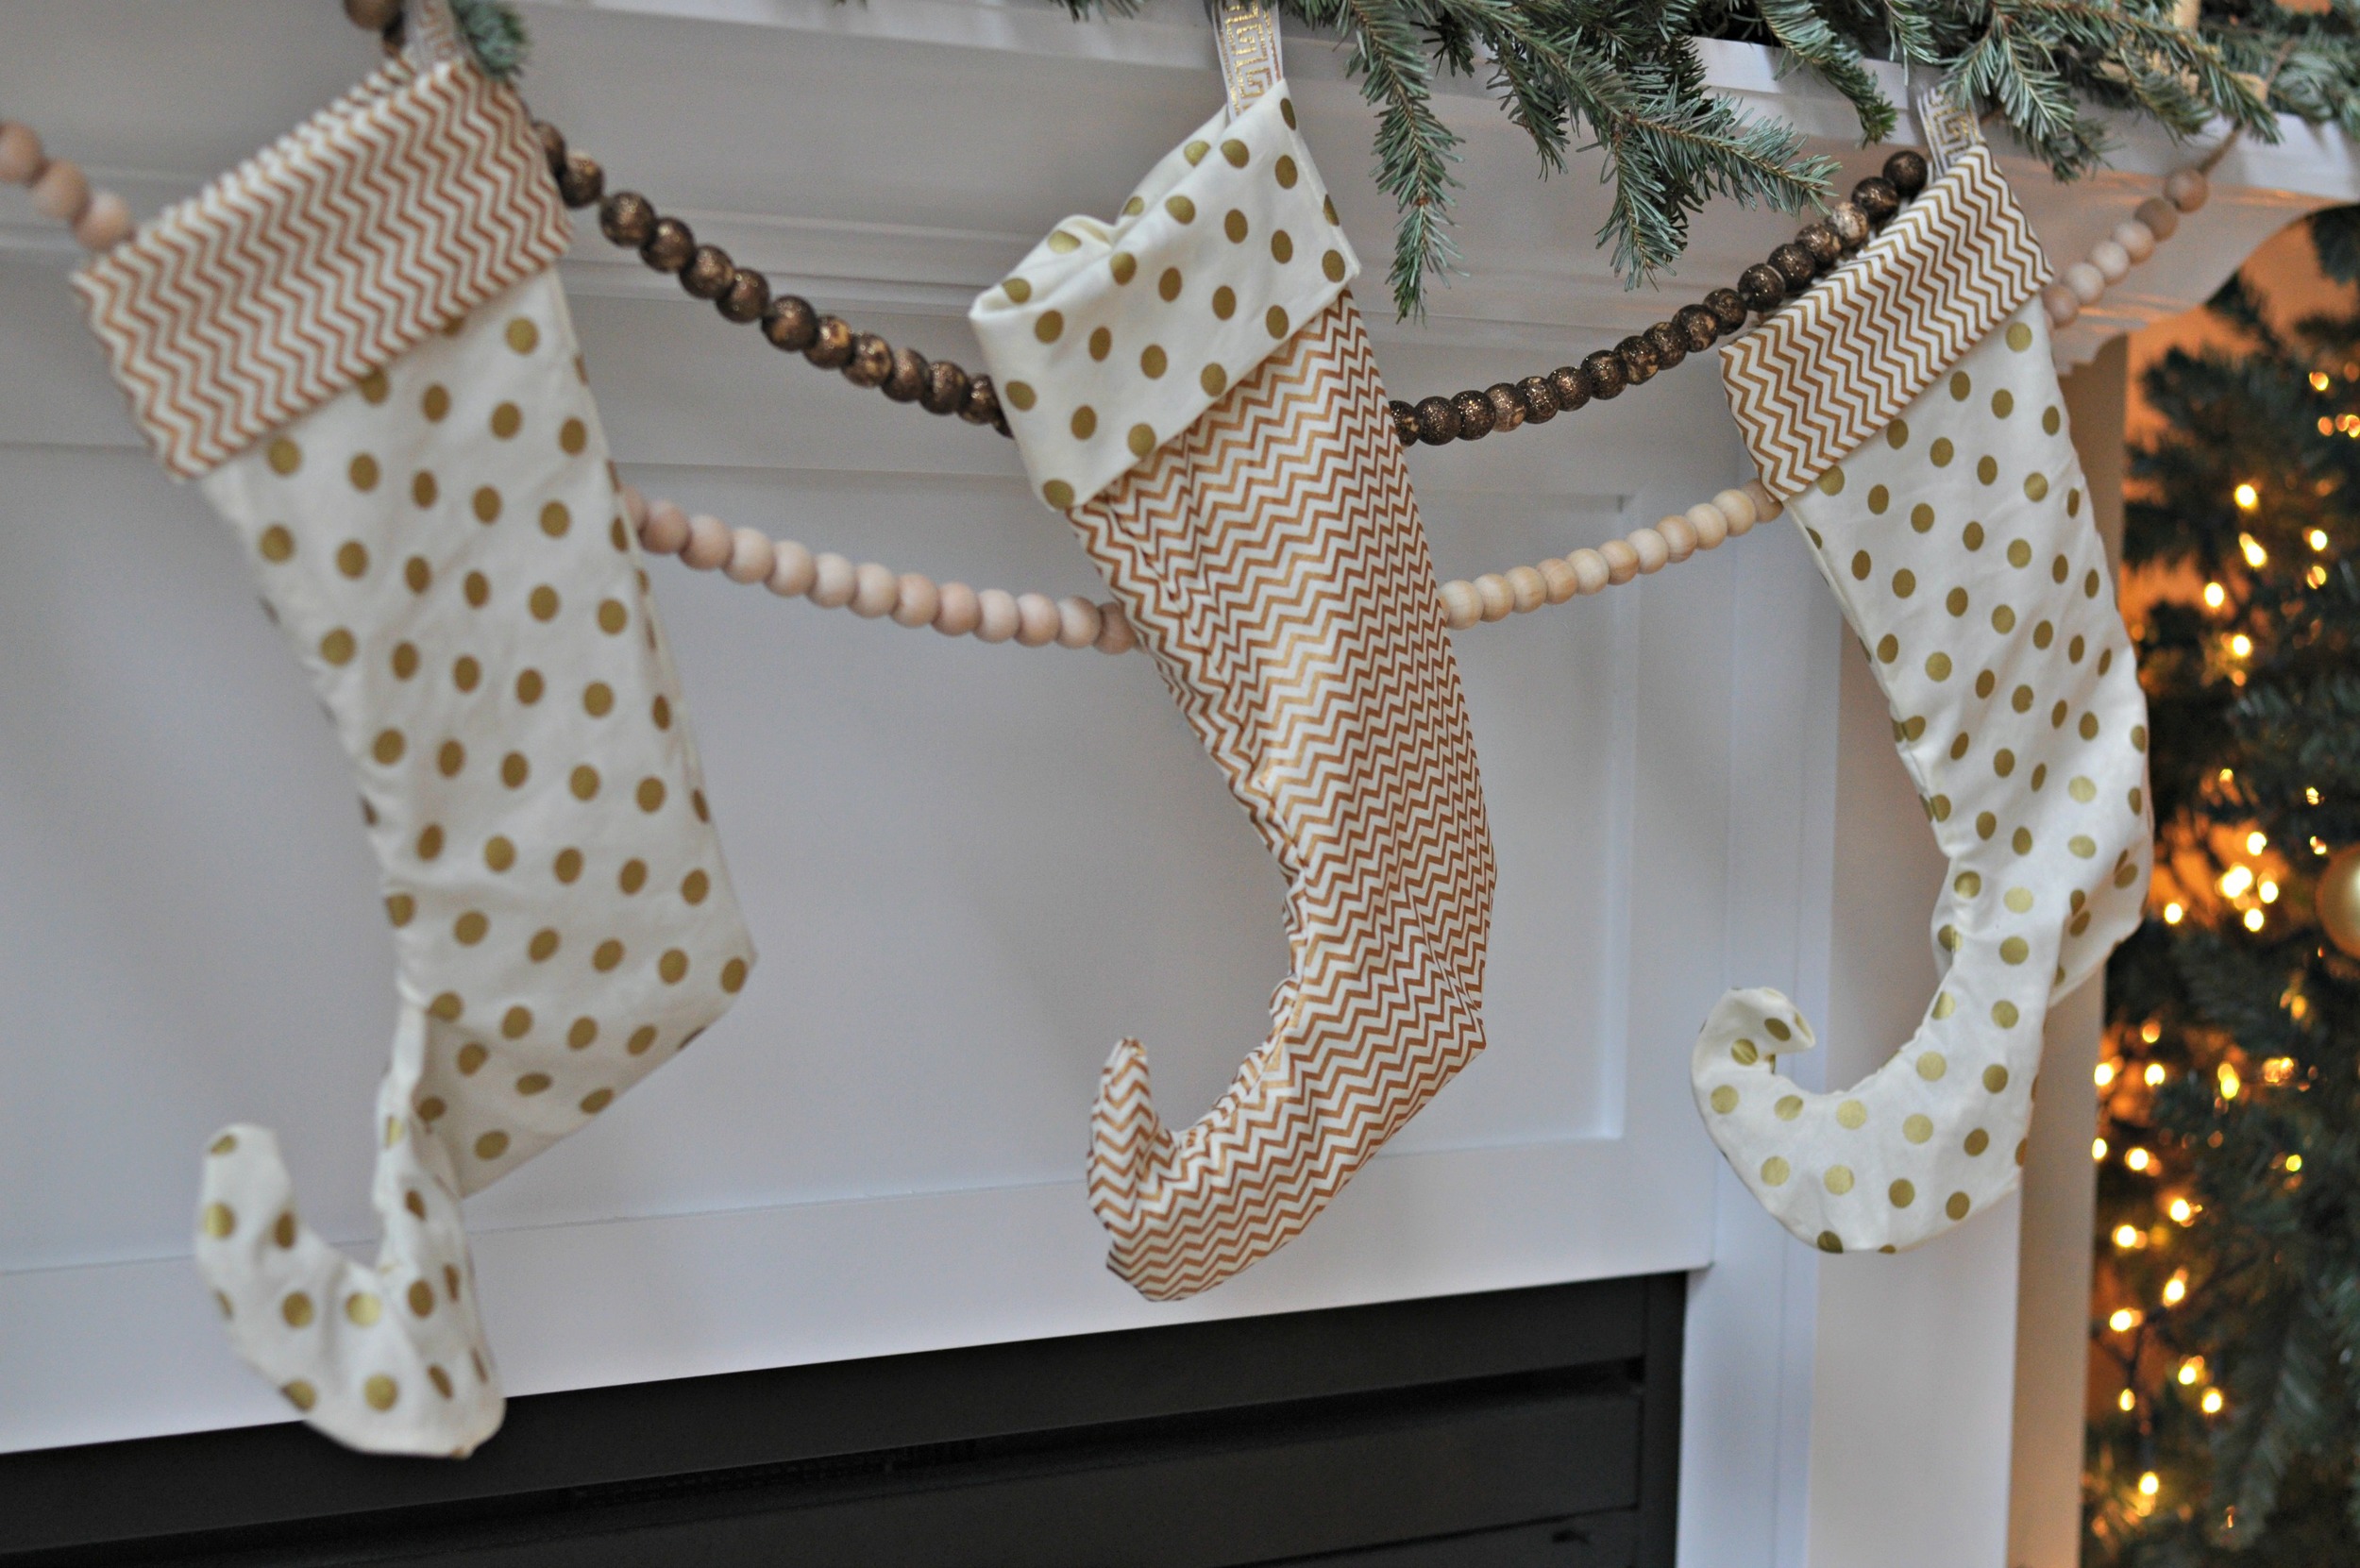
We bought real garland this year.  We have artificial trees so this gives us that glorious tree smell.  Mmmm, tree.

Holiday 2013 Mantel 1.jpg

It also makes a giant mess.

Worth it.

Holiday Mantel.  Gold and nutcrackers..jpg

Check out our mantels circa 2011 and 2012.  

Linking up to Our Fifth House and Ten June!

Be sure to share your Dare to DIY entertaining project with us today!

What's your mantel looking like this year?  Anyone else terrified of being murdered by holiday decorations?

***Pssst. Looking for a holiday gift idea?  There are few flannel infinity scarves left in the shop!***  


Photobucket Photobucket Photobucket PhotobucketPhotobucketPhotobucketfollow us in feedly

DIY Dining Cart Reveal

Find the complete tutorial here!

The following is the birth story of our dining cart.  The world loves birth stories.  Luckily this one doesn't contain the words uterus or vagina.  Wait.  It does now.  Crap.

Me:  "Hey, Nate.  Want to build some open shelves for the dining room?"

Nate:  "Whatever."

One week later.

Nate:  "How big do you want these open shelves?"

Me: "Well, it kind of depends on the size of the cabinet that will go below them.  Want to build one?  Or how about something like this one from Restoration Hardware but smaller?  I saw it the other day and I kind of fell in love."

Nate: "Whatever."  Heads to office to whip up a dining cart in Sketch-Up.

A trip to Lowe's and a few hours later, our precious dining cart arrived into the world.

DIY Dining Cart 3.jpg

She's beautiful, isn't she?  

We were hoping our bundle of joy would be just the right amount of rustic and industrial.  Modern enough to keep Nate happy.  Vintage enough to keep me happy.  She didn't disappoint.

DIY Dining Cart 2.jpg

We didn't photograph the shelves without my beautiful Pyrex but you can sort of see the fancy breadbox work Nate did on the ends.  He far exceeded my expectations on this project.  He's a keeper.  (I have to say that since he's the father of my newest addition.)

This cart has some unique touches.  We used a metal bracket on the end.  (The cheap ones from any home improvement store.)  We used upholstery tacks to fill in the holes.  We used black spray paint and beat it up a little to give it an aged look.

DIY Dining Cart Corner

The wheels were $4.99 a piece on Amazon.  They got the same spray paint and a beating treatment.

DIY Dining Cart wheel.jpg

Please don't mind the dirty floor.  We were busy creating.

Threaded black iron caps were used on the ends of the pipes running along the back.

DIY Dining Cart knob.jpg

The whole thing was finished like our farmhouse table.  We used the same stain (Rustoleum's Wood Stain in Weathered Grey).  

It coordinates lovely with our farmhouse table.

DIY Dining Cart in Room
DIY dining cart. Unique furniture build!

So, the whole open shelf idea turned into something different.  Now I'm working on a big ol' piece of art to hang above the dining cart.  And probably one hundred million other things because that's my thing.

We'll have a tutorial in the next week or so (Update: Find the tutorial here.).  If the blog doesn't get eaten by holiday posts.

Bottle Brush Tree Place Card {Dare to DIY}

How was everyone's weekend?  We had a great time with both of our families.  Ike is tuckered out.  I won't be hungry again until Christmas.  All is well.

Today is the second Dare to DIY party for 2013.  The always lovely Rachel {Maybe Matilda} is this week's host.  I can't wait to see what DIY entertaining shenanigans you all came up with!

We actually don't do a ton of entertaining during the holidays.  Time just slips away before we realize we should host something.  As a Dare to DIY host, I'm not allowed to wuss out on the challenge so I decided to get whip up a charming place card.

Bottlebrush tree on car place card

Like every cliche blogger, I've become obsessed with bottle brush trees.  If you live in a cave (Hi, Mom!!!), these trees are usually shoved into Mason jars.  I decided to use mine as a place card.  Because everyone needs to know where to sit at a fake dinner party. 

I picked up the VW bus at Walmart in the toy section.  The trees are from Joann's.  I had the Baker's twine from last year.

I invited Ike to the pretend dinner party!

christmas ike for party.jpg

He was pumped.

I decided to set the table for a quick imaginary party.  It's good to use my China for something, right?

christmas tablescape setup.jpg

I wanted to keep the setting relaxed and blogger cliche.  I added a simple white napkin and our regular Mason jar drinking glasses on top of some flannel.  As if Mason jar glasses weren't enough, I added a paper straw.  What kind of blogger would I be without paper straws?  Black and white straws would have been better but I failed to plan ahead.

Christmas Ike view.jpg

Ike supervised the set up.

Christmas tree in mason jar.jpg

I decided to take this whole thing over the top and shove a bottle brush tree and some Epsom salt in a Mason jar.  They make me smile.  Smiling is my favorite.

Christmas centerpiece with mason jars.jpg

The little vans with bottle brush trees also add to the centerpiece.  Aren't they charming?  We also bought a real little tree for the centerpiece.  We'll hopefully plant this guy outside in the Spring.  If Spring returns.  I feel like this may turn out to be the longest Winter ever.  And it's only December.

Christmas Centerpiece.jpg

Our dining room is looking quite festive.  I can't wait to share with your our newest addition to the dining room this week!

christmas dining room.jpg

Now it's time to see what my lovely co-hosts whipped up!  It's always fun to see what how we each tackle these dares!


Dare to Entertain

(Festive VW bus place cards via Decor and the Dog, Kraft paper runner and table via Maybe Matilda (TODAY'S HOSTESS), Blue Ball jar snowscapes via NewlyWoodwards, Gilded animal place cards via Primitive and Proper)

Now it's time for you to share your Dare to Entertain project!  I can't wait to read through all of them!  Head on over to Maybe Matilda and get to sharing!  One person that links up has the chance to win holiday cards from Tiny Prints!


Dare to Do It Yourself Link Party

Did you dare to entertain?  Are you obsessed with bottle brush trees and flannel like I am?

Photobucket Photobucket Photobucket PhotobucketPhotobucketPhotobucketfollow us in feedly