DIY Dining Cart Reveal

Find the complete tutorial here!

The following is the birth story of our dining cart.  The world loves birth stories.  Luckily this one doesn't contain the words uterus or vagina.  Wait.  It does now.  Crap.

Me:  "Hey, Nate.  Want to build some open shelves for the dining room?"

Nate:  "Whatever."

One week later.

Nate:  "How big do you want these open shelves?"

Me: "Well, it kind of depends on the size of the cabinet that will go below them.  Want to build one?  Or how about something like this one from Restoration Hardware but smaller?  I saw it the other day and I kind of fell in love."

Nate: "Whatever."  Heads to office to whip up a dining cart in Sketch-Up.

A trip to Lowe's and a few hours later, our precious dining cart arrived into the world.

DIY Dining Cart 3.jpg

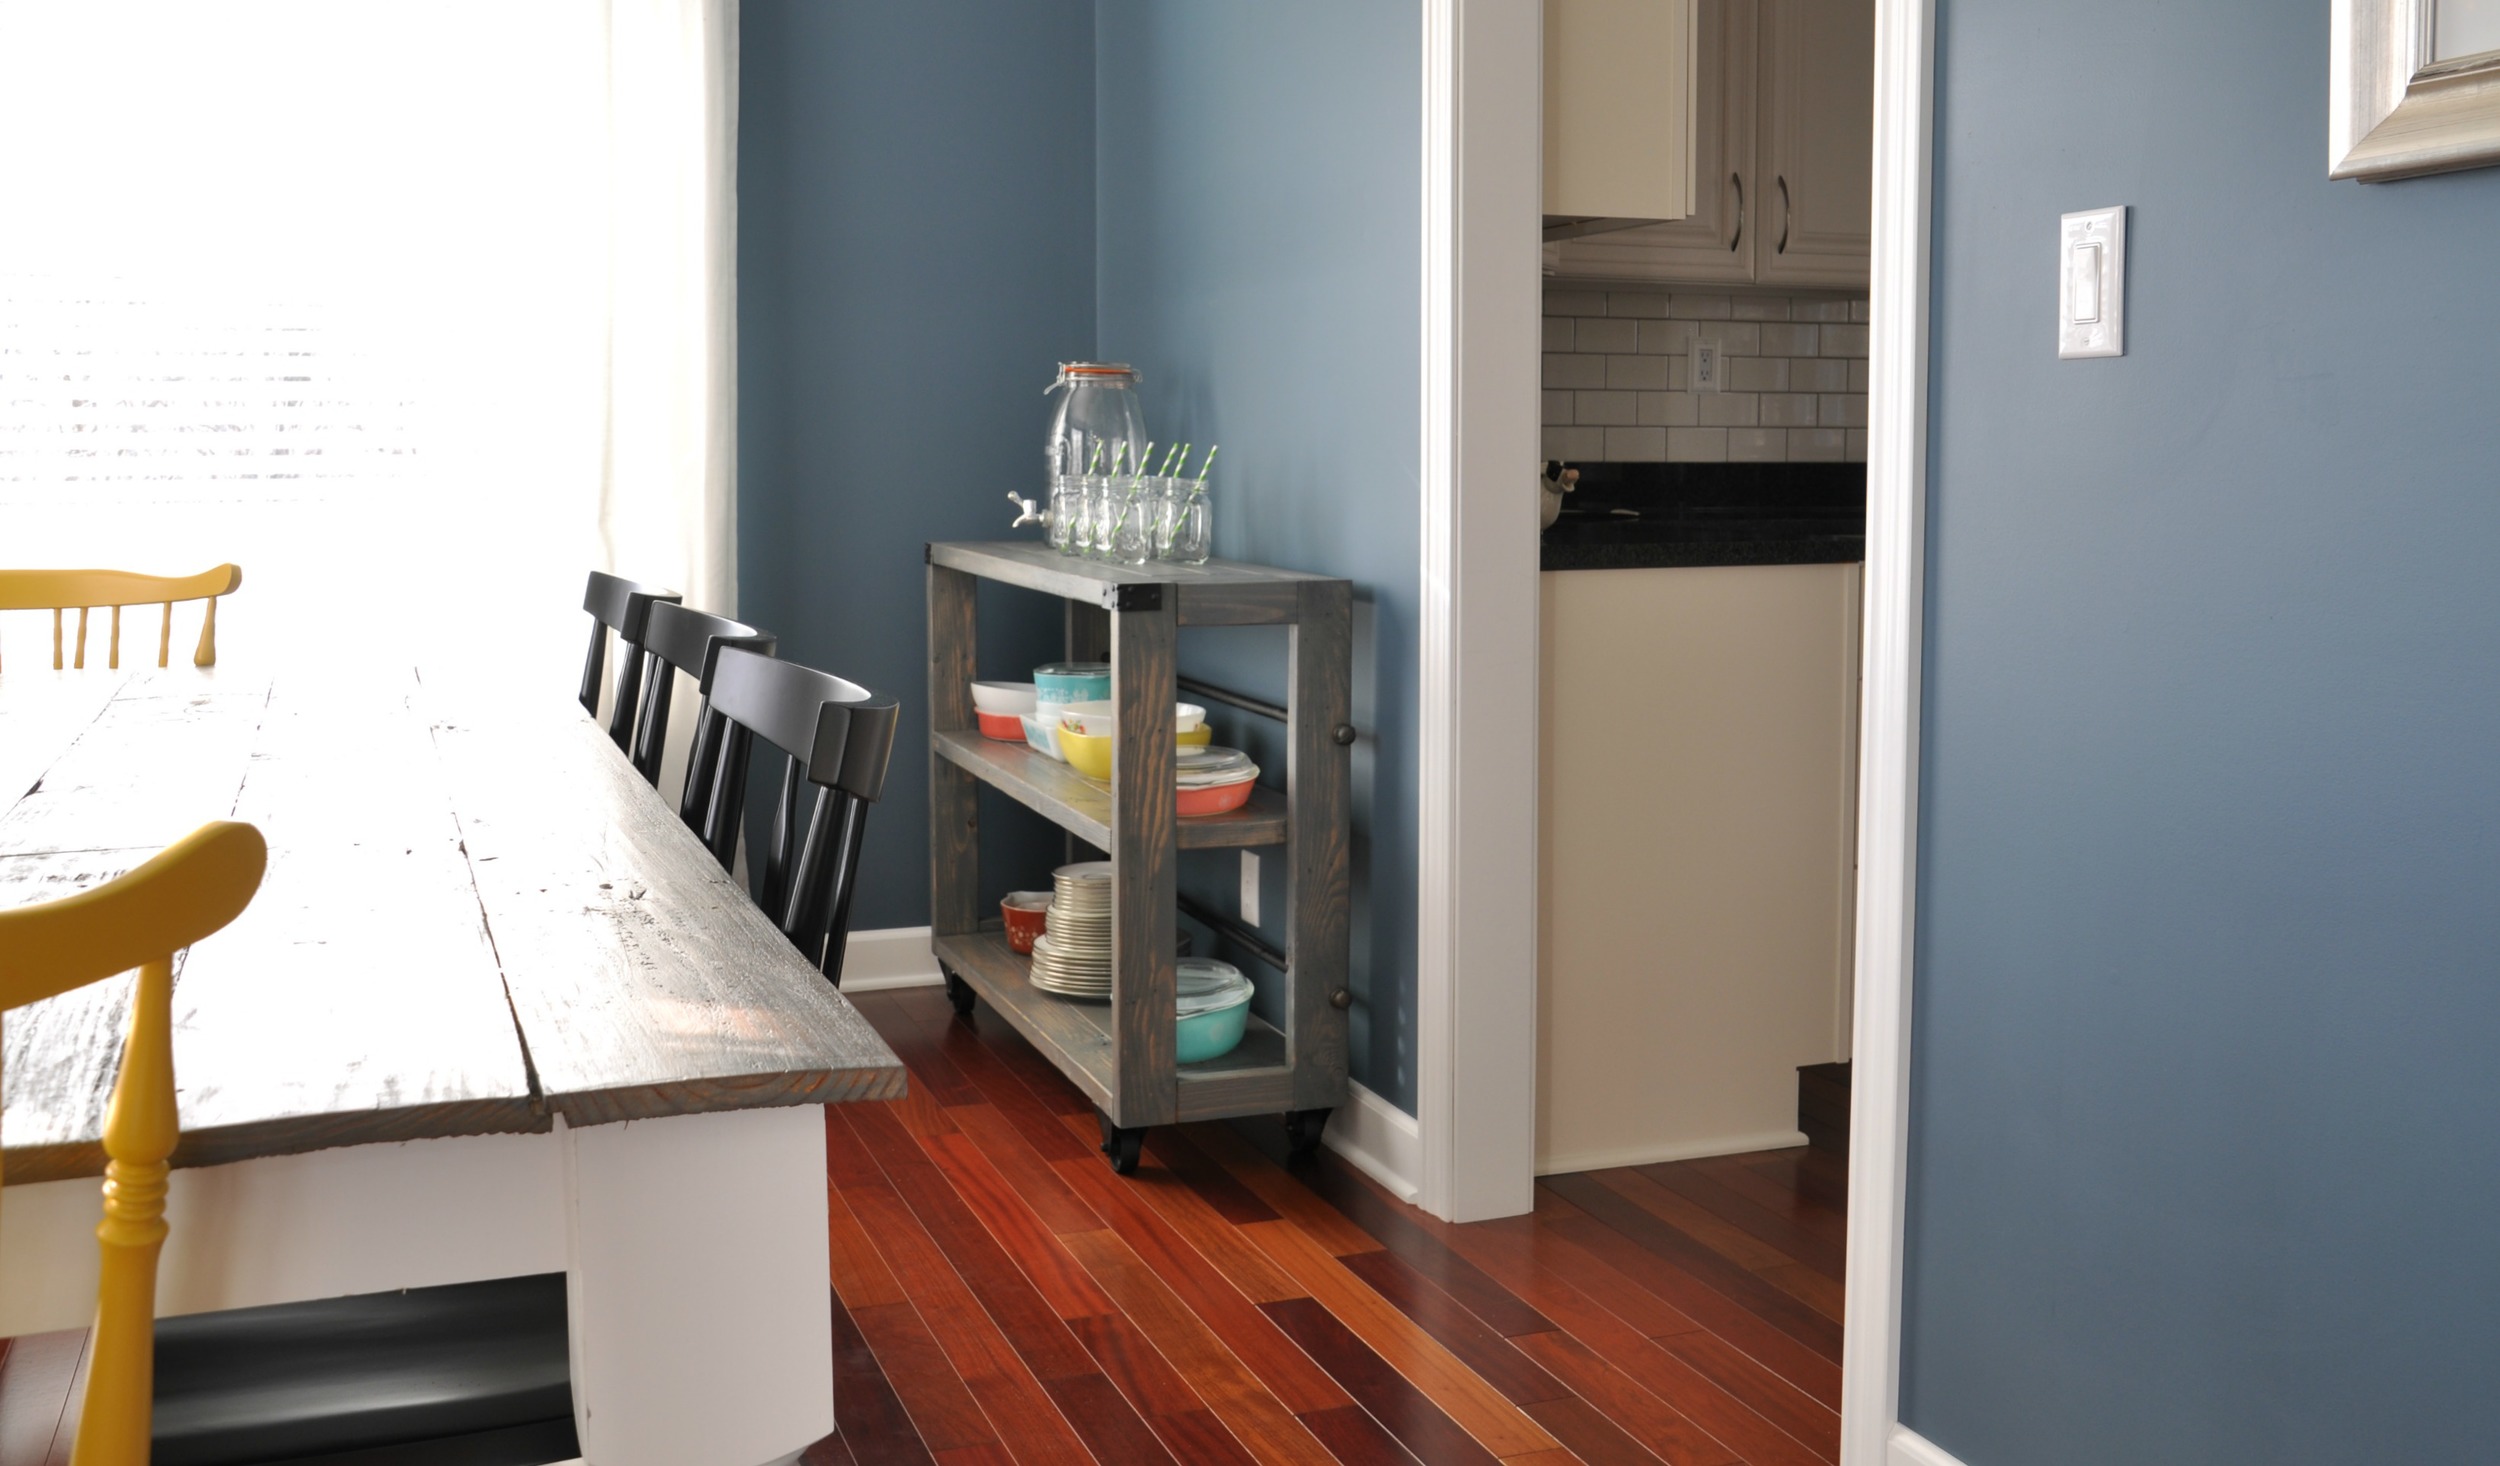
She's beautiful, isn't she?  

We were hoping our bundle of joy would be just the right amount of rustic and industrial.  Modern enough to keep Nate happy.  Vintage enough to keep me happy.  She didn't disappoint.

DIY Dining Cart 2.jpg

We didn't photograph the shelves without my beautiful Pyrex but you can sort of see the fancy breadbox work Nate did on the ends.  He far exceeded my expectations on this project.  He's a keeper.  (I have to say that since he's the father of my newest addition.)

This cart has some unique touches.  We used a metal bracket on the end.  (The cheap ones from any home improvement store.)  We used upholstery tacks to fill in the holes.  We used black spray paint and beat it up a little to give it an aged look.

DIY Dining Cart Corner

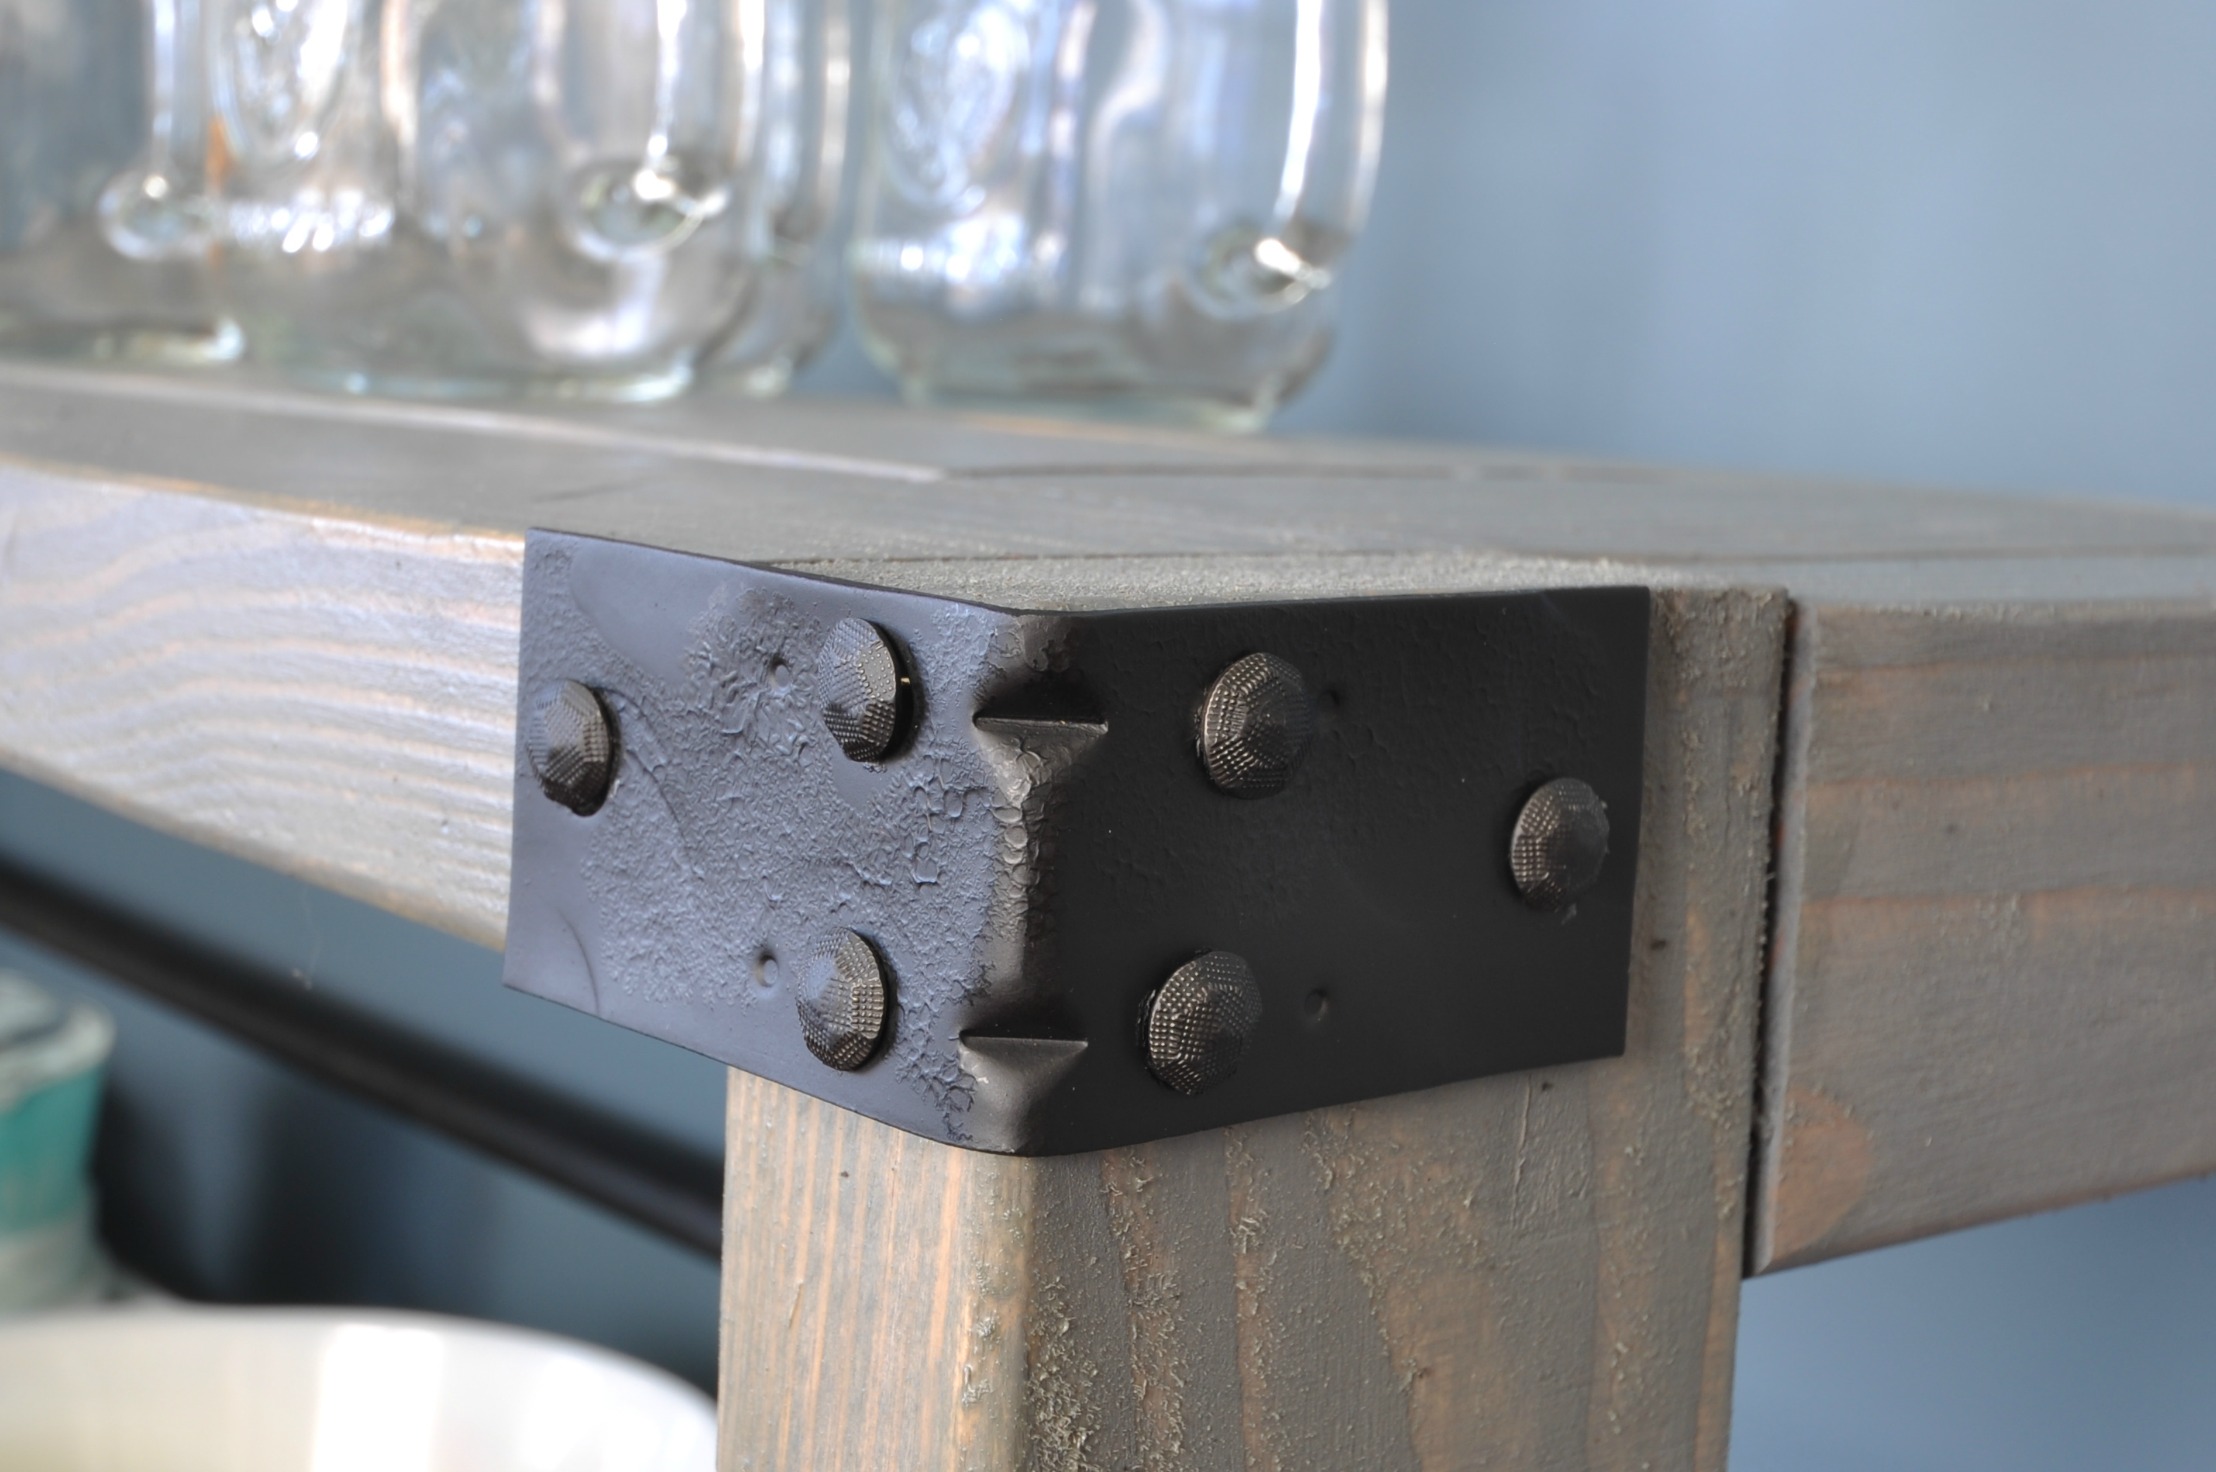
The wheels were $4.99 a piece on Amazon.  They got the same spray paint and a beating treatment.

DIY Dining Cart wheel.jpg

Please don't mind the dirty floor.  We were busy creating.

Threaded black iron caps were used on the ends of the pipes running along the back.

DIY Dining Cart knob.jpg

The whole thing was finished like our farmhouse table.  We used the same stain (Rustoleum's Wood Stain in Weathered Grey).  

It coordinates lovely with our farmhouse table.

DIY Dining Cart in Room
DIY dining cart. Unique furniture build!

So, the whole open shelf idea turned into something different.  Now I'm working on a big ol' piece of art to hang above the dining cart.  And probably one hundred million other things because that's my thing.

We'll have a tutorial in the next week or so (Update: Find the tutorial here.).  If the blog doesn't get eaten by holiday posts.

Bottle Brush Tree Place Card {Dare to DIY}

How was everyone's weekend?  We had a great time with both of our families.  Ike is tuckered out.  I won't be hungry again until Christmas.  All is well.

Today is the second Dare to DIY party for 2013.  The always lovely Rachel {Maybe Matilda} is this week's host.  I can't wait to see what DIY entertaining shenanigans you all came up with!

We actually don't do a ton of entertaining during the holidays.  Time just slips away before we realize we should host something.  As a Dare to DIY host, I'm not allowed to wuss out on the challenge so I decided to get whip up a charming place card.

Bottlebrush tree on car place card

Like every cliche blogger, I've become obsessed with bottle brush trees.  If you live in a cave (Hi, Mom!!!), these trees are usually shoved into Mason jars.  I decided to use mine as a place card.  Because everyone needs to know where to sit at a fake dinner party. 

I picked up the VW bus at Walmart in the toy section.  The trees are from Joann's.  I had the Baker's twine from last year.

I invited Ike to the pretend dinner party!

christmas ike for party.jpg

He was pumped.

I decided to set the table for a quick imaginary party.  It's good to use my China for something, right?

christmas tablescape setup.jpg

I wanted to keep the setting relaxed and blogger cliche.  I added a simple white napkin and our regular Mason jar drinking glasses on top of some flannel.  As if Mason jar glasses weren't enough, I added a paper straw.  What kind of blogger would I be without paper straws?  Black and white straws would have been better but I failed to plan ahead.

Christmas Ike view.jpg

Ike supervised the set up.

Christmas tree in mason jar.jpg

I decided to take this whole thing over the top and shove a bottle brush tree and some Epsom salt in a Mason jar.  They make me smile.  Smiling is my favorite.

Christmas centerpiece with mason jars.jpg

The little vans with bottle brush trees also add to the centerpiece.  Aren't they charming?  We also bought a real little tree for the centerpiece.  We'll hopefully plant this guy outside in the Spring.  If Spring returns.  I feel like this may turn out to be the longest Winter ever.  And it's only December.

Christmas Centerpiece.jpg

Our dining room is looking quite festive.  I can't wait to share with your our newest addition to the dining room this week!

christmas dining room.jpg

Now it's time to see what my lovely co-hosts whipped up!  It's always fun to see what how we each tackle these dares!


Dare to Entertain

(Festive VW bus place cards via Decor and the Dog, Kraft paper runner and table via Maybe Matilda (TODAY'S HOSTESS), Blue Ball jar snowscapes via NewlyWoodwards, Gilded animal place cards via Primitive and Proper)

Now it's time for you to share your Dare to Entertain project!  I can't wait to read through all of them!  Head on over to Maybe Matilda and get to sharing!  One person that links up has the chance to win holiday cards from Tiny Prints!


Dare to Do It Yourself Link Party

Did you dare to entertain?  Are you obsessed with bottle brush trees and flannel like I am?

Photobucket Photobucket Photobucket PhotobucketPhotobucketPhotobucketfollow us in feedly

Dare to Be Thankful Features + Sneak Peek

Did you all survive Thanksgiving?  Are you braving the Black Friday madness?  I go with the lady in-laws out of tradition.  I shop in the morning.  Drink a Peppermint Chocolate Chip milk shake from Chick-fil-A and then I call it a day.  I usually have approximately 3 panic attacks in that 3 hour period.  Aw, tradition.

Today I'd like to share with you three of my favorite projects from Monday's Dare to DIY link party.  Be sure to check out all of the projects here!

In no particular order.  

This chalkboard from Interiors by Kenz is just the right amount thankful and cute.  Check out the whole project for a cute little heart detail.

Thanksgiving Chalkboard Art from Interiors By Kenz

This "Give Thanks" sign from At Least I Will is super fancy. I love the use of cork letters!

Give Thanks Sign from At Least I Will

Isn't this pilgrim wine bottle from Corner of Main the most darling you've seen?  I bet it makes the wine taste even better than usual.

Pilgrim Wine Bottle from Corner of Main

Thanks to everyone who participated!  (Again, check out all of the projects over at Primitive and Proper!)

Are you ready for next week's challenge, Dare to Entertain?  If not, there's still time.  Get to crafting!

Here's a sneak peek of my project.

Dare to Entertain 2013.jpg

Here's all of the party details!

Party Date: Monday, Dec. 2

(Link goes live Monday morning at Maybe Matilda)

Dare to… entertain!

DIY something for your table. This could be something from last week's Thanksgiving table or a new Christmas look. Get creative and use things in new ways. Or go true DIY and make something totally new. Ideas include place mats, table runners, place cards or centerpieces.

Giveaway: One of you will win 50 free Christmas cards from Tiny Prints.

Dare to do-it-yourself button 2013.jpg

Will you dare to entertain?