Happy Thanksgiving
/Ike wishes everyone a happy Thanksgiving!

Enjoy those food comas!
Ike wishes everyone a happy Thanksgiving!
Enjoy those food comas!
On Friday , I mentioned that we now have a tutorial on the DIY Network website.

Overall, working with the DIY Network was very easy. We typed up our tutorial, attached some pictures, and sent an e-mail. Easy button.
We had a slight problem though. We received an e-mail back stating that the headboard was not styled well enough. I had a sneaking suspicion this would be the case when I hit “send”.
Nate took the photos in a hurry before we rushed off to make the 3 hour journey back home. I didn’t look at them while we were there. I was a little sad when I opened them..


Wrinkly duvet. Not enough color. Oops.
The week-end plans didn’t allow for another trip back home any time soon so I sweet talked my mom into “styling” her bed. She was pretty nervous. It was kind of like “What Not to Wear” but for her bed. I gave her guidance and she was sent out on her own to make it happen.
My guidance was pretty simple. She needed two white shams (preferably with a little texture) and couple smaller pillows (preferably white or coral). The execution was harder due to the fact that they live in the middle of nowhere. She was able to find two pretty white shams (with texture) from Target. She sewed covers for the smaller pillows out of white and coral fabric.
Next came the actual styling. This is where her love for me was tested…

Look at that pillow spacing. Isn’t she cute?
We discussed moving the pillows closer, folding the sheet/duvet back a bit, holding the camera straight, more natural light/less flash, books on the nightstand, etc. I think she took about 60 photos…and pondered if giving birth to me was a good idea.
60 photos later, we arrived at this…


Who else out there has tested their mother’s unconditional love? Any bed styling dilemmas? Do you make your bed on a regular basis or only when you have guests? Or never?
It’s farmhouse table Q&A time!
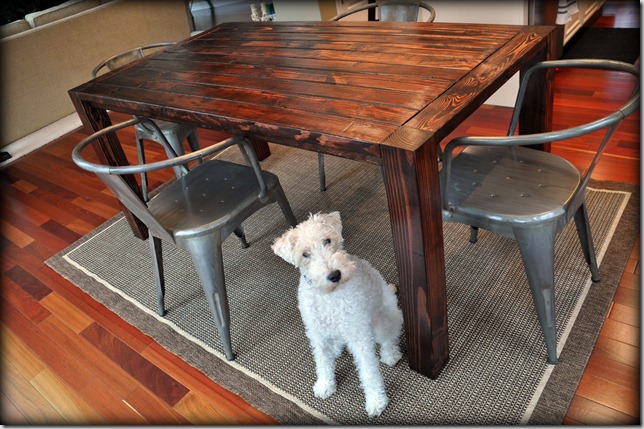
Did you use a tutorial/plan?
Yes, the
.
Did you make any modifications to the plan?
Yes, we added the “breadboard” on the end (the addition of the horizontal boards in place of all vertical boards.) (In Ana’s directions, there is a 2x3. Nate cut the ends to the same length as that 2x3.)
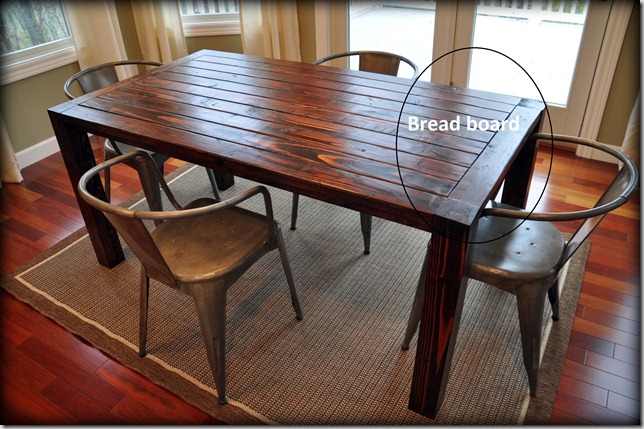
How long did the table take to build/finish?
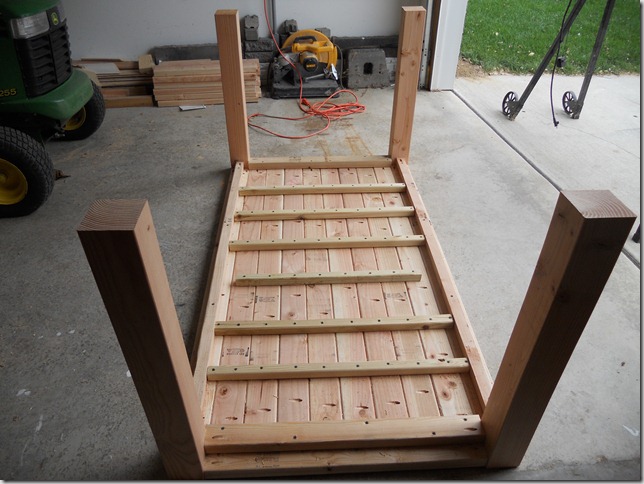
4-5 hours for building. 1 hour of sanding. 30-45 minutes for staining. 1 hour total for 3 coats of poly.
What would you do differently during the building process?
Nate tells me he would have focused more on making the boards even. After the assembly, the boards were slightly uneven. Nothing some sanding couldn’t fix. Nate and his dad used a belt sander, hand sander, and a planar to make the table level.
What kind of wood did you use?
Whitewood. Stud grade. We wanted a rustic look so imperfections in the wood were actually a good thing.
What stain did you use?
Minwax Red Mahogany
What poly did you use?
Minwax Fast Drying Polyurethane Clear Satin
What did you learn from your first major staining project?
It’s important to wipe off any excess stain. Amateurs. We wanted a dark color so we left more stain on than we should have. The result was a tacky table. After some Googling, we applied a second coat and wiped off the excess. This worked. No more tackiness.
How much did it cost to build the table?
The lumber was $45. The stain and poly were about $20-25 total
.
Where are the chairs from?
The chairs are the
Jackson Tub Chair from World Market
.
Do the chairs feel short?
Nope. They just look short because they don’t have tall backs. Eye trickery. The shortness bothered me at first but they are super comfortable and I love the metal with the table. This is my “Bring me food!” pose…


Will Nate build me a table?
Nate doesn’t think he has enough time in the day for custom table orders….mainly because I fill his time with crazy projects. Oops!
Any other questions? Who’s glad it’s a short work week this week?
This blog accepts forms of cash advertising, sponsorship, paid insertions or other forms of compensation. The compensation received may influence the advertising content, topics or posts made in this blog. That content, advertising space or post may not always be identified as paid or sponsored content.
The owner(s) of this blog is compensated to provide opinion on products, services, websites and various other topics. Even though the owner(s) of this blog receives compensation for our posts or advertisements, we always give our honest opinions, findings, beliefs, or experiences on those topics or products. The views and opinions expressed on this blog are purely the bloggers’ own. Any product claim, statistic, quote or other representation about a product or service should be verified with the manufacturer, provider or party in question.
Decor and the Dog is a participant in the Amazon Services LLC Associates Program, an affiliate advertising program designed to provide a means for sites to earn advertising fees by advertising and linking to amazon.com.