Mudroom Bench

Are you sick of our mudroom yet?  I didn’t think so.

Today we’ll share with you how we built our mudroom bench.  I find this stuff boring but it will be a good resource for us in the future and it will hopefully help some of you out as well. At least there are some pretty pictures.

Nate is going to make us look like fancy bloggers with his SketchUp designs.  I’m going to let him explain this one because all I did was paint the thing….

***

We first purchased two 4x8 sheets of 3/4" MDF particle board.  We only used one sheet plus a little bit of the second.  We had a fair amount left over to build a shelf and then some. 

First, we started with our cut list: 

- 4 - 15 1/2"x18"

- 40 1/2"x18"

- 3 - 18"x 2 1/2"

- 39 1/2"x 2 1/2"

- 22 1/2"x 18"

- 19"x 2 1/2"

- 14 3/4"x 2 1/2"

- 42 1/2"x 16 3/4"

- 24 1/16"x 16 3/4" 

We started by connecting the two sides to the back board.  We used some wood glue between the two pieces and then used 2" finish nails in a nail gun. 
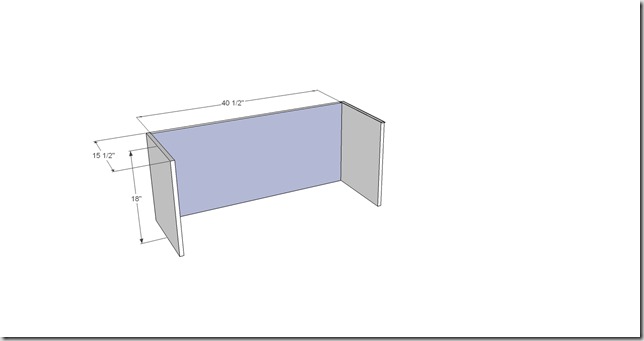
How to build a mudroom bench DIY tutorial

We attached a small board to the front of the left hand board.  Then we attached the cross support.  We nailed the right side of the cross support.  On the left side we used a pocket hole jig (like we used for our

West Elm Headboard Copy

).  The jig was needed because there was nothing to nail into on the left side.

How to build a mudroom bench DIY tutorial

Moving on to the right side of the bench.  We built the right side the same way as we did the left side except the upper cross support needed pocket holes on both sides to attach to the side supports as there was nothing to nail it into.  Then we took the 14 3/4" x 2 1/2" piece and placed it in the top left side and nailed it in make sure the top had something to attach to. 
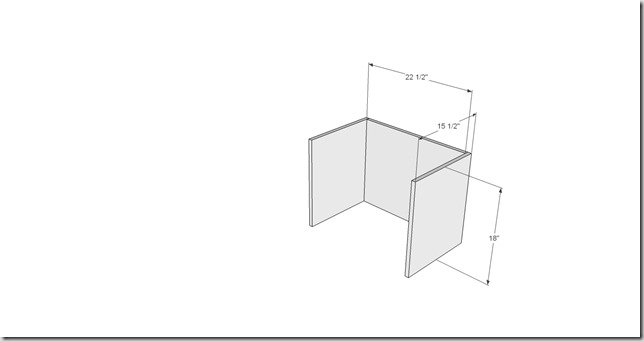
How to build a mudroom bench DIY tutorial

Next, we put the two sides together, making sure they were square (or whatever angle the corner is you are placing the bench into), then we nailed them together through the upper supports in both directions. 

How to build a mudroom bench DIY tutorial

Then we placed each top piece onto the bottoms and nailed down into the bottoms (after gluing, of course). 
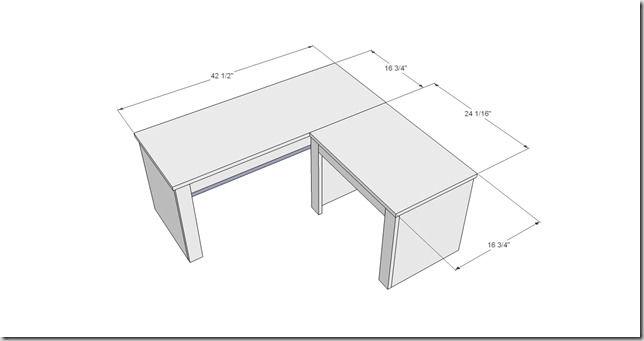
How to build a mudroom bench DIY tutorial

We used a hand sander to smooth out the pieces that were placed together to ensure that were flush. We filled in all the nail holes and any gaps with wood filler.  We then sanded and repeated until the bench was smooth.  We then painted and placed the bench in the mudroom.

How to build a mudroom bench DIY tutorial

Now I can finally go watch Big Brother.  And Michelle wears 90’s soccer sandals too.  Don’t let her fool you.

***
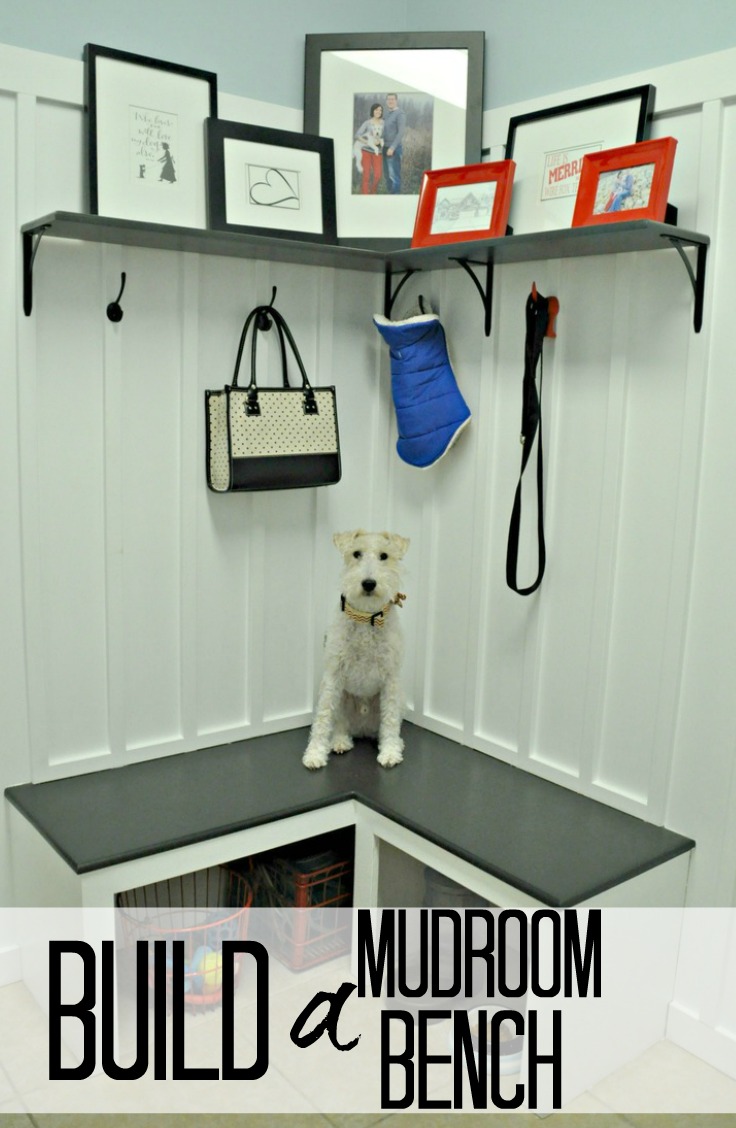
Build a Mudroom Bench.jpg


Everyone thank Nate for writing that tutorial so willingly!!  Anyone have any questions?

Now for fun stuff, who’s watching HGTV Design Star.  I’m just getting caught up.  Who’s your favorite? 

Who’s watching Big Brother?  Who thinks this season is awful because they brought Rachel back?

Help the Indecisive

I’m nothing if not indecisive.  And I love a good survey.   And I’m tired of writing how-to posts.

How about you take a survey and help me make a decision that I keep wavering on? Ok!

What color should I paint the inside of the entry door to our garage (Not the bi-fold doors.  We’ll tackle those another day..unless you have an easy fix for us!)…

Black? Red? Yellow? Keep it white?

805111936pn
805111913pn

For those who have trouble visualizing things (Try not to be jealous of my Photoshop Skills. I only pretend to be a fancy blogger)…

805111936black
805111936red
805111936yellow

Note: These are not the exact colors I would use.  They are just the first that I clicked in Photoshop..again, I’m a fancy blogger.

What do think?


Feel free to leave a comment with why you picked the color that you did! Comments help make my work day more enjoyable.  Mommas, don't let your babies grow up to be pharmacists....

Board and Batten

I love moldings.  You know,  Craftsman style/old home goodness type moldings.  Our house has a bead board island and a few rooms with crown molding and that’s about as far as we get in the molding department.

When we were designing our house neither of us wanted a stand builder grade construction home.  What did we have the budget for?  A slight step above a standard builder grade construction home.  Moldings cost money.  Pharmacy school loans trump moldings.  Sad but true.  As my pharmacy school loans decrease, moldings in our house increase.  Is this enough math for you?  I thought so.  How about some a pretty pictures?

As I was wasting precious time on the ol’ Pinterest, I ran across this beauty…

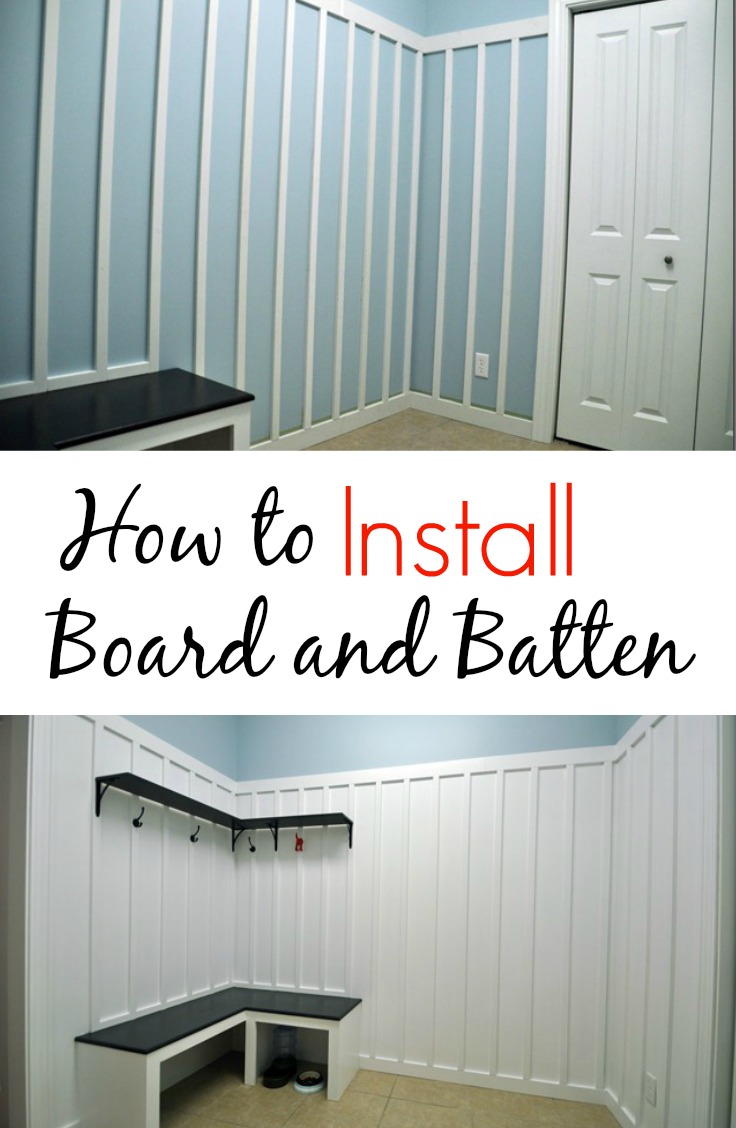
How to Install Board and Batten DIY Tutorial

And that’s when I became obsessed with the idea of tall board and batten.  And then I did what any good wife would do, I put Nate to work to help me create this….

How to Install Board and Batten DIY Tutorial

(We really need to retake these photos.  They are quite distorted. I fired my photographer.  I will re-hire him if he makes me breakfast in bed….And doesn’t Ike look all sophisticated after his bath? He at least smells better.  Focus.)

How We Installed Board and Batten

(with a lack of pictures because I fired my photographer)

Step 1: Purchase Supplies

  • Liquid Nails
  • 1 x 4’s (for base and top molding)
    • We used primed MDF because we are lazy and don’t like to prime and the boards are straighter and more consistent.
    • 1 x 2’s (to go in between top and base molding)

Step 2: 

Remove everything from the room…luckily for us this only included a couple of dog dishes and some base molding (because it didn’t match the new board and batten)…

How to Install Board and Batten DIY Tutorial

Step 3:  Install new base molding (1x4’s)

Cut the boards to length. Dry fit. Add Liquid Nails (keeping away from edges to prevent oozing) and adhere to the wall.  This part is scary.  Nate kept telling me OVER and OVER, “You had better like this because this stuff isn’t coming down.”  He acts like I change my mind a lot…

Step 4:  Install 1x2’s

Cut 1x2s to desired length.  We decided to space them every 6 inches.  We marked the wall on the bottom and the top with a pencil every 6 inches (taking into account the width of the 1x2’s).  This helped us line the boards up vertically when installing them.  Nate applied the Liquid Nails (while wearing his 90’s soccer sandals and rocking a Justin Bieber hair cut) and adhered the board to the wall. 

How to Install Board and Batten DIY Tutorial

We then used painter’s tape to hold the boards into place.  Repeat across room.  I don’t know if you need to do this but it made us feel better.

How to Install Board and Batten DIY Tutorial

Ike is also rocking a furry ‘do. 

Step 5: Install top molding

This is where you cross your fingers that all of your 1x2 cuts are correctly.   Cut the top molding to width, add Liquid Nails, and adhere to wall.

How to Install Board and Batten DIY Tutorial

Step 6: Use caulk to fill in any gaps in the boards

Do this between the boards and also between the wall and the wood.

Step 7: Paint away. 

Painting is the worst part of the project.  Although caulking was a close second.

Step 8: Enjoy!

How to Install Board and Batten DIY Tutorial
How to Install Board and Batten.  Great tips!

And now some frequently asked questions: 

(by important people, like our moms…)

How long did this project take?

  • Installing board and batten:  1 to 1 1/2 hours
  • Caulking: 1/2 hour
  • Painting: 3  hours. Bleh. (Thanks Olympic, kindly send me one gallon your Olympic One to make up for your sad paint.  I’d like to become a fan.)

How did you decide how high to make the board and batten?

We’re not much on following rules.  We took my pretty Pinterest photo and guestimated the height in our mudroom.  I had originally planned on much lower molding but we are happy with the final result.

Why did you space the boards every six inches?

We just eye balled it.  Six inches looked good to both of us.  No magic math formula here.

Anyone else tackled any molding projects?  Or are you a lucky one that owns a pre-molded home?  Why is Pinterest such a magical place?

***Check out more more projects on our DIY page!

Photobucket Photobucket Photobucket PhotobucketPhotobucketPhotobucketfollow us in feedly