Rainbow Birthday Cake

I did it.  I turned 30.  I was seriously dreading it.  Thirty.  So old.

My 30th birthday was actually quite fabulous.  I think I like being thirty.  Or at least that’s what I keep telling my old self.  Isn’t that would old people do?  Convince themselves that being older is actually better.

Rainbow birthday cake definitely helped the transition from being a twenty-something to a thirty something…

082

I’m honestly not sure I could have done it without the cake.

056pn

Want to make your own cake to ease into being another year older?  Of course you do.

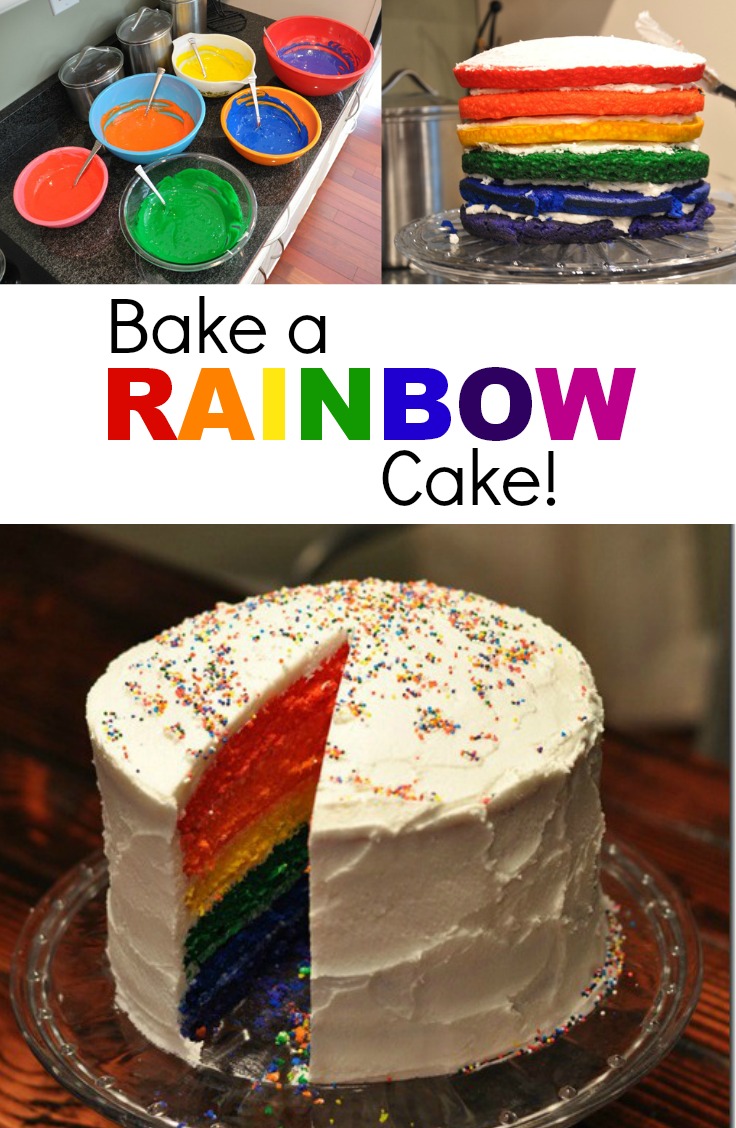
Gather your ingredients.  Two boxes of white cake mix and gel food coloring. (The drops won’t work.)  Sprinkles are optional.  Wait.  Who am I kidding?  Sprinkles are never optional.

001

Mix the cake mixes according to the directions on the box.

Divide the batter into 6 bowls (~1 1/2 cups in each).  Add ~1 teaspoon of gel food coloring to each.

008

I was quite giddy at this point.  Look at how pretty that mess is!  And then I realized someone would need to wash all of those dishes.  Giddy fail.

Now it’s time to bake.  I only have 2 round cake pans so this was definitely a  time consuming cake.  Bake ~15 minutes or until toothpick comes out clean. 

Words of wisdom from the ancient one:  Grease your pans VERY well…or this cake becomes a mess. (See purple and blue layer below.)  Use a knife to loosen the edges.  Let cool until you can touch the pan.  CAREFULLY flip onto a wire rack to cool completely.

Next it’s time for the frosting!  We used Nate’s mom’s secret frosting recipe.  Nate thinks I married him for his charming good looks and sense of humor.  It was actually for the frosting recipe.

Alternate cake and frosting.  Don’t worry if it doesn’t look super pretty.  It will still turn out just fine. 

020

It helps to have a supervisor.

032

Nate applied a skim coat of frosting to the outside and then let it sit in the fridge while we went out for a fancy supper at Noodles.  We returned and Nate applied the final layer…and sprinkles.

039

And then we cut into it.

062

Magical.

085
069
074

Ike, of course, got in on the birthday action.  He was really more interested in eating the cake than having his picture taken.  He keeps mumbling something about an agent.

Picnik collageike

I think thirty is going to be pretty awesome!

Bake a Rainbow Cake.  Learn how!
Photobucket Photobucket Photobucket Photobucket PhotobucketPhotobucketfollow us in feedly

7 Very Important Topics

1.  I turn 30 on Sunday.  Thirty.  That hurts.  I know it really doesn’t matter but I like to worry about things that I have no control over.  It’s my thing. 

2. The lovely sisters over at Paisley Print Shoes shared some fun jewelry storage ideas…including mine.  Head on over and check that out post here!  I enjoy their blog so much.  Two sisters with different tastes coming together to write a blog.  I should start one with my brother.  Oh, that’d be a good one.

245pn

3.  I have the day off.  Our birthday is a holiday at my place of employment.  I really do like my job.  Especially when I have the day off.  Ike loves days off too.

image

4.  I want to make myself a rainbow birthday cake with sprinkles.  Is that weird for a 30 year old? Don’t answer that.

image
                                via Whatever

5. I am obsessed with this tote.  Obsessed.  Someone find me a less expensive alternative…that looks just like it.

image
via Madewell

6.  Nate and I are going to Costa Rica in a couple of months.  I want to go now.  I'm a very patient person in my old age.  Have you been to Costa Rica?  If so, give me the scoop!  I can’t tell if I’m more excited to see the rainforests, black volcanic sand beaches, or monkeys.  Who am I kidding?  It’s the monkeys.

image                                                                via Riu Guanacaste

7.  Happy Week-end!

What are your very important topics this Friday?  Trips. Want list. Recipes. Monkeys.  Tell me all about it.

Ike’s Couch

Earlier this week I showed you the progress that I am making in the office. I was hoping to have the entire room done but it’s not going so well.

I purchased some new curtains.  I wanted plain curtains because patterned curtains make me nervous.  It’s a Michelle thing. 

I purchased a new houndstooth rug.  (You can find it here.  I got it 50% off.)  I’m digging it.  Ike likes to roll on it.  Life is good.

358pn

But as you can see, the room is looking “bleh”. I need new art behind the couch.  I am leaning towards floating shelves with photos or a large map. 

I’m not sure if the lamp I picked up at Target is staying or not.

We also need a new couch.  This couch was free from one of my pharmacy school roommates.  It is even prettier without a slip cover.

389pn

I have two issues with buying a couch right now.  First issue…I am so stinking close to paying off my student loans.  So stinking close.  Right now I’d rather have the satisfaction being student loan free than having a new couch.

The second issue is Ike. This is Ike’s couch.  He loves this couch.  We have no clue why.  It’s fairly comfortable but the dog is in love with this couch. He’s always sneaking in here to take a nap.

362pn

Do you see that death stare that I am getting?  He doesn’t mess around.

“Hey Ike, do you think we should get a new couch?”

375

I told you.  He doesn’t mess around.

But unfortunately he’s the dog and the dog only gets the say on important things like bandanas and mudrooms. Poor neglected puppy.

Now is when I ask for your help.  What would you do with this space?  (I should clarify, what would you do with this space AFTER my loans are paid off.)

Here’s another angle looking back at the desk area to help you out.

379pn

Share your thoughts!  How often do people really ask for your honest opinion?  (Honest, not brutally honest.  I’m a sensitive creature.)  Any good couch recommendations? What color of couch would you go with?  Are you over maps or still digging them? How about floating shelves?  And wood floors?  (I’m still hoping to convince Nate on that one.)  Happy Leap Day!

Sunday AM Glazed Donut Muffins

Don’t you just love Sunday mornings?  Yes, I know it’s Wednesday but I want it to be Sunday so I am going to pretend it is.  Or should I just blame Leap Day?  It messes me up.  Leap Day is keeping 29 another day longer though.  Thank you, Leap Day.

Where was I going with this?  Oh yes, Sunday mornings.

This past Sunday morning was particularly lovely.  I woke early-ish.  I read a little.  Wasted time on the internet a little.  The sun was shining.  The dog was snuggly.  My stomach started to growl.  Nate kept sleeping.  My stomach started to growl more.  Nate was still sawing logs.

I decided to start breakfast without the accounting zombie.  I headed on over to my Nom Nom Breakfast Board and picked out Glazed Donut Muffins from My Baking Addiction

268pn

Good pick!  These muffins were tasty and easy to make.  I followed the recipe exactly.  (You can find it here.)  I have a few suggestions if you would like to make these yourself.  The recipe stated to bake 15-17 minutes.  I baked for 15 minutes and that was too long.  The muffins were also a little dry..which could be due to over baking.  I might poke some holes in the top to let that delicious glaze settle on in and moisten things up.

269pn

The recipe also states that they are best served warm.  Nate and I both preferred them later on in the afternoon.  Not that we ate more.

266pn

Is it Sunday yet?  What’s your favorite morning of the week?  Any muffin recipes that I must try this Sunday?

Burlap “Wallpaper” How To

Yesterday I shared with you that I “wallpapered” burlap to the back of my office shelves.

Use burlap as wallpaper

I had a hard time deciding what I wanted to do to the back of the shelves.  Paint was an obvious answer but that seemed like a lot of work. And very committal. I hate commitment.  My husband is a lucky man.  I know you can repaint but I chickened out.  I also couldn’t decide on a color.  I know some people mentioned yesterday that they would have chosen a bright color.  That’s just not us.  We’re very neutral people.  I probably would have chosen brown.  Boring.  Whatever.  We’re a pharmacist and an accountant.  Crazy party people live here.

I then saw a post on How About Orange about using fabric as wallpaper.  It seemed easy enough.  The other positive was that if I didn’t like it I could just take the fabric down and wipe up the paste.  I was digging it.

I told Nate about my plan.  He gave me that “Are you out of your mind crazy woman beast?” look that I’ve been getting a lot lately.  (I think he is going to put a Pinterest block on my computer.  Seriously.)  I put up a good front and acted like I totally knew what I was doing and this project would be a piece of cake.

And surprisingly, it was.

Here’s what you’ll need:

  • Fabric cut to your appropriate dimensions. 
    • This was probably the hardest step of the whole process. 
    • I’d check out Chelsea’s tutorial for cutting burlap here.  She pays better attention at Joann’s than I do.  Or maybe her local Joann’s employees are a little friendlier than mine.  Just saying.
    • Cornstarch 
    • Water 
    • A brush  (I used a foam brush but any brush would do.)
341pn

Bring ~4 cups of water to a boil.  While you are waiting, mix ~1/2 cup of cornstarch with a small amount of water.  Just enough to dissolve the corn starch and make this milk looking sludge.

345pn

Add the cornstarch mixture to the boiling water slowly while whisking.  I love whisking.  Seriously.  Favorite kitchen utensil.

354pn

Boil until thickened (~5 minutes).  Let cool.

I cooled my paste just so that I could handle it without scalding myself.  (I’m super patient.  I think my impatience was okay in this case though because this paste turns to sludge fairly quickly.)

105pn

I removed the shelves and then brushed the entire surface with a thin layer of the paste.  I found that I didn’t need a lot. A small amount would hold the burlap.  I did find that I needed press a small section for a few seconds to get the burlap to stick.  Burlap was a decent material to chose.  I am horrible at cutting and burlap is hard to cut.  It is, however, very stretchy and forgiving.  If my cut was a little off I could just tug and make it work.

Once the area was completely “wallpapered” I put the shelves back in, styled them pretty, and waited for Nate to get home to show him that I this was not the giant DIY disaster that we both expected.

300pn
309pn
330pn
281pn

I’ll keep you posted on how this holds up.  How long will it stick?  Can I really remove it easily when I change my mind about in this room in 6 months?  Someone has to be the guinea pig, right?

Who’s going to slap some fabric on their walls now?  Do it!  Anyone else going to soon be banned from Pinterest?  What’s the craziest pin you have attempted?

Use Burlap as Wallpaper!.jpg
Photobucket Photobucket Photobucket Photobucket PhotobucketPhotobucketfollow us in feedly

Makeover Monday

Do you have one of those rooms in your house?  You know, the room where all of the unwanted items in your life go to die.  The room that just doesn’t feel right to you
.
That was my office.  Here’s a refresher…

housejan2011 028

Everyone else told me that they thought the room looked just fine.  I just wasn’t feeling it though.  Probably because it normally looked like this…

068_thumb[1]

Embarrassing.  I really shouldn’t post photos like this on the interweb.

I spent the past two week-ends cleaning up the pit.  I even went through all of the cupboards and drawers.  You wouldn’t believe how much storage space I have now that I rid the room of junk.  It’s refreshing.

Cleaning the room just wasn’t enough.  I also decided that the space needed a little style.  I wanted it to feel like a cozy library.

Here’s how I ended the week-end…

277pn

We added beadboard and trim behind the computer monitor.  This is something that we had been meaning to do for the past three years and just now got around to it. Time flies.  I tried painting the beadboard with magnetic paint but that was a DIY fail.  One of my employees gave me her left over magnetic paint.  One of us didn’t stir it well enough because no magnet will cling on the beadboard.  Oh well, it still looks pretty.  I’m afraid the area may end up looking cluttered if we were able to hang things on it anyways.  That’s my story.

291pn

I “wallpapered” with burlap behind the shelving areas.  Nate was certain this was going to be a DIY disaster but we both like how it turned out.  It gives the area a little color and texture.  And it’s non-committal.  My favorite type of project.  I’ll share this how-to tomorrow.

330pn

Lastly, I attempted to style the bookshelves with old books and thrifting finds.  The book hunt is a ton of fun.  I can’t wait to keep adding to the collection.  Who doesn’t like a book titled “Lines about Wines” or “How Never to Be Tired”?  I might need to read that one.  Most of these books were purchased for less than a dollar from thrift stores.

295pn
306pn
300pn
316pn

I fell in love with these book-ends while thrifting with the parents.

309pn

They were even approved by my dad. Weird.  He was for sure that I was going to paint them.  Brass is back Daddy-o.  My mom did remind me that I would have hurled at the thought of brass in my house a year ago.  She may be right on that one.  It’s good for moms to be right on occasion.

And look, baby Nate and Michelle.  Our engagement photo in a brassy gold frame from the Salvation Army.  What is this world coming to?

331pn

I love how this room seems to fit in better with the rest of our house.  It feels a little more like us.  I’m also enjoying the new air freshener…the smell of old books.  Mmmm.  Nate thinks the room needs a good airing out.  Someday he’ll get my obsession with old.  At least he puts up with it. And installs beadboard.

281pn

It may have taken us three years but we now have an organized office with a little style.

Picnik collagefinal

Any make-overs happening over at your place?  What’s holding you back from tackling that dumping ground room?  Who thinks I’m crazy with the burlap?  Anyone else love that delicious old book smell?

I was compensated for this Winter Home Projects post by BlogHer but all opinions expressed are my own.

Makeover Monday

Do you have one of those rooms in your house? You know, the room where all of the unwanted items in your life go to die. The room that just doesn’t feel right to you.

That was my office. Here’s a refresher…

Everyone else told me that they thought the room looked just fine. I just wasn’t feeling it though. Probably because it normally looked like this…

Embarrassing. I really shouldn’t post photos like this on the interweb.

I spent the past two week-ends cleaning up the pit. I even went through all of the cupboards and drawers. You wouldn’t believe how much storage space I have now that I rid the room of junk. It’s refreshing.

Cleaning the room just wasn’t enough. I also decided that the space needed a little style. I wanted it to feel like a cozy library.

Here’s how I ended the week-end…

We added beadboard and trim behind the computer monitor. This is something that we had been meaning to do for the past three years and just now got around to it. Time flies. I tried painting the beadboard with magnetic paint but that was a DIY fail. One of my employees gave me her left over magnetic paint. One of us didn’t stir it well enough because no magnet will cling on the beadboard. Oh well, it still looks pretty. I’m afraid the area may have ended up looking cluttered if we were able to hang things on it anyways. That’s my story.

I “wallpapered” with burlap behind the shelving areas. Nate was certain this was going to be a DIY disaster but we both like how it turned out. It gives the area a little color and texture and it’s non-committal, my favorite type of project. I’ll share this how-to tomorrow.

Lastly, I attempted to style the bookshelves with old books and thrifting finds. The book hunt is a ton of fun. I can’t wait to keep adding to the collection. Who doesn’t like a book titled “Lines about Wines” or “How Never to Be Tired”? I might need to read that one. Most of these books were purchased for less than a dollar from thrift stores.

I fell in love with these book-ends while thrifting with the parents.

They were even approved by my dad. Weird. He was for sure that I was going to paint them. Brass is back Daddy-o. My mom did remind me that I would have hurled at the thought of brass in my house a year ago. She may be right on that one. It’s good for moms to be right on occasion.

And look, baby Nate and Michelle. Our engagement photo in a brassy gold frame from the Salvation Army. What is this world coming to?

I love how this room seems to fit in better with the rest of our house. It feels a little more like us. I’m also enjoying the new air freshener…the smell of old books. Mmmm. Nate thinks the room needs a good airing out. Someday he’ll get my obsession with old. At least he puts up with it and installs beadboard.

It may have taken us three years but we now have an organized office with a little style.

Any make-overs happening over at your place? What’s holding you back from tackling that dumping ground room? Who thinks I’m crazy with the burlap? Anyone else love that delicious old book smell?

All posts in the BlogHer Winter Home Projects program are 100% editorial content presented by a participating sponsor. Our advertisers do not produce the content. This post is made possible by Home Depot and BlogHer.

Until I Have to Drive In It

We woke up to a winter wonderland this morning…

234

I tried using my new photography knowledge. I don’t think I should quit my day job just yet.  Here’s a funny story.  I asked Nate what to do when my pictures were turning out too dark.  He told me to read yesterday’s post.  Always the comedian.  But it worked. 

The super wet and heavy snow is my favorite.  It’s just so pretty.  Those poor trees probably disagree.

204

And I’ll change my “it’s so pretty tune” in about 5 minutes when I have to drive in it.  But until then, let’s enjoy the view…

222

225

The view from the living room is quite pretty as well…

238

Too bad I can’t stay on the couch all day and enjoy it!  Off to work!

Happy Friday!  Any snow where you are?  How about you 60-70 degree people?  Wait, I don’t want to hear from you. Okay, I do.  I lied.  Any big week-end plans?

DSLR for Dummies- Exposure Compensation

I'm back with a DSLR post.  I am starting to take some photos on my own now.  It's pretty sweet.  I'm digging it.

Nate, however, is not.  The DSLR is his precious child and I'm pretty sure he cringes every time I touch it.   I had the camera approximately 10 feet from the table and he's like "Whoa, watch out for the lens."   10 feet.  Seriously.

I then asked Nate to solve this hypothetical situation for me.  If Ike, the DSLR, and I are tied down to train tracks and a train is rapidly approaching, in what order would he try to save us...


I'll keep you guessing on that one. 

Today I wanted to learn about something called exposure compensation.  Although I had no clue at the time that's what I wanted to learn about.

I tried to take a few photos of our office this past week-end (Fun posts next week. Get excited).  The photos kept turning out dark no matter what I did.  Nate informed me I needed to adjust the exposure compensation.  Who knew.

See that little button right there.

2012-02-19 18.48.47pn

It’s really hard to take a close up of the top of your camera with your camera.  I need a second DSLR for that.  You know, when my money tree in the backyard grows to maturity. In the mean time, you get a camera phone shot.  What did we ever do before camera phones?   Oh yeah, we learned how to use DSLRs.

That button controls exposure compensation.  Exposure compensation helps you when you are in either aperture or shutter priority (aperture refresher here).  The camera will try to expose for what it thinks the best exposure is. Sometimes you will want a different part of the picture brighter or darker.  This button (in aperture mode) will change the shutter speed in order to get a brighter or darker image while keeping the same aperture.

For example...in the following photo the table is exposed properly.  The front side of the cow is darker than we would like...(The cow is an early birthday gift from a dear friend.  Isn't he perfect? Focus.)

170
No exposure compensation
I then dialed the exposure compensation to 0.7.  The front side of the cow is now brighter. Shutter speed longer.
 
168
Exposure compensation 0.7
Nate then had me dial to 1.7 to continue to see the change.  Shutter speed even longer.  Super bright.  I need shades.

169
Exposure compensation 1.7
I then dialed to -1.0.  Everything is darker.  Shutter speed was faster.

171 

In summary, exposure compensation is an easy way to quickly change the brightness to get the correct exposure....because the camera isn't always going to get it right.  Bummer.

Any words of wisdom on exposure compensation?  What do you think is the solution to Nate's hypothetical train situation?   This is a test my darling readers.

Blogging Basics- Blog Header

I’m back with some blogging knowledge.  I like to pretend I know what I’m talking about.   For those of you that don’t care about blog headers, there are some cute Ike photos ahead.

First impressions on your blog are important. There are a lot of blogs out there.  You need to draw people in as soon as they click on your page.  One easy way to do this is by having a nice blog header. 

Do you need to spend $100 to have someone design one for you?  Nope.  You can DIY this one and use that $100 on something important.  Like paint.  Or fabric.  Or chocolate.

Today I’m going to show you how to make a header using Picnik.  Yes, the lovely free Picnik that is disappearing soon.  I’m actually in denial about the whole thing. I think it’s one big April Fool’s day joke.  I’m on to you Google. I have Photoshop Elements.  I’m just too lazy to use it.  Okay, I did use it on my current header but I also said a lot of swear words while making it.  I used Picnik for my first header.  And I made it without swear words.  Anyone remember this?…

Picnik collage

Memories.

Now it’s time for you to make your very own photo header.

Step 1: Head on over to Picnik and find the collage option.  (It keeps moving on me.  Oh my, I’ll never be able to learn PSE.)

image

Step 2:  Pick one of the rectangular collage options.  I’ll choose the one with 4 photos.

Step 2head

Step 3: Upload the photos you want to use in your header, and drag and drop them in the frames where you want them.  You can mess around with all of those fun buttons on the left.  I think the proportions option is quite helpful.  You can also change the background color here as well.  Click “Done!” when complete.

image

Step 5:  Next you will want to include your blog name in your header.  Click on the "Text" button at the top of the page. Type your blog name in the box.  You can select the font, size, and color at this time as well.

image

I wanted my title to have different fonts so I just created multiple text boxes. 

image

Step 6:  Click “Save and Share” at the top when you are finished.

Step 7:  Change your file name and dimensions on this screen.  ~94% is good for most blog widths.  You may need to adjust this if yours looks a little off after uploading it to your blog.  Click the “Save Photo” button and save the file to your computer.

image

Step 8:  My advice now continues in Blogger.  I figure if you are taking advise from me you should be using a simple blog format like the lovely Blogger because I really should be giving layout advice.  Click design from your dashboard.  Next click the edit button next to the header.

headerblog

Step 9: Next to "From your computer" click "browse”.  Locate the file you previously saved to your computer to upload the photo.  Once that is complete, make sure to select the button that says "Instead of title and description." Then click save. 

last

Step 10:  Enjoy your pretty new blog header that took less than 5 minutes to make.

Furry Dog Header

Okay, you might want to spend more than 5 minutes on it.  The Furry Dog Blog doesn’t exist so I decided to not waste any more time than necessary on it.  I’m going to use that time to comb the  dog instead.  So furry.

Anyone find this helpful?  Who’s going to teach me PSE?  Any good April Fool’s Day jokes out there?  Who wants to brush my dog for me?