West Elm Parachute Duvet Review

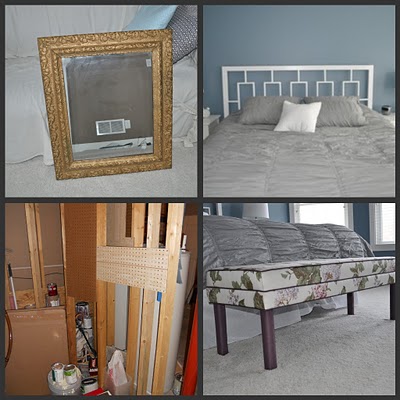
Our new duvet arrived last week!  I'm in LOVE!!


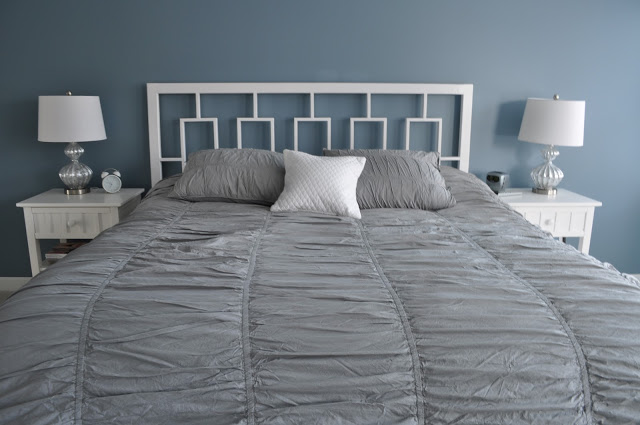
I love the color (feather grey).  I love how it flows!  I love how soft it is! I love how warm it is! I love how it has ties on the inside to keep the comforter from slipping!  I love how it has a slightly wrinkled look so you can't tell if I was too lazy to take it out of the dryer on time or it's just supposed to be that way!
Rave reviews from this customer!!

I put it on the bed before washing (to make sure I liked it and didn't want to send it back). 
It was perfect. 
I was then afraid to wash it because it looked so good straight out of the package
(but not washing it is obviously gross).
I then washed it according to the directions and it actually came out looking better..
and it was REALLY soft. 
Also, the dog stopped rolling on it because it smelled new. Bonus.

The only negative is that it is a little short on each side of our king bed.  If you have a queen, I would order a king to get that extra width.  Not a deal breaker for me though...just need to some coordinating bedding.

And now for the next bedroom decision....

Do the windows need something more??


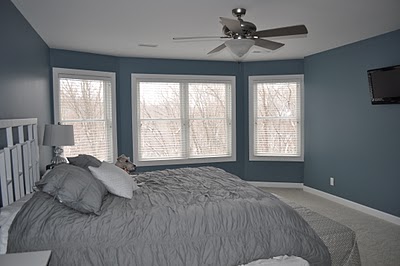
I'm debating between white or light grey curtains hung something like this...

Image found here

Or white or light grey Roman shades like this...

bedrooms - black white striped silk roman shades built-in window seat storage baskets bay window ivory cream striped wallpaper  From my beloved
Image found here
What are your thoughts?  Or am I just crazy and I should leave the windows alone?
I NEED your opinions!!!
(Don't talk to Nate before answering this! :P)

Tomorrow we'll do a full tour of the master bedroom to end the week!

Under-the-Stairs Storage

This is what the area under our staircase in our basement storage room looked like.  GIANT disaster. Disgusting.


After Nate got frustrated when trying to locate a specific paint color, he got clever and figured out an inexpensive shelving system.

Here's what he used:
  • 6 shelving brackets
  • 8 foot piece of 1x12"
  • 1 hour of time

He hung the brackets (making sure they were level, of course).  He cut the 1x12" to the appropriate lengths and then set them on top of the brackets.  He then screwed the board to the bracket and Wah-Lah...


Inexpensive storage.  Not super pretty but it is now organized and more functional!  And that's all the really matters, right?

If only I wasn't such a messy painter....

Mirror Obsession Continues

I guess I have a thing for ugly mirrors.  Who knew?

Take this guy....


The detail is pretty but the gold just wasn't doing it for me! 
Nothing a little spray paint can't fix.


And then comes the next important question....where do I hang it?? 

This leads to a decorating tip from me, the professional (ha!).  If you see something that you REALLY like and it fits in with the overall style of your house, purchase it.  Even if you don't know where you will put it in your house...purchase it.  You will find a place! 

After some thought, I realized that I just wasn't digging the way our hall table looked (for more reasons than a lack of mirror)....


After hanging the mirror, purchasing a $6 Target lamp shade, and relocating some accessories I already had around the house...here is the hall table today....


If only mirrors were easier to photograph...
And how long do poinsettas live?  Ours is still going strong...

Week-end Recap

It was a pretty laid-back yet productive week-end around our house.

We went to a Quad Cities Mallards hockey game.  It was chaos.  The crowd rivals that of a NASCAR race.  They chant "You Suck", wave their middle fingers in the air, and wear awesome hats.  It was intense.


Nate started to organize our office (talk about intense).  It's a disaster.  We had 2 drawers full of papers from our 5 years of marriage.  He insists we keep everything.  I want to throw everything away. We're compromising.


I hung out with Elmer...


EVERY trim corner in our house is cracked (due to the house settling and changes in temperature).  I started fixing the cracks. I got the first floor done and half of the upstairs.  Looks like this will be an ongoing project.  Pretty rewarding seeing the results though.

And here's a sneak peak of what you will find coming up on the ol' blog....


How'd you spend your week-end?

House Tour- Kitchen

In between crazy craft projects, cute dog pictures, and Kindle recommendations...
I think I will give you a tour of our house. 

So far I have only posted the good stuff. 
From here on out I'll show you all of it.
The good, the bad, even the ugly....and yes, there is ugly.

Let's start with the kitchen.

Here is what our kitchen looked like around July 2008. 
Not too functional...


And here it is around September 2008. 
The dry wall is up but it would still be pretty hard to whip up some mac & cheese in this kitchen....


And December 2008. 
It is now at least functional but is missing crown molding and the island is lacking...


And here we are today!
Crown molding on the cabinets and beadboard on the island give it a little more interest.
We're still debating on a backsplash. 
We can't decide what we want and if we want to do it ourselves or hire someone.
Feel free to comment with suggestions!  We're open to anything!


Room info
Wall color: Svelte sage (Sherwin Williams)
Cabinets: Woodland/Provincial doors/Ivory
Granite: Epic stone/Black
Fridge: GE profile, french door
Cook top: Whirlpool
Oven/microwave: GE
Dishwasher: Bosch

Hope you enjoyed the tour.  There will be more next week...along with the duvet reveal!

My Kindle is My Child

I got a Kindle for Christmas.  I love it like I gave birth to it.  Seriously.


One-click ordering on Amazon.....fabulous for convenience, bad for budgeting. :P 
One-click and you have any book you want right in front of you. 
Tell me that's isn't awesome dangerous.

I try to alternate between the free books and ones for purchase. 
The free selection isn't bad but I feel I can only rot my brain with so many trashy romance novels.

I will try to share each week what I'm reading/have read.
(Amazon now has Kindle Apps for your computer, phone, etc so don't feel left out if you don't own the actual Kindle itself.)

There will be no in-depth book reviews (I'll let you read the ones on Amazon)...
I will only give you a personal rating by mwah...(basically does it suck or not suck).
This week's feature:
"Always the Baker, Never the Bride" by Sandra Bricker

Always the Baker, Never the Bride
Click here for book description!

It was free when I "purchased" it but now has a charge of $9.99.
I enjoyed it for free but I think it should be more in the $5 price range.
Cheesey and predictable. I did, however, have trouble putting it down!
If it goes free again, read it...if not, no loss.

I am currently reading "The Imperfectionists" by Tom Rachman.  Stay tuned for my rating...

Feel free to comment with books that you are enjoying this week!

It's Just a Sweater...Pillow

I've had my eye on Pottery Barn's Sweater-Knit Pillow cover for awhile...

Sweater-Knit Pillow Cover, 26"
Image found here
Unfortunately, Pottery Barn and I don't agree on pricing. 

I kept thinking about the pillow covers and debating if it was something I could tackle.  I then decided...what's the worse that could happen? I would ruin a $1.50 sweater I got from the Salvation Army.  I can handle that loss.

So, I headed to the Salvation Army and picked out two $1.50 sweaters (along with a pair of $3 Express Editor pants in perfect condition....yeah, awesome. I know!).
ο»Ώ
ο»Ώ
I suck at "how-to's"...especially on this because I didn't know what I was doing.

I shoved (technical term) the pillow form into the sweater. 
I cut off the arms.  I placed pins around the pillow so I had a general outline of where to sew. 
I used a large, zig-zag stitch to sew where I had pinned (on 3 sides of the pillow).  I left the 4th side open because I change my mind with decorating as often as some people change their underwear (you can decide how often that is). 
To close the last side, I tied some bows with ribbons. 
And wah-lah...........sweater pillow cover for $1.50.


 Take that Pottery Barn.
ο»Ώο»Ώ ο»Ώ

DIY Window Headboard Tutorial {West Elm Inspired}

Here is our tutorial on how we built our West Elm Inspired window headboard (see post here for cost and time breakdown). 

Window Headboard, Twin, White

West Elm Window Headboard

ο»ΏFeel free to ask questions if we forget anything!

Here is the plan.  It is for a king sized bed. (Click  here for queen dimensions.) It is weak...some day I might be a fancy blogger...but until then...you get this...

How to build a headboard, DIY, West Elm Inspired, Tutorial

1. Buy your supplies.

*affiliate links

How to build a headboard, DIY, West Elm Inspired, Tutorial

2. Cut the lumber.  You will need:

  • Using 2x4: cut to 75" (horizontal support on very bottom)
  • Using 2x3:
    • cut 2 - 75" pieces (top and bottom horizontal of headboard)
    • cut 2 - 55" pieces (side pieces)
    • Using your 1x2s cut:
      • ten 9" pieces (horizontal part of "window")
      • ten 18.5" pieces (vertical part of "window")
        • (the picture shows 20" but this takes into account the other pieces)
        • ten 6" pieces (for top and bottom of "window")
        • six 5" pieces (in between windows)

3. Lay out lumber in shape of the headboard as a dry fit. Put the good sides of the lumber (the sides you want to show) face down. Mark the back sides so you know which side to drill the pocket hole into:

How to build a headboard, DIY, West Elm Inspired, Tutorial

4. Drill pocket holes using jig:

How to build a headboard, DIY, West Elm Inspired, Tutorial

5. Screw headboard together.  This is where math and a right angle are handy.  I, obviously, was not involved in this step.  I was doing useful things...like lamp shopping.

6. Sand. We used our Rockwell Sonicrafter Sander.

7. Prime.  We used FastPrime2.  It was in our basement. It works.  I applied it with a brush and a mini-roller.  It took FOREVER because there are A LOT of corners.  It won't look pretty after the prime...don't get discouraged.

(Also, this project would be better done in the spring/fall..instead of the dead of winter...so you don't have to paint in your mudroom...you live and you learn.)

How to build a headboard, DIY, West Elm Inspired, Tutorial

8. 2 coats of paint.  We used Olympic Zero VOC Premium white, semi-gloss.  This paint is great.  It doesn't smell, is good for the enviroment, covers well...and did I mention it doesn't smell.

9. Attach to your bed frame using bolts, nuts, and washers (we used some we dug up in our basement) that are long enough to go through the wood and attach to your bed frame.

10. Enjoy your inexpensive headboard!

Like this project?  Be sure to check out our building projects here.  Don't forget to check out our other DIY projects here!  Make the matching bedframe with this tutorial!

How to build a headboard, DIY, West Elm Inspired, Tutorial
Build Your Own Window Headboard.  West Elm Inspired.jpg
Photobucket Photobucket Photobucket Photobucket PhotobucketPhotobucketfollow us in feedly

West Elm Window Headboard Copy Cat

Our copy cat headboard is complete!

Here was our inspiration image...

Window Headboard
West Elm Window Headboard
ο»Ώο»ΏAnd here is our much less expensive version (it's sad our new bedding isn't here yet but I couldn't wait to post the final product, so excuse the mattress pad photo. :P)....


Clicking "CHECKOUT" on the West Elm site would have been MUCH easier but our version was MUCH cheaper and more rewarding.

West Elm wanted $299.00 plus $60.00 shipping.

Our cost: $57.06 Here's the break down:
  • Lumber: $18.40
    • One 2x4x8'
    • Four 2x3x8'
    • Five 1x2x8' (we purchased 1 extra)
  • Paint: $10.97 (Olympic Zero VOC in white, semi-gloss)
  • Pocket hole screws: $3.98 (#100 1 1/4")
  • Pocket hole jig: $19.98
  • We already had/borrowed: the primer, miter saw, clamps, rollers, 90 degree angle, screw driver

How long did it take?  Long enough. :P

Cutting wood/laying out pattern: 1 hour
Drilling pocket holes: 1 hour
Screwing together: 1 hour
Sanding: 1/2 hour
Priming: 1 1/2 hours
2 coats of paint: 1 hour for each coat (I'm a slow painter and there were A LOT of corners.)

Plans and how-to to follow!!