Today's guest is Ashley from
Design Build Love. Ashley is a frequent commenter on this blog (see, it's pays to comment) and we have quickly become blog buddies. I enjoy reading Ashley's blog because she is also "fixing up/decorating" a newer home on a budget. You can tour her lovely home
here! Ashley and her husband were also on an episode of the DIY Network's House Crashers (read about her experience on the show
here). How awesome is that? Ashley is now going to share with you her favorite "Before and After"...
***
Hi y'all, I'm Ashley and I blog over at
Design Build Love! Let's just say that when Michelle emailed me about guest blogging over here, I was
more than excited! I LOVE Michelle and her blog... and her adorable dog! To be honest, I don't even know how I originally found Michelle's blog, but once I did, I was hooked, and it seemed to be a great design match for me since our homes follow along the same color palette. Most people know Michelle's amazing West Elm headboard knock-off, but have you seen her gorgeous thrift store, made-over dresser that lives in her master bedroom? That is one of my all-time faves in blogland!
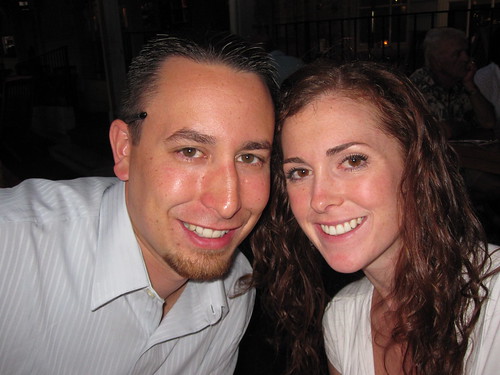
If you head over to my blog, you might notice that I often refer to my blog as "our" blog and that's because I have an amazing husband named Eric, who's always by my side to join in on each and every project I dream up! This is us:
We describe ourselves as young, newlywed professionals who moonlight as designers/home-improvement-DIYers! We’re BUSY, we’re FRUGAL, and we LOVE to DO-IT-OURSELVES. Our motto is to save and buy what we want, or if it’s out of reach, build it ourselves! We’ll never pay someone to do something that we can do ourselves (unless there’s a safety issue), because we both believe in learning, and with a little eagerness and determination, we usually can accomplish any of our projects!
To get a little taste of what we do, we thought we'd share our
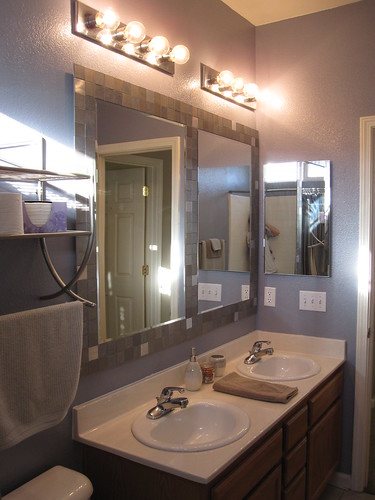
Guest Bathroom Before and After and our custom aluminum tile framed mirror.
After a bit of love and construction, our guest bathroom looked like this:
BUT... it wasn't pretty to start...
Our house was a fairly beat-up short sale, so our bathroom was nothing but nastiness... see...

We knew there was
no way we could allow guests to use a bathroom like that. We quickly painted the bathroom a soothing blue, hung some accessories, and added a new shower curtain, but our
very builder-grade bathroom still lacked some major
pizazz... See...
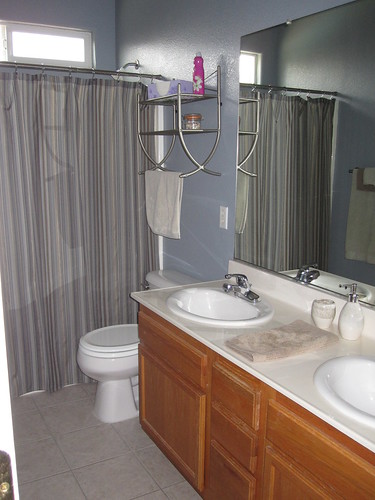 Guest Bathroom Before Tiled Mirror, but After Paint, New Shower Curtain, and Accessories
After a
lucky break, inheriting some left-over
Recycled Aluminum Tiles from a friend, we decided to make a tile-framed mirror for our bathroom! Sure, we could have used our existing mirror for this project, and just tiled around it, but we
really just wanted more BANG for our
effort... and the final product absolutely rocked our world:
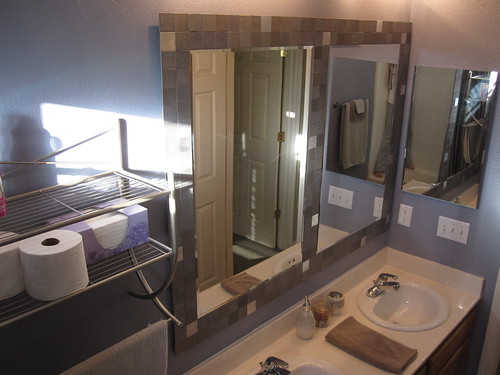 Mirror Updated!
We are sooooo thrilled with the results, and while we still have more plans for the bathroom, we couldn't be happier with our
"pizzaz!"
In case you were wondering how to make a tile-framed mirror (it took me a
lot of online research to find the right method for us), this is how we did it... STEP by STEP:
- Buy the proper size mirror for your space (we went with a 24x36, beveled edge mirror from Lowe's).
- Lay out the tiles around your mirror to determine best layout and proper spacing. For ours, we decided to do a double row around both mirrors, with a married center row (we didn't have enough width over the vanity to do a double row around each mirror separately).
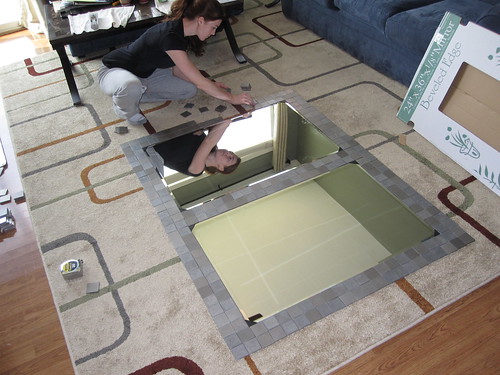
- Once you have the layout down, choose the proper mounting method!!! Choosing the proper method is essential to the project. After much back and forth, we decided to go with a plywood mounting method. To do this, cut a sheet of plywood down to size (to allow for a quarter-inch of the tiles to hang over on each side) and then primer the wood on both sides for moisture protection- see the primered wood below.
- After the primer dries, snap a chalk-line down the middle to properly align the tiles down the center. Start by tiling the middle two rows along the chalk line. To secure the tiles to the wood, we used Liquid Nails, as we were butting the tiles up to one another with no space between.
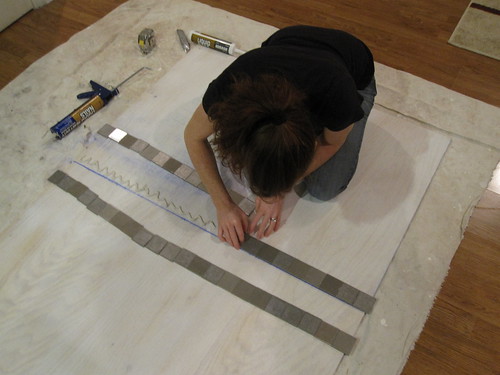
- Next, place the mirrors onto the plywood using Mirror Adhesive by Liquid Nails. This is absolutely essential because if you do not use the proper adhesive when mounting a mirror, the adhesive will eat away at the coating on the back of the mirror and it will look very bad.
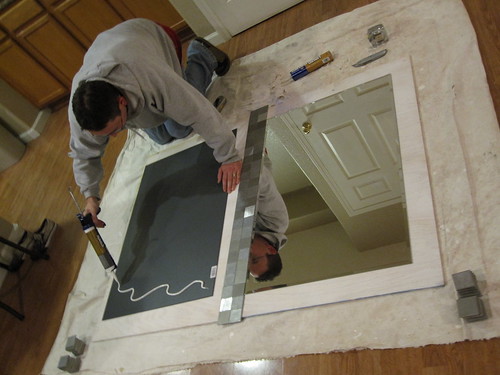
- After both mirrors are place, then tile the remainder of the frame using the Liquid Nails and the tile pattern that you've already laid out in Step 2.
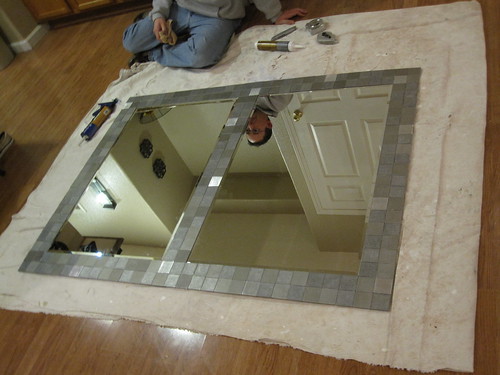
- Allow to cure for at least 24 hours.
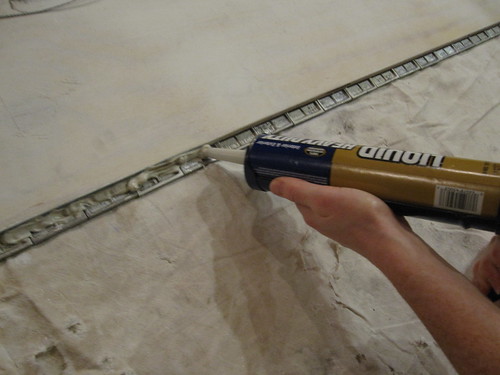
- After curing, flip the mirror over and apply a line of liquid nails to the back of the tiles and the edge of the plywood for extra security.
- Lastly, secure proper hanging hardware. We went with the new Hangman Track System! Traditional hardware was not strong enough in the plywood, nor secure enough for the weight of the newly mounted mirrors. But, the Hangman system was perfect and extremely easy to use!!! For the Hangman system, you will mount the hanging hardware on the back of the mirror and then on the wall. Afterward, we just set the mirror on the wall-mounted track and we were all DONE!!! :D We are so thrilled with the result. It made such an impact and was a wonderful D-I-Y project!
If you're into a little DIY-fun, pop on over for a visit at www.DesignBuildLove.co (no "M") and let us know what you think!
-Ashley
***
How impressive is that mirror? Makes our
trim addition look all boring! Be sure to stop by
Design Build Love and check out the improvements Ashley and her husband have made to their beautiful home!!
Don't forget about our $50 PetSmart Gift Card Giveaway...enter
here!