Pinterest Challege: Button Wall Art + Link Party
/
As a refresher, the Pinterest Challenge is a fun blogland motivator to get us to step away from pinning and get to doing. I stepped away (for a very short period of time) and I did.
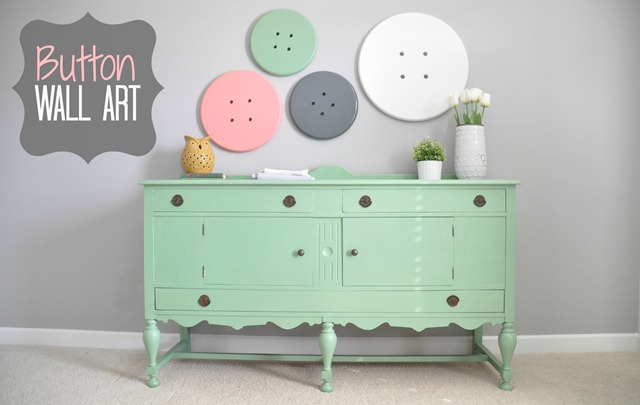
I have been working on my craft room and I figured the challenge would be a good excuse to knock out another project. I have a completed sewing table and a painted buffet. I needed something for the walls. And then it came to me during a Pinterest scrolling session. Buttons!

These buttons make me happy. They add a touch of whimsy to the room with only a small dose of cheese. I mean, they are buttons on the wall which makes them slightly cheesy. But I think they work perfectly in my craft room.

I was originally inspired by this pin.
My inspiration buttons had some nice edges and a great variety of sizes. It’s tax season so I knew fancied router edges were out. I had seen some round pieces of wood at Lowe’s while I waited

The answer was buttons.

The buttons were super simple to make. I was going to complete them all by my little lonesome. Nate, however, decided that assisting me with the buttons would take less time than taking me to the ER. I still believe I could have completed them on my own. With all 10 fingers intact. Probably. Maybe.
If you’re interested in making buttons of your own, you will need:
- Round Wood
- We cheated and used the Ponderosa Panels that we found in the lumber section of Lowe’s. Any round wood would do.
- A drill
- Various sizes of drill bits
- A screw to hang the button on the wall
- Primer and paint

He marked the center of the circle. He then measure out equal distance from the center to ensure even spacing of the button holes.

He clamped the wood to the work table and drilled away.

We eye balled the drill bits for size and guessed what would look decent.

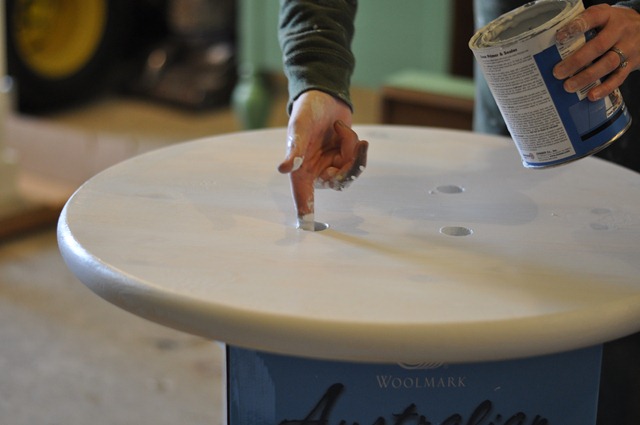
I was in charge of the primer and paint. The holes were hard to paint so I resorted to painting them with my finger. I’m sure a small brush would have work too but then I’d have to wash another brush. I told Nate that I was giving the button a rectal exam. He told me that I shouldn’t write that in a blog post. He’s probably right.

I used a base white from Sherwin Williams for the white button. The green button is the same green as the buffet, Sherwin Williams Agate Green. The coral button is Sherwin Williams Dishy Coral. I used spray paint on the gray button (Rust-Oleum Painter’s Touch dark gray). I found it easier to paint the buttons with a brush than to use spray paint. Lesson learned.

To hang the buttons, Nate drilled a small hole in the back of the button. We put a screw in the wall (using a wall anchor) and hung the button from the screw. We didn’t use a fancy system to decide how to place the buttons on the wall. We’re all about crossing our fingers and hoping for the best. And we had an extremely helpful supervisor so we weren’t too concerned.

He’s a fantastic supervisor. If we can keep him focused.

There you have it. Pinterest Challenge complete! Happy, whimsical button art.

Be sure to check out the projects completed by my lovely co-hosts:

Now it’s your turn! It’s time to share your project!
- Click on the blue “Add Your Link” button (you might have to do some scrolling, depending how many projects are added).
- Add a link to your specific blog post about your project in the url field (not your home page).
- Where it says “name” write a descriptive name for your project (ex: “Button Art”) as opposed to your actual name .
- We’d also love if you could quickly link back over to our project posts within your own. I’ll make it easy, just copy this: Linking up to the Pinterest Challenge with Megan (The Remodeled Life), Katie (Bower Power), Sherry (Young House Love) and Michelle (Decor and the Dog).
- Please also link to your inspiration project on Pinterest as well as to directly link to the original project/site. Share the Pinterest love.
I’ll be pinning my favorites to the Pinterest Challenge Awesomeness board! I’ll probably share some on facebook as well!
Linking up to: House of Hepworths


