Bottle Brush Tree Place Card {Dare to DIY}

How was everyone's weekend?  We had a great time with both of our families.  Ike is tuckered out.  I won't be hungry again until Christmas.  All is well.

Today is the second Dare to DIY party for 2013.  The always lovely Rachel {Maybe Matilda} is this week's host.  I can't wait to see what DIY entertaining shenanigans you all came up with!

We actually don't do a ton of entertaining during the holidays.  Time just slips away before we realize we should host something.  As a Dare to DIY host, I'm not allowed to wuss out on the challenge so I decided to get whip up a charming place card.

Bottlebrush tree on car place card

Like every cliche blogger, I've become obsessed with bottle brush trees.  If you live in a cave (Hi, Mom!!!), these trees are usually shoved into Mason jars.  I decided to use mine as a place card.  Because everyone needs to know where to sit at a fake dinner party. 

I picked up the VW bus at Walmart in the toy section.  The trees are from Joann's.  I had the Baker's twine from last year.

I invited Ike to the pretend dinner party!

christmas ike for party.jpg

He was pumped.

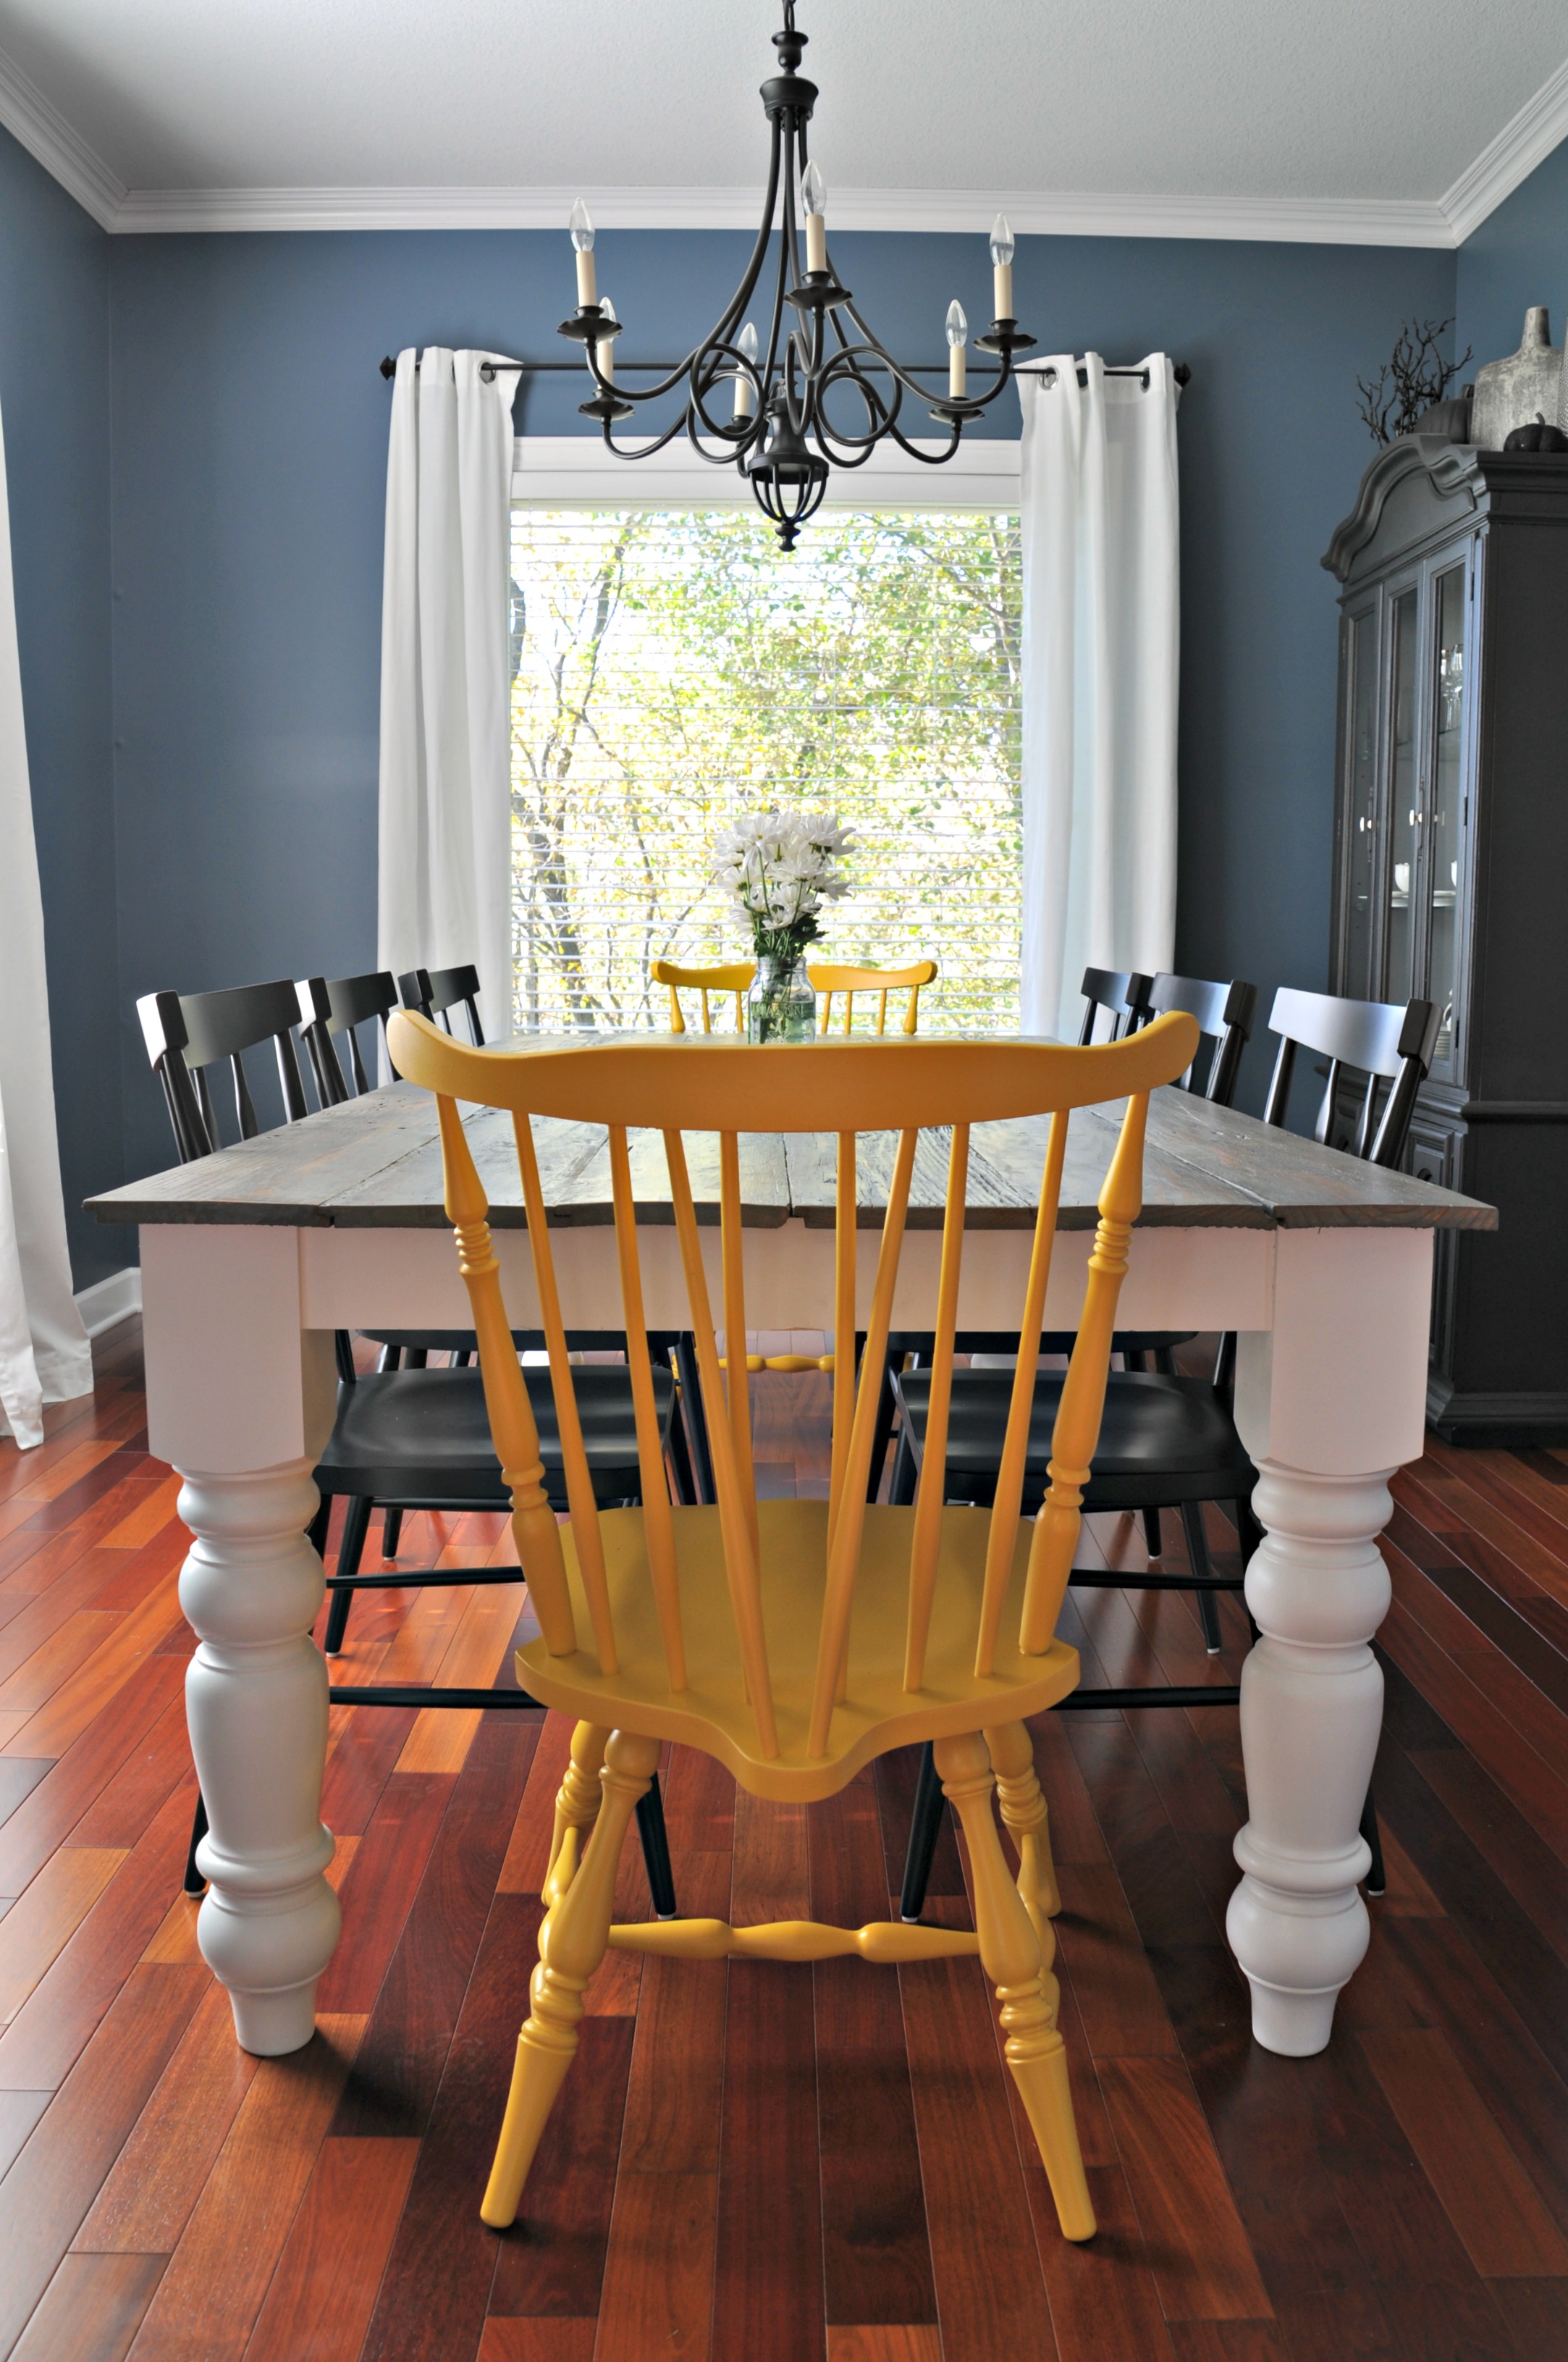
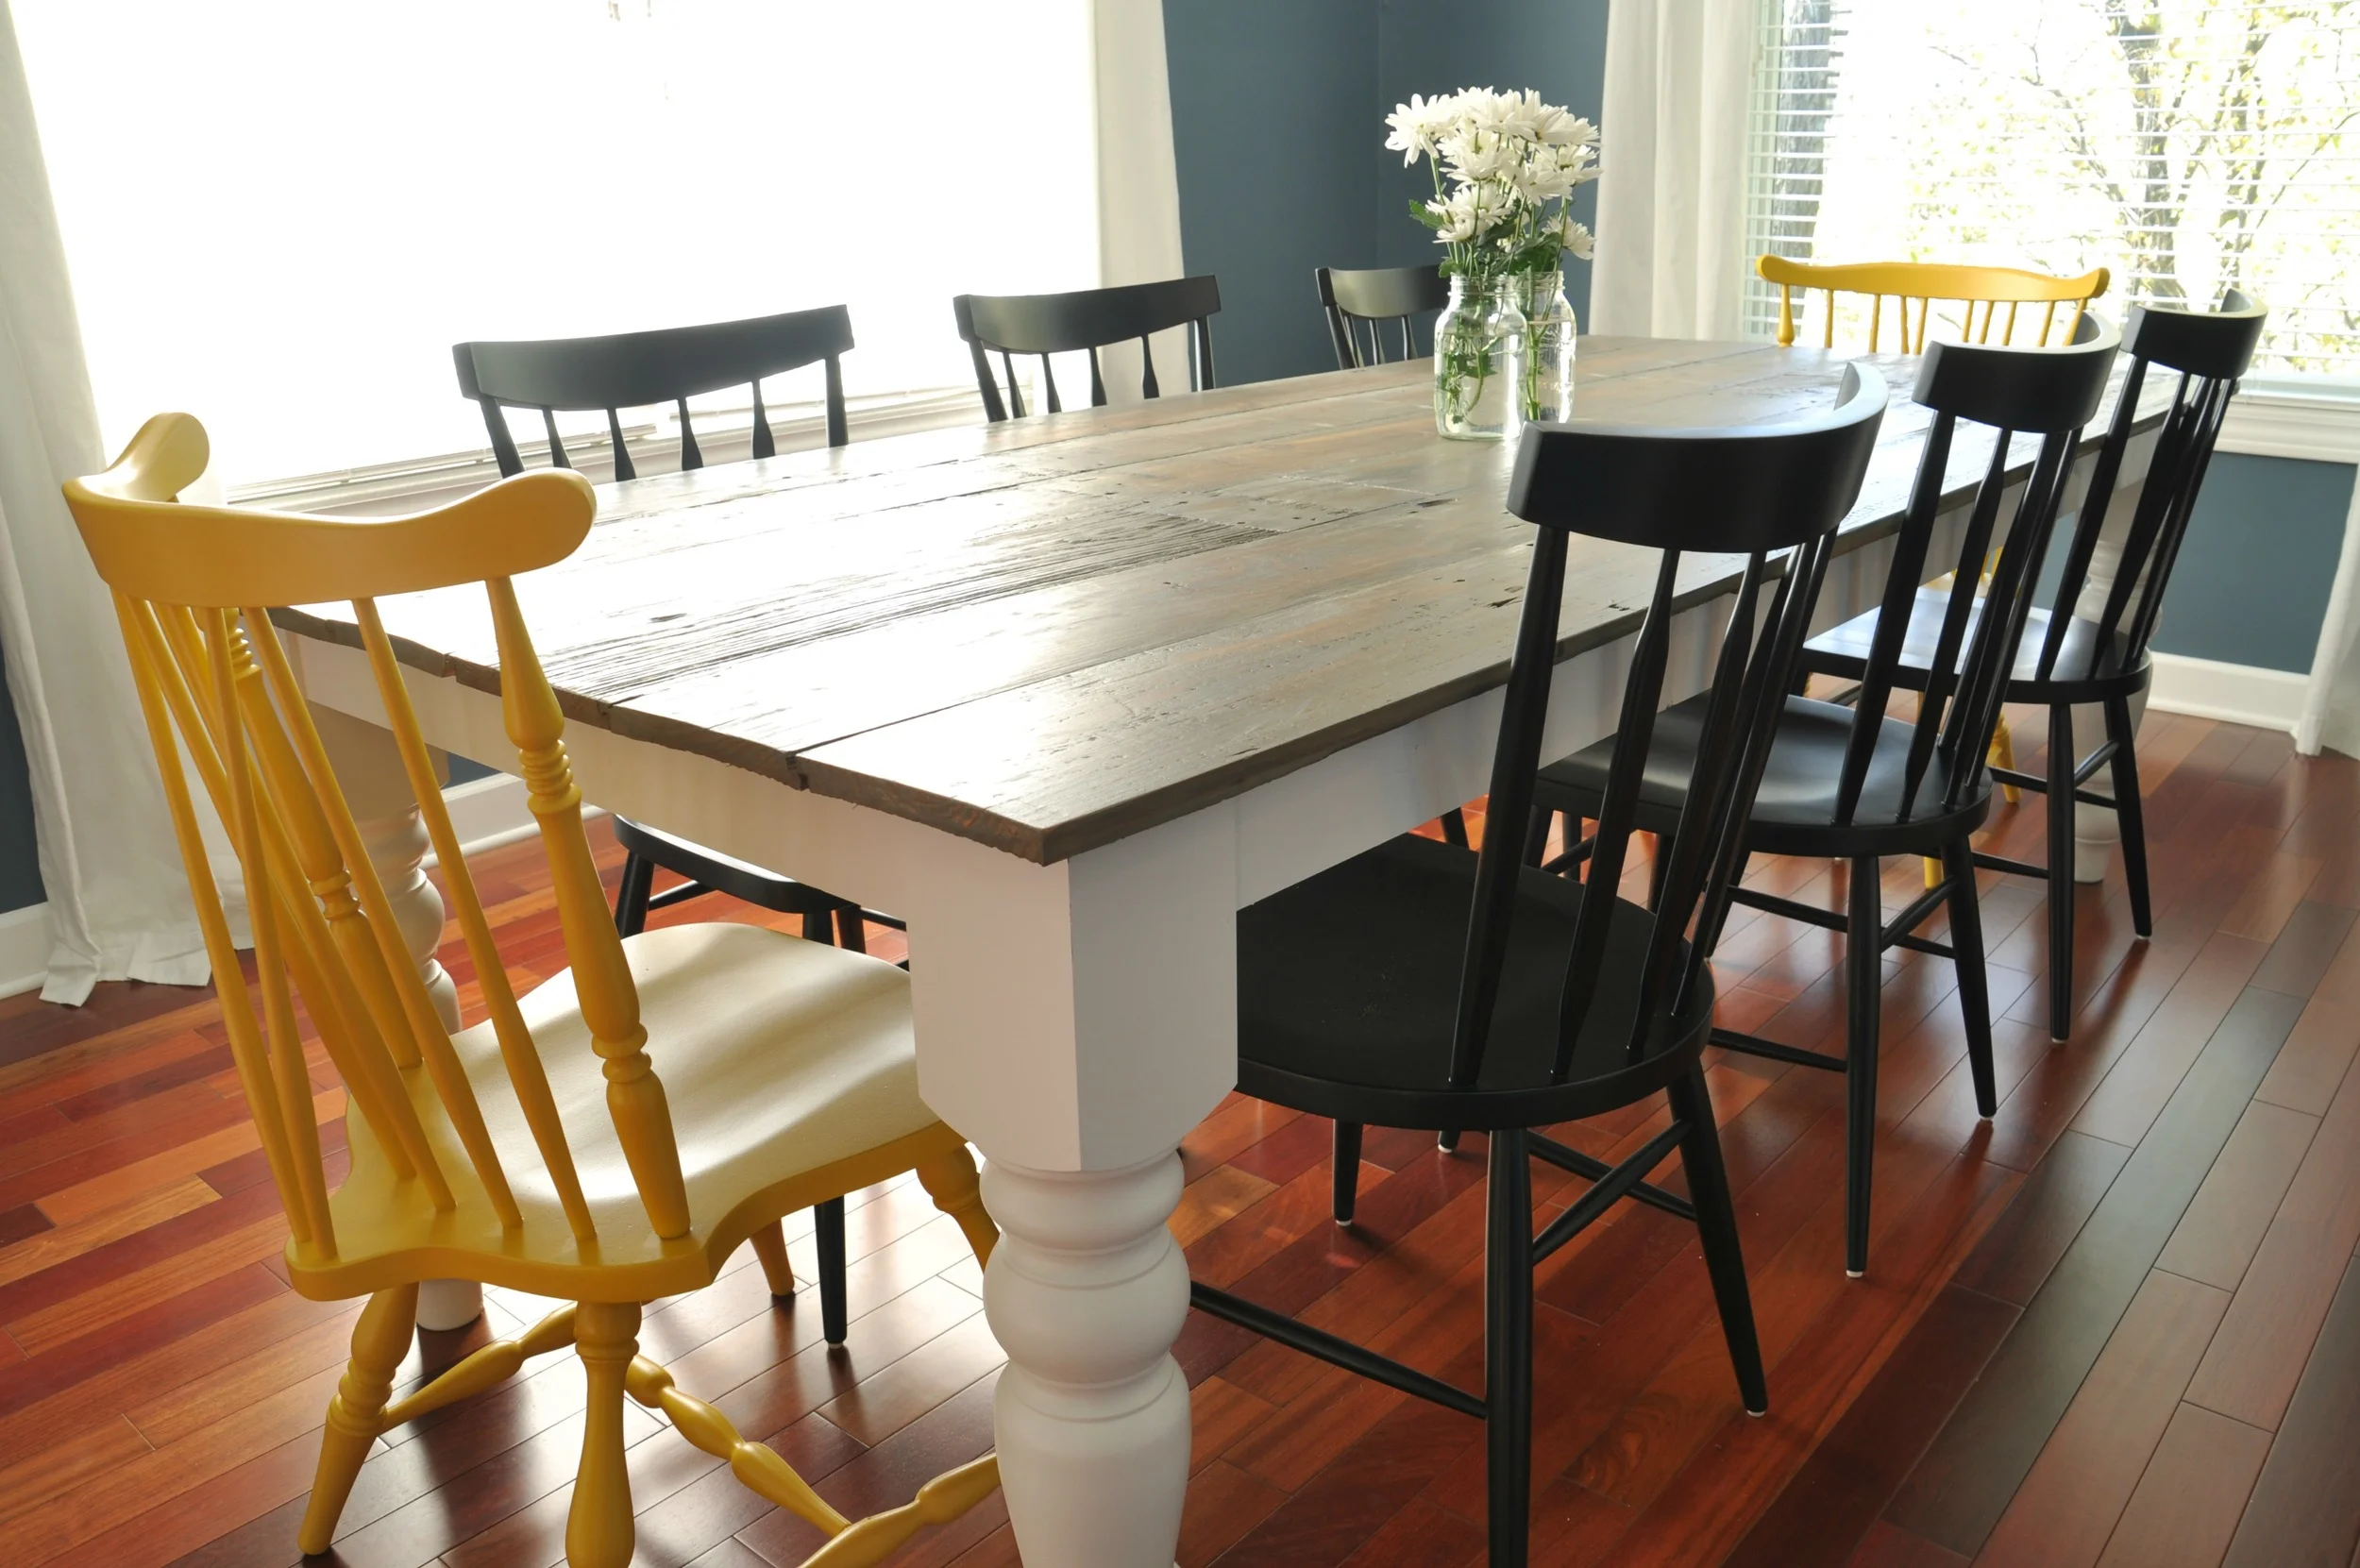
I decided to set the table for a quick imaginary party.  It's good to use my China for something, right?

christmas tablescape setup.jpg

I wanted to keep the setting relaxed and blogger cliche.  I added a simple white napkin and our regular Mason jar drinking glasses on top of some flannel.  As if Mason jar glasses weren't enough, I added a paper straw.  What kind of blogger would I be without paper straws?  Black and white straws would have been better but I failed to plan ahead.

Christmas Ike view.jpg

Ike supervised the set up.

Christmas tree in mason jar.jpg

I decided to take this whole thing over the top and shove a bottle brush tree and some Epsom salt in a Mason jar.  They make me smile.  Smiling is my favorite.

Christmas centerpiece with mason jars.jpg

The little vans with bottle brush trees also add to the centerpiece.  Aren't they charming?  We also bought a real little tree for the centerpiece.  We'll hopefully plant this guy outside in the Spring.  If Spring returns.  I feel like this may turn out to be the longest Winter ever.  And it's only December.

Christmas Centerpiece.jpg

Our dining room is looking quite festive.  I can't wait to share with your our newest addition to the dining room this week!

christmas dining room.jpg

Now it's time to see what my lovely co-hosts whipped up!  It's always fun to see what how we each tackle these dares!


Dare to Entertain

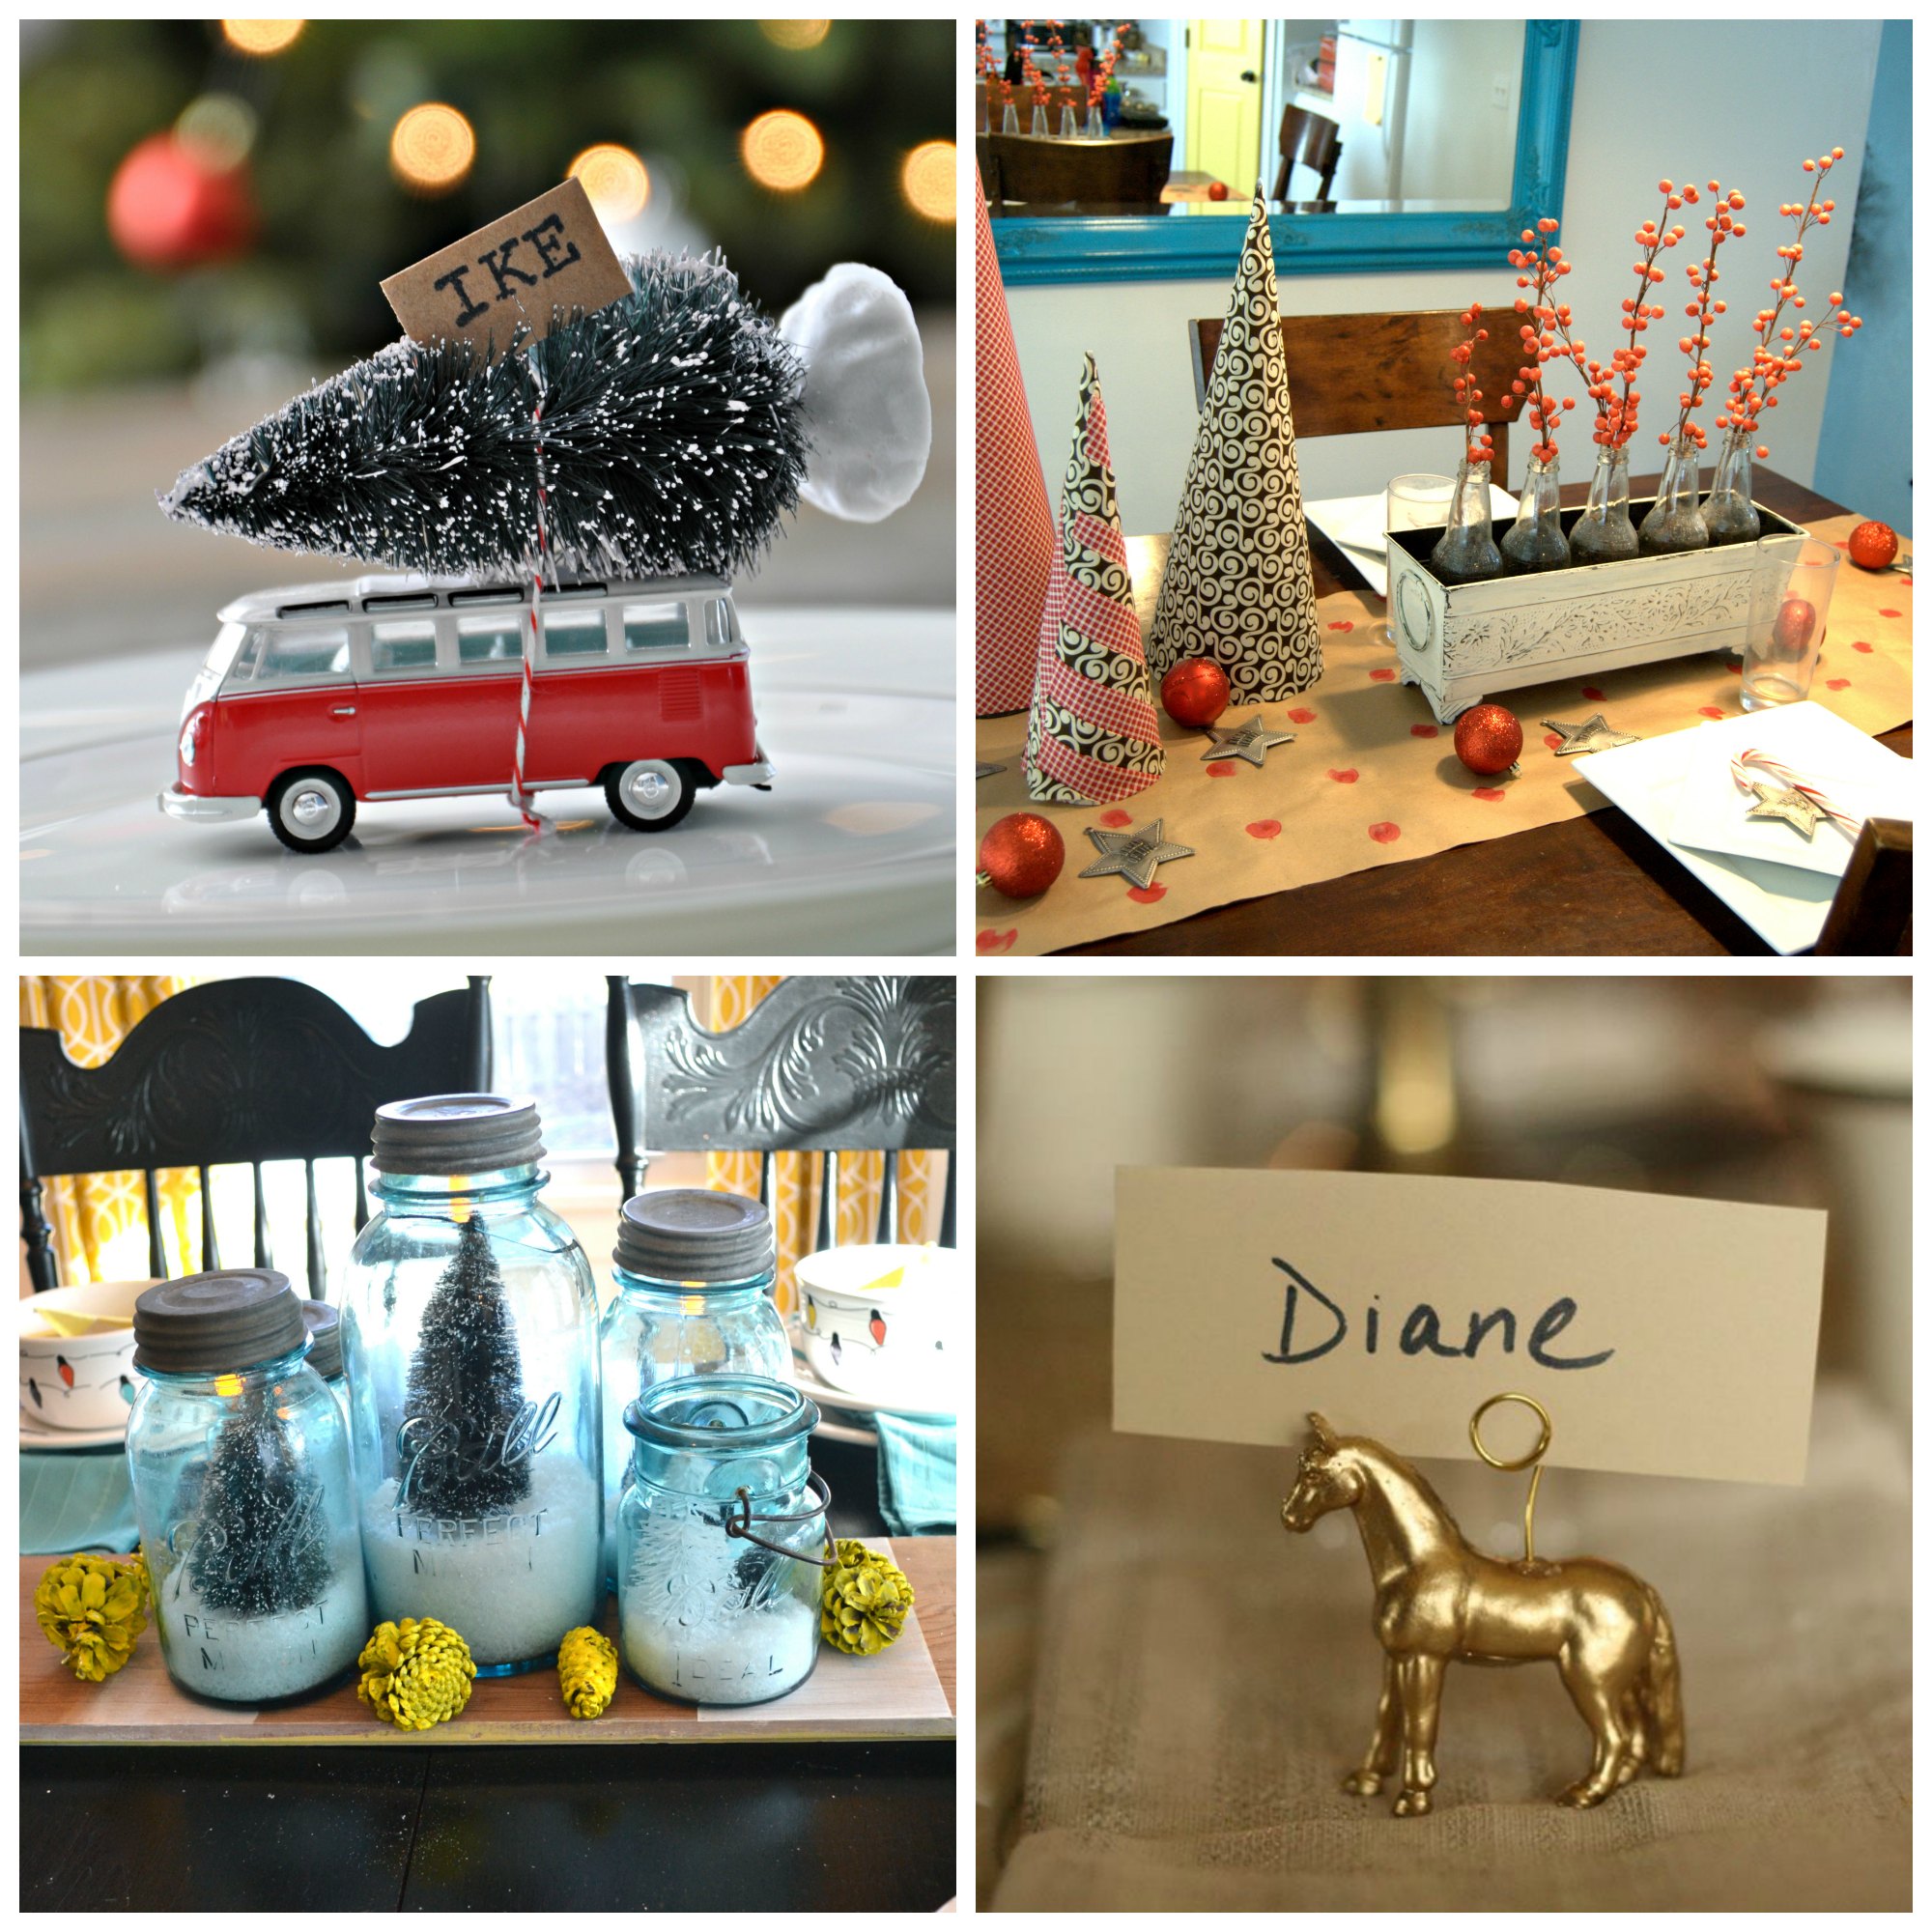
(Festive VW bus place cards via Decor and the Dog, Kraft paper runner and table via Maybe Matilda (TODAY'S HOSTESS), Blue Ball jar snowscapes via NewlyWoodwards, Gilded animal place cards via Primitive and Proper)

Now it's time for you to share your Dare to Entertain project!  I can't wait to read through all of them!  Head on over to Maybe Matilda and get to sharing!  One person that links up has the chance to win holiday cards from Tiny Prints!


Dare to Do It Yourself Link Party

Did you dare to entertain?  Are you obsessed with bottle brush trees and flannel like I am?

Photobucket Photobucket Photobucket PhotobucketPhotobucketPhotobucketfollow us in feedly

Dare to Be Thankful Features + Sneak Peek

Did you all survive Thanksgiving?  Are you braving the Black Friday madness?  I go with the lady in-laws out of tradition.  I shop in the morning.  Drink a Peppermint Chocolate Chip milk shake from Chick-fil-A and then I call it a day.  I usually have approximately 3 panic attacks in that 3 hour period.  Aw, tradition.

Today I'd like to share with you three of my favorite projects from Monday's Dare to DIY link party.  Be sure to check out all of the projects here!

In no particular order.  

This chalkboard from Interiors by Kenz is just the right amount thankful and cute.  Check out the whole project for a cute little heart detail.

Thanksgiving Chalkboard Art from Interiors By Kenz

This "Give Thanks" sign from At Least I Will is super fancy. I love the use of cork letters!

Give Thanks Sign from At Least I Will

Isn't this pilgrim wine bottle from Corner of Main the most darling you've seen?  I bet it makes the wine taste even better than usual.

Pilgrim Wine Bottle from Corner of Main

Thanks to everyone who participated!  (Again, check out all of the projects over at Primitive and Proper!)

Are you ready for next week's challenge, Dare to Entertain?  If not, there's still time.  Get to crafting!

Here's a sneak peek of my project.

Dare to Entertain 2013.jpg

Here's all of the party details!

Party Date: Monday, Dec. 2

(Link goes live Monday morning at Maybe Matilda)

Dare to… entertain!

DIY something for your table. This could be something from last week's Thanksgiving table or a new Christmas look. Get creative and use things in new ways. Or go true DIY and make something totally new. Ideas include place mats, table runners, place cards or centerpieces.

Giveaway: One of you will win 50 free Christmas cards from Tiny Prints.

Dare to do-it-yourself button 2013.jpg

Will you dare to entertain?

Steel Meister Stainless Steel Cleaner

This post brought to you by Steel Meister. All opinions are 100% mine.

I don't know about you all but we are in full on holiday mode in our house.

The trees are up.  The decorations are out.  The lights are hung.  Now all that is left is to enjoy Thanksgiving and then start holiday baking and enjoying time with family and friends.

My kitchen is pretty much a constant disaster in the month of December.  I love to bake and my kitchen shows it!  

I don't want to spend my entire month cleaning but I do freak out if I don't have a tidy house.  One area of our kitchen that I struggle cleaning is our stainless steel.  We've been in our house for 5 years now and I have continued to struggle with finding a good stainless steel cleaner.  I feel like I tried them all (natural routes included) and I just decided to settle with the last one I tested.  But a refrigerator that looks like this drives me batty!

Look at those fingerprints.  I constantly give Nate a lecture that I have now titled "Grimy Hands 101."  He has yet to pass.  And I don't think it's because I am a poor instructor.  I will never complain about my husband cooking but is that mess on the fridge really necessary?  USE A HAND TOWEL.

Even Ike understands keeping the fridge clean.  Look at that face!

I figured I'd give Steel Meister a shot.  I'd just bow out of the campaign if it wasn't a good fit.  

I was honestly surprised at how well this cleaner works.  It was easy to use.  You spray the cleaner onto the cloth and then you apply by wiping as you would to polish a car. 

I have two favorite things about this product:

1. It doesn't streak.  Every other cleaner I've tried I have had to scrub and buff to be streak free.  Point for Steel Meister.  

2. It keeps our stainless steel cleaner longer.  I was pretty skeptical when the product review said that it not only cleaned but also protects from future build up.  Our fridge door last about 2-3 days before I start to wig out compared to the previous 10-15 minutes.  I noticed after the initial application that I hardly had to scrub to get any gunk off the fridge door handles!

So shiny and finger print free!  I have definitely found my new stainless steel cleaner!  

Want to try Steel Meister yourself?  Read the Steel Meister reviews and pick up yours at the Home Depot (in the appliance section).  You can also follow Steel Meister through various social media: facebook, twitter and Pinterest.

Speaking of Pinterest, be sure to check out my "Cleaning- Before and After" board!

Do you have any stainless steel surfaces that drive you batty?  Are you a big holiday baker?  Anyone else need a lesson in Grimy Hands 101?

Visit Sponsor's Site

DIY Thankful Banner {Dare to DIY}

Today's the day! The very first day of the Dare to DIY for 2013.  

Cassie {Primitive and Proper} is today's host.  Check out my project and head on over for a ton of Thanksgiving inspired DIY projects.  I can't wait to read through them all!  (Darn work cramping my blog time.)

I decided to update my Instagram display with a "Thankful" word banner.

Thankful Word Banner {Decor and the Dog}.jpg

It's no secret that I'm an Instagram addict.  (My username is decorandthedog.  Weird, right?)  I use Instagram to capture those little life moments that I don't want to forget. I have the worst memory.  Except for pharmacy information.  I remember all of that.  I just can't tell you what I had for supper last night.  Wait, I can.  My Instagram feed tells me it was ham and bean soup.  Thanks, Instagram!

Thankful word banner.jpg

I made the "Thankful" word banner using felt and Heat n' Bond Iron-On adhesive.  I traced my letters on the felt backing.  (Be sure to keep in mind that you are tracing mirror images).  I applied the Heat n' Bond according to the directions. I then applied the front layer of felt and cut out my letters.

banner process.jpg

I then top stitched around each letter.  I think these letters would be cute for any holiday or birthday!

Thankful Word Banner close.jpg

To dare myself to be even more thankful, I decided to print out some new Instagram photos using Snapstagram.  (They gave me a code for some free prints.  I wasn't required to post about them but I was super happy with their products.)  The DIY prints work great on my Instagram display because they are sturdier than other prints and seem to hang on the clothes pins better.

 My Instagram feed is full of so many things that I am thankful for.  Some of which include my darling friends.

Thankful for Friends.jpg

And of course, these two.  How could I not be thankful for these two?  

Nate and Ike.jpg

One final thankful shot.

Thankful.jpg

Another great "thanful" project would be this photo book (also from Snapstagram).  It's just too cute not to share.  The cover is plain Kraft paper.  I made a book of Ike (totally thankful for Ike) and stamped the front accordingly.  These would make awesome gifts for family, especially if you have non-furry children.

Ike Thankful Book.jpg

Now it's time to check out my co-hosts amazing thankful projects. Rachel {Maybe Matilda} made a tutu for her darling baby girl.  Cassie {Primitive and Proper} created a thankful tree with feathers and arrows.  Kim {NewlyWoodwards} whipped up a thankful chalkboard crossword.

Be sure to link up your own DIY thankful project at Primitive and Proper!  We can't wait to see what you came up with!

Thanksgiving DIY Ideas.jpg

(Baby tutu via Maybe Matilda, Thankful tree with feathers and arrows via Primitive and Proper, Thankful banner and Instagram display via Decor and the Dog, Thankful chalkboard crossword via NewlyWoodwards)

Dare to do-it-yourself button 2013.jpg

Did you Dare to Be Thankful?  Tell me you did! Are you an Instagram fan?  Anyone want an Ike book? ;)

A Reminder and Sneak Peek

I always have to Google "Sneak Peek" to make sure I pick the right "peek".  I must remember "peak" is like the mountain.  Moving on.  

First, I installed Disqus to possibly help with the commenting woes since transferring to Squarespace.  It'll probably cause more problems (like none of my old comments transferred (working on it)) but let's give it a shot.  Let me know if you have problems.  Social media or e-mail me if you do! 

Next, I wanted to remind you all that Monday is the first link up for Dare to DIY!

Dare to DIY 2013

The link party will go live on Monday morning over at Primitive and Proper.  Cassie is seriously one of my favorite people.  I think you should head on over to her blog and check out some of her projects.  You know, get to know the hostess before you show up to the party.

Here are the full details in case you have forgotten.

Party Date: Monday, Nov. 25

(Link goes live Monday morning at Primitive and Proper)

Dare to… be thankful!

DIY a Thanksgiving project to remind you to be grateful during this season. Ideas include a Thanksgiving advent calendar, artwork or banners.

There are also prizes!  One of you will win 1 artisan enhancement 8 oz leaf and foil, 1 artisan enhancement 8 ounce clear topcoat, 1 copper gilding wax, 1 silver gilding wax  and 15 feet of foil from Catfish Studio.

Here's a sneak peek at my project.  Thankful is a tough one but it's good to step outside of our comfort zone every now and then and just create!

20131116_153214.jpg
IMG_20131119_165306.jpg

The suspense.

Nate and I are also finishing up a project for our dining room.  It's so pretty and I can't wait to share!

sneak peek.jpg

More suspense.

Here is a sneak peek at what Ike will be working on this weekend.

IMG_20131116_085732.jpg

There is absolutely no suspense there.

Happy weekend!  I can't wait to see what you craft up for Monday!

32.7

I'm currently in the middle of about 32.7 projects.  Which means I have zero productive things to blog about this week.  But hold on for next week.

Let me distract you with some cute pictures of Ike and weird Michelle ramblings.

Here is Ike wearing a scarf.  He looks quite stunning in it.  Notice the tennis ball in the office?  There are approximately 32.7 tennis balls around our house at this very moment.

Ike in a Scarf

Here I am wearing a scarf that I knitted on Sunday while watching The Wonder Years.  I go through these phases were I knit like 32.7 scarves and then I don't knit again for another 11 months.

Knitted scarf

I sold my hutch on Craigslist last night.  It was one of the first pieces of furniture that I painted.  Sort of sentimental in a weird way.  The girl that bought it was in love so I feel like it went to a good home.  Now we are finishing up a project to replace it with.  And I'm in love.  My husband is a furniture building animal.

Also, we put up our Christmas trees this past weekend.  They aren't lit or decorated but they are up.  Our house is in this weird half fall/half Christmas stage and it's making my OCD self wig out.  Ike's cool though.

20131119_192109.jpg

It has snowed 32.7 times in the past few weeks.  Or like 2 or 3 times. I can't remember.  I have a feeling it's going to be a long Winter.  Anyone in a warm climate have a guest room for me from approximately January to April?

IMG_20131022_162751.jpg

Ike likes to sit like this while I vacuum.  He kills me.

IMG_20131107_160048.jpg

So, that's life around our home the past week.  I'm off the new few days so hopefully I can knock out 32.7 projects!

Who has that guest room for me?  Have you started decorating for the holidays?

Beer Bottle Opener {DIY, Tutorial}

This post is for the dudes that read Decor and the Dog.  (Hey, John and Nick!  And baby brother.)  

Or the root beer in a bottle drinking crowd.

I mentioned that we hosted a beer tasting the weekend before last.  We aren't big on special party touches (we don't really do the hosting thing well) but we use hosting as an excuse to get things done around the house.  Nate had been wanting to make a beer opener (which is clearly as important as our living room built-ins).  He totally got that done.  

Beer Bottle Opener 8.jpg

Want to make your own fancy wooden beer opener?  This would make a great holiday gift for the dudes in your life.  Pair it with a six pack or two.  Gift complete.

It's also easy enough that I can make it without an ER trip.  #winning

Materials

  • One 1"x2" board (We bought a 2' Red Oak board.)
  • 1 1/4" lag screw
  • 1/2" magnet
  • Stain/Poly
  • Beer

Instructions

Step 1: Cut the board to 8 inches long.  Sketch out handle.  (See pencil mark below.)

Beer Bottle Opener 1

Step 2:  Use a scroll saw to cut on drawn line.  Sand smooth.

Beer Bottle Opener 3.jpg

Step 3: Using a 1/2" drill bit, place the magnet on the bit.  Mark with painter's tape to get the depth of the magnet.

Beer Bottle Opener 4.jpg

Step 4: Hold the screw on the end to help determine the best placement for the magnet.  Place a mark in the middle of the board to help guide where you will drill/place the magnet.  

Beer Bottle Opener Tutorial

Step 5: Drill the hole for the magnet.  Try to make yours more centered than ours.  Womp. Womp.

Beer Bottle Opener 6.jpg

Step 6:  Drill pilot hole for screw.

Step 7: Stain/poly

Step 8: Hammer the magnet into drilled hole.  Screw lag screw in leaving the depth as thick as most beer bottle caps.  (Ours has a 1/2" gap between the wood and bottom of the bolt.)

Beer Bottle Opener 7.jpg

Step 9: Open beer!  Look at the beer cap stick to the magnet.  FANCY!!!

Beer Bottle Opener 9.jpg

Step 10: Host a beer tasting. And open ALL OF THE BEERS.

Beer Bottle Opener Tutorial
DIY Magnetic Beer Bottle Opener

Like this beer opener?  Be sure to check out our beer tasting flight carrier!  (Also a great gift idea!)

Any thoughts on beer gifts for the dudes in your lives?  

Dare to DIY


It's the most wonderful time of the year!   The time where we watch Elf 17 times in 3 weeks.  And...

It's Dare to DIY time!

Some of you may be familiar with this little link party originated by the lovely NewlyWoodwards.   "Dare to DIY" is a fun series of link-ups to motivate us to DIY projects through Thanksgiving and Christmas - and to do it together. It's a great way to complete some of those holiday projects and meet new blog friends.

The fifth year of this series of blog parties is going to be the best yet!

And why, you ask?

The co-hosts are awesome. 

Kim at NewlyWoodwards (The mastermind of this awesome DIY-ness.) 

Cassie at Primitive and Proper.

Michelle at Decor and the Dog (That's me!)

Rachel at Maybe Matilda.

We'll all be hosting one week at our blog and we'll have an awesome giveaway each week for one of you! That means more projects and more fun!

Dare to do-it-yourself button 2013.jpg


Here's the plan:

Each Monday morning, the link party goes live for that week's Dare to DIY challenge at the blog listed above. You can link up your best project (or two). Just remember that the post should correspond with the theme of the week.

The linky will stay live through Wednesday. Later in the week, each of us will spotlight at least 3 projects we loved from the week on our blogs. And one of you will win a special prize! We'll also pin those projects on our shared Pinterest board.

The only rules:

1. Please follow the Dare to DIY theme of the week (see below). You can share up to 2 projects.

2. Please link back to Dare to DIY on one of our blogs.

3. Please go to at least one other blog and comment. This is a party. So get to know a few other bloggers.

And here are the themes - starting in less than 2 weeks. Dare to do it, lovely readers. Dare to do it.


Party Date: Monday, Nov. 25

 (Link goes live Monday morning at Primitive and Proper)

Dare to… be thankful!

DIY a Thanksgiving project to remind you to be grateful during this season. Ideas include a Thanksgiving advent calendar, artwork or banners.

Giveaway: One of you will win 1 artisan enhancement 8 oz leaf and foil, 1 artisan enhancement 8 ounce clear topcoat, 1 copper gilding wax, 1 silver gilding wax  and 15 feet of foil from Catfish Studio.


Party Date: Monday, Dec. 2

(Link goes live Monday morning at Maybe Matilda)

Dare to… entertain!

DIY something for your table. This could be something from last week's Thanksgiving table or a new Christmas look. Get creative and use things in new ways. Or go true DIY and make something totally new. Ideas include place mats, table runners, place cards or centerpieces.

Giveaway: One of you will win 50 free Christmas cards from Tiny Prints.


Party Date: Monday, Dec. 9

(Link goes live Monday morning at Decor and the Dog)

Dare to… give homemade gifts!

DIY a gift made by you. Nothing is more special to give than something you created, so share projects that will be given in brown paper packages this holiday season. Ideas include bath and body items, kitchen gifts, hand-sewn clothing or home decor.

Giveaway: One of you will win a free stencil from Royal Design Studio.


Party Date: Monday, Dec. 16

(Link goes live Monday morning at NewlyWoodwards.)

Dare to… deck the halls!

DIY something new to deck your halls. Did you find something in a catalog that you wish you had? Wreaths, stockings, pillows or advent calendars? Make it! Inspire us all to do the same.

Giveaway: One of you will win $100 from Red Envelope.

So, what do you think? Will you dare?  I hope you'll join us!  Tell me you will!

Free Farmhouse Dining Table Plans

Today we'd like to share with you how Nate built our farmhouse table.  Nate wrote the directions last night.  I had to translate them.  I wonder if there is a Rosetta Stone for Nate.  He can build farmhouse tables but he most definitely can't write coherent sentences.  I can sort of write coherent sentences but I can't build tables.  We're quite the pair.

Free Farmhouse Dining Table Plans

Here are free dining table plans so you can make your own farmhouse dining table!

Material List

4 Table legs (We used these from Osborne Wood.)
3 - 1"x4"x8'
3 - 2"x4"x8'
6 - 1"x7"x8' barn boards (You can use 1"x8"x8' boards, ripped down to 7")
Kreg 1 1/4-Inch Pocket Hole Screws
Kreg Mini Jig Kit
Titebond-3 Ultimate Wood Glue
Brad Nailer
1 5/8" Brad nails (if using ship lap barn boards)

Cut list

  • 1"x4" (Apron boards)
    •  2 @ 30.25"
    • 2 @ 82"
  • 2"x4"
    • 5 @ 38"

*affiliate links included

Directions {Table Base}

Attach the 1"x4"s to the legs using pocket hole screws and wood glue, offsetting 3/8" back from the front/sides of the leg tops. 

Dinning Room Table Skirt Spacing

Assembling the table is easiest done on the floor or work bench if you have one large enough.  I recommend assembling the table upside down, as shown in the photos.  Starting from the leg, mark 10.5", 25.5", 40.5", 55.5" and 70.5" on the long 1"x4". Using these marks, attach the 2"x4"s to the 1"x4".

Dinning Room Table Support Dimensions

Depending on the finish of the bottom and table top, paint or stain the legs and apron. 
 

Directions {Tabletop}

On the first board you are attaching the tabletop, determine the top of the board and then flip it over.  Mark the board using the drawing below.  You need a mark 2" from the end and 1" from the side.  Flip board back over and place it on top of the table matching up the marks with the top corner of the table legs. 

Dinning Room Table Corner.jpg

If using ship lap barn boards, secure the board to the top with brad nails.  

Contuine attachign all boards with brad nails until all boards are attached.  I did have some boards that were slightly warped, as is expected with barn boards.  Really big clamps came in handy to help straighten them out.  I also had some boards that did not want to stay down with brad nails so I went under the table and drilled in some pocket holes which helped pull the board down and secure it better.

If you are not using ship lap barn boards, attach all boards using pocket hole screws, then attach top to the bottom using pocket hole screws.

Dinning Room Table Top


A hand planer (or larger planar) really helps in starting to get the boards all level.  If you don't have a planar, a belt sander will work.  It just might take you longer.  Plane and sand the boards until all smooth.  Apply stain and poly (or paint).  Read how we finished our tabletop here.

Dinning Room Table Dimensions
Free Farmhouse Dining Table Plans {DIY Tutorial}

Who's ready to build their own?  Do you speak Nate? ;)

Photobucket Photobucket Photobucket Photobucket PhotobucketPhotobucketfollow us in feedly

Rustic Farmhouse Dining Table

Say "hello" to our new dining room table and chairs. (Finally.  Am I right?) 

Farmhouse Table Reveal. Farmhouse table with colorful chairs!

I love how happy the room is now.  It's no longer a stuffy formal dining room. 

Farmhouse Table Reveal. Farmhouse table with colorful chairs!

We hosted a beer tasting party on Saturday night and the table worked out beautifully.  I'm pretty particular and I was always worried about our old dining table getting scratched.  I would have been hyperventilating in the corner as beer rings were added to the table top.  Instead I was able to enjoy my Moscow Mules in peace and enjoy the party.  Scratches don't matter.  Beer rings wipe right up.  All is right in my OCD world. 


Farmhouse Table Reveal. Farmhouse table with colorful chairs!

Having seating for eight versus six was pretty awesome too.   

The yellow made me a bit nervous at first. (COLOR IS SO SCARY!)  I think it's the yellow chairs that add that extra bit of fun that the room needs.   

Farmhouse Table Reveal. Farmhouse table with colorful chairs!

A random daisies in Mason jar photo because daisies and Mason jars make the world a better place.  

Daisies.jpg

Like always, one new project leads to another new project.  We are going to replace the hutch with a smaller cabinet with open shelving above it.  I love the hutch but Nate and I both feel it's making the room a little stuffier/heavier than we want it.  I'm excited for open shelving to display my ever growing Pyrex collection.  It'll be a great way to add some more color to the room as well.  Who am I?


Farmhouse Table Reveal. Farmhouse table with colorful chairs!

We'll have a full tutorial (including materials list) later this week!   Unless I flake. ;)

Here are links to past dining room post!

Are you a farmhouse table fan?  Who's pumped for open shelving? 

Linking up to: Thrifty Decor Chick

Photobucket Photobucket Photobucket Photobucket PhotobucketPhotobucketfollow us in feedly