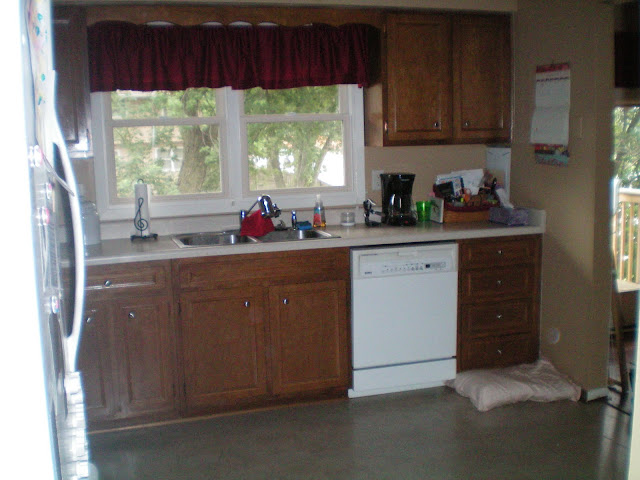
Kitchen Goes White

Today I am going to tell you a story about how Nate’s sister’s kitchen went from this…
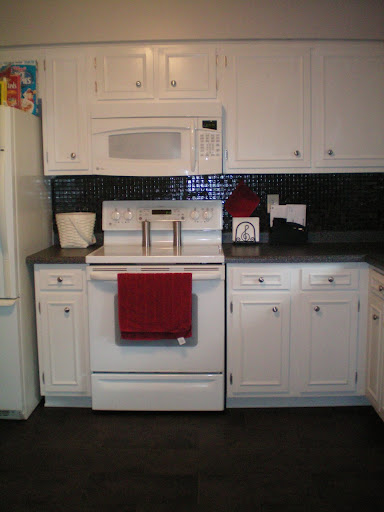
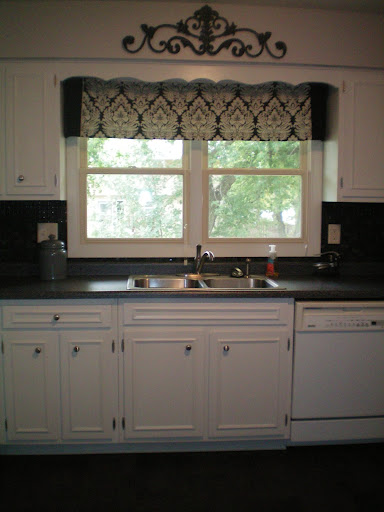
To this…

One Labor Day week-end, Nate’s sister invited us over to help her paint her kitchen cabinets.  How nice of her.  (She had previously painted the walls (Burnished Clay from Behr) and installed new flooring (Armstrong's Almafi Black Vinyl Tile.))

The cabinet doors were removed and set up for painting in the garage…

Labor Day 018

Nate’s sister went with Rustoleum's cabinet painting kit in Linen.  The kit contained a stripper (for the cabinets..get your head out of the gutter), a base, a glaze, and a sealer.  The stripper would have worked well if the previous owners hadn’t chosen to use gallons of varnish on every door.  The many layers of varnish did require some sanding.  We then brushed on 3 coats of the base on all of the doors and then cabinet frames.  Nate’s sister decided to skip the glaze and then finished with the sealer.  Overall, we were all impressed with Rustoleum’s kit.  The paint went on well and had a nice professional finish when dry.

After we left (we are only so loving), Nate’s parents helped install the counters (Custom Craft in Black Granite), reinstall the cabinet doors, and install the new cabinet hardware.

Nate’s sister then got to work on the tile backsplash the following week-end.

A couple of week-ends and less than $1000 later, she has a pretty new kitchen!  I’m pumped to wash dishes in this kitchen at Thanksgiving! On second thought, I vote paper plates so I can just admire the beauty of a newly remodeled kitchen.

Moral of this story: Painting your kitchen cabinets is totally worth the effort.  We do recommend calling all willing family members to help you out!  Nate’s sister also e-mailed me stating she would be willing to help us with our kitchen backsplash when we get around to it. Bonus!

Parade of Homes

This week-end was cold and gloomy.  A little rainy.  Boo.

We made ourselves take a break from projects.  It was nice to relax…for a few hours.  And then we were both a little stir crazy…and driving each other nuts.  We need projects.  We are project people.

We decided to head to the Quad Cities Home Builders Association’s Parade of Home.  Who wouldn’t want to spend part of their afternoon looking a new homes and getting bad ideas?  All free of charge.  The bad ideas…not completing them.  Unfortunately.

What ideas did we walk away with?  What trends did we notice?

We both really liked the built-ins/moldings in this living room…

image

We could see making this happen here…

112pn

But the tv would need to stay above the fireplace.  It would just be surrounded by pretty moldings.  I don’t want to tilt my neck to watch How I Met Your Mother.

We also both loved the moldings around these windows…(Please work with the cell phone photos.  We figured carrying around our DSLR may be frowned upon.  And we’re chickens.)…

image

Nate had tried to explain this idea to me a couple of months ago. I wasn’t understanding.  He thinks we can make it work here…

We have wanted the windows closer together top-to-bottom since the day they went up but we think that adding moldings similar to the photo above may make the gap less noticeable.  Or we could be completely wrong but it sounds like a fun project.

I fell in L.O.V.E with these pendant lights.  I have no idea why.  They just spoke to me.  “Put us in your home Michelle.” I e-mailed the company that did the lighting in the house to see if I should keep dreaming or if I can make them a reality.  Fingers crossed I hear back soon.

image

We were also looking for basement ideas during our parading around.  The only thing we walked away with is this cabinet…

image

It looks like us.  And it looks like a good place to store DVDs, games, etc.  Add it to the list.

What trends did we notice in the new homes?  We want to be sure to keep up with the times and not leave our house stuck in 2008.  Probably not a problem now…but in the future.

  • ORB finishes.  Makes me want to replace our satin nickel but I’m too lazy just yet.  Maybe satin nickel was circle back around.
  • Carpet on the stairs.  Nate pointed this out repeatedly so that’s why it made the list.
  • Doorless walk-in showers.  Nate was a visionary on that one.
  • Dark kitchens with walk-in pantries disguised with cabinet doors.  The hidden pantries were awesome but not something we can make a reality.

Have you been looking at house lately?  New or old.  What trends are you loving/hating?

A Lotta Chip Cookies

Today we would like to share with you a recipe introduced to us by my grandmother.

A Lotta Chip Cookies contain “a lotta” chips.  Hence the name.  They are a delicious combination of about every kind of baking chip imaginable.  Makes you want to eat a lotta them…

003

A Lotta Chip Cookies

  • 1 cup butter, softened
  • 1 cup peanut butter
  • 1 cup sugar
  • 2/3 cup brown sugar
  • 2 eggs
  • 1 tsp vanilla
  • 2 cups flour
  • 1 cup old fashioned oats
  • 2 tsp baking soda
  • 1/2 tsp salt
  • 2/3 cup each:
    • milk chocolate chips
    • semi-sweet chocolate chips
    • peanut butter chips
    • white chocolate chips
    • butterscotch chips

Combine sugars and wet ingredients. Combine dry ingredients.  Mix together.  Add chips.

Drop by rounded tablespoonful 2 inches apart on ungreased cookie sheet.  Bake at 350 for ~10-12 minutes.  Cool 1 minute and then move to wire rack.

What’s your favorite recipe from Grams?  Any big week-end plans?  I think we’re headed to a hot air balloon festival.  Should be interesting!

Master Bedroom Closet

Today I would to introduce you to a new “room” in our house….our master bedroom closet.  It’s nothing fancy.  It is large and practical.

030

The closet is where Ike likes to sleep in the sun and bark at the dog across the street. And we store our clothes here.  The large picture window may be a slight design flaw.  We do enjoy the natural light…just not the having to remember to close the blinds when changing at night.

On the left is my side…

018

On the right is Nate’s…

035

This past week-end I went through all of my clothes and got rid of things that didn’t fit, have been with me since high school, were stained, etc. I don’t know why it took me so long to tackle this because it is so nice having extra room.  I’ll drop these clothes off at the Salvation Army.  I like donating. 

I did make a huge step in my life.  I got rid of some ugly flannel pants there were about 5 sizes too big and were thinning horribly.  I’m surprised part of my wedding vows didn’t include me getting rid of these immediately.  The Christmas tree pants, however, were on me so they survived…much to Nate’s disappointment.

015

Ike wanted to keep his cherry bikini but I eventually talked him into letting it go…

027

You’re not in high school any more little buddy.  Sad day…

026

Are you a clothes hoarder or do you only keep what you wear?  What’s the ugliest but yet most comfortable item of clothing that you own that you just can’t part with?  Who feels bad for my poor sleepy dog?

Fall Decorating

I’m usually not big into decorating for holidays other than Christmas but I’m learning that decorating your mantel is almost a requirement for a decor blogger.  Who am I to argue?

Here was our mantel for the summer…who am I kidding? Here is our mantel from the past two years…

005

Here is the mantel after a little fall decorating…(I love how it looks like Ike is chewing his bone in the fireplace)…

115pn

112pn

116pn

118pn

The faux pussy willow are from Wal-Mart (Better Homes and Gardens).  I had three people comment on how pretty they were as I walking around.  These comments made me question if buying the weeds was a smart decision.  The comments also made me realize why I don’t normally shop at Wal-Mart.  People in Target mind their own business.

The owl was from TJMaxx.  I have a bird phobia but these little cartoon owls get me every time.  I also loved the color. 

The pumpkins were from my basement…originally from Joann’s.

I know the mantel is a little bare in the middle.  I may have come up with a solution.  We’ll see.  I’ll keep you in suspense.

I also purchased two placements from Target. No one commented on how pretty these placemats were.  I love Target. I turned the placemats into pillows.

044

I just ripped a small hole (larger enough for my hand) in the seam and then stuffed some stuffing in it until it looked like a pretty pillow.  I then sewed them back shut.  Cost was ~$6 per pillow.  Awesome.  I’m obsessed.

The living room now says bring it on fall.  We’re ready for your dog snuggling, hot cocoa drinking, and new seasons of television watching!

056

Are you a holiday decorator?  Are you pumped for fall or sad to see summer go?

Dog Bow Tie

What would I do without Pinterest?  (Besides clean my house, read, etc).  I mean, I would never know that Ike needed a bow tie…

How hard can it be to make a bow tie?  With a little experimentation (I did major in Biology) on a rainy Sunday, I came up with this…

105pspn
097pn

Would you like to make your favorite canine a bow tie?  Here’s how I did it.  I, however, should probably stick to give advice about your medications but here’s my attempt at a sewing tutorial.  I wish I knew how to use our DSLR…

Gather your supplies:

  • Two 4”x12” pieces of your fanciest fabric.  Dogs totally know the difference. 
    • I made a couple before I got the size right.  Ike weighs about 24 lbs so you can probably guess from there the size you may need.
    • One 3" x 4" piece of matching fabric
    • A sewing machine.
    • Thread and needle.
057

Step 1: Grab the two 4”x12” pieces of fabric and place them right sides together.  Sew around the edges (I don’t remember what I used for a seam allowance. Small.)  Leave a small opening on one of the short ends.  Turn ride side out.  You might need to shove your scissors or a pen in there to get the corners.

Step 2: Sew the two ends together (tucking the unfinished edges under).  I got crazy with the zig-zag stitch. Why did I use a zig-zag stitch.  Because I have never used this option and it looked fun.  I used white thread because I wanted you all to be able to see my awesome sewing skills…not because I didn’t have black thread at on hand.

070

Step 3: Fold this piece in half and sew a small line (~1 inch) in the center-ish.  This will help the bow tie bend.  Ike is a great sewing assistant.

073

Step 4: Grab your 3”x4” piece of fabric and fold in half (right sides together) and sew along one edge.  Turn right side out.  Again, grab that pen or scissors.

076

Step 5: Hand sew these ends together.  Unless you are smarter than me and can figure out how to do this with a sewing machine.

081

Step 6:  Slide the larger piece of fabric through this newly created loop.  And voila, you have a doggie bow tie…

085

I slid Ike’s collar through the back of the smaller loop.  I suppose you could get fancy and sew a collar but I already felt ridiculous spending 30 minutes of my Sunday making my dog a bow tie for no apparent reason.  He loves it though…totally worth it…

101pn

Look at that face.  Pure joy from his bow tie.  Or was it the bone in my hand?  Totally the bow tie.

How do you pamper your pet?  Fancy toys, yummy treats, bow ties?

Loaded “Baked Potato” Soup

Fall has hit the Midwest.  I had to bust out my flannel Christmas tree pants last night.  That’s how cold it got.  Please don’t call those crazy folks at “What Not to Wear” on me.  I will never give up the Christmas tree pants.

My dear friend, Amanda, is visiting from Reno this week.  We had her over for supper the other night…

2015pn

I never know what to make when we have people over.  I’m a horrible host.  Oh yeah, I don’t cook either. Minor detail. Luckily Nate is a good chef and he whipped us up a delicious supper. 

What’d he make?  Loaded "baked potato" soup!  One of my favorites!

The recipe is originally from Kraft but Nate has doctored it a bit.

Loaded “Baked Potato” Soup

  • Southern Style Hash browns (1 bag)
  • 3 cans chicken broth
  • 3 cups milk
  • 12 pieces of bacon (we go with the easy microwave kind)
  • 2 1/2 cups shredded cheddar cheese
  • 1 green onion (diced)

Combine broth, milk, and green onion in stock pot.  Once hot, add hash browns.  Cook hash browns until mushy (technical term).  Mash with potato masher (one of my favorite utensils..after the whisk).  Add bacon.  Simmer for about 5 minutes.  Add cheese.  Simmer for about 5 minutes.  Add flour to thicken to desired consistency.  Enjoy!

We like to eat it with Rhodes frozen bread.  Mmmmm, carbs.

2014

We forgot to photograph this until after supper so excuse the mess.  It is one of the most delicious things you will eat. I promise.  Can you go wrong with cheese and bacon?  I didn’t think so.

2019pn

This soup is Michelle and Amanda approved. 

What’s your favorite soup recipe?  What’s your go-to dish when you have guests over?  Do share!

Bedroom Furniture for the Parental Units

On Tuesday I shared with you some changes that we helped my parents make to their bedroom.

Part of those changes include some furniture painting.  It’s been awhile since I completed a furniture make-over.  I missed it.  I find painting furniture therapeutic which is weird because I hate painting.  I’m a complicated human being.

First up, the dresser…

My mom purchased it from a co-worker for $25.  The dresser was made by a family member of the co-worker.  It was in great condition but you can see some knots in the wood.  I filled them in with a little Elmer’s wood filler and sanded them smooth.  Mom wanted a punch of color so we went with Sherwin Williams Coral Reef.  We used their ProClassic Interior Enamel.  This was the first time I used this type of paint for furniture and I really like it.  It self-leveled and covered well.  The knots disappeared!

Herrick Master Bedroom 071

I wasn’t sure about the knobs at first.  Mom loved them.  They are growing on me.  I would probably replace them with a glass knobs but only because I like to make things difficult.  This dresser ended up fitting in well with the cottage theme Mom had in mind.

Next up was the nightstands.  I pre-warned Mom that it would be difficult to find a pair of matching nightstands.  Finding anything that resembled a nightstand was difficult in middle-of-nowhere Iowa.  We did end up with these two nightstands that we were purchased from two different antique stores…

058

They were close enough in height and similar looking.  We went for it.  The one on the right had obviously seen some better days but we weren’t scared.  A little sanding, primer, and paint and we had these beauties…

Herrick Master Bedroom 076

Herrick Master Bedroom 077

I love a good furniture make-over!  Especially when I don’t have to pay for it.

Have you painted any furniture lately or do you think painting wood is a crime?  What’s your favorite type of paint to use on furniture?  On a random note, tell me what you’re reading so Mom and I can stock our nightstands with good reading material!

Linking up to: Primitive and Proper