Roomspiration Blog Hop

Today you should head on over to A View Along The Way.  Kelly is hosting a link-up of living rooms as part of the Roomspiration Blog Hop and Link Party.  Kelly is hilarious and who couldn’t use a little more room inspiration?….but first take a quick glance at our living room. 

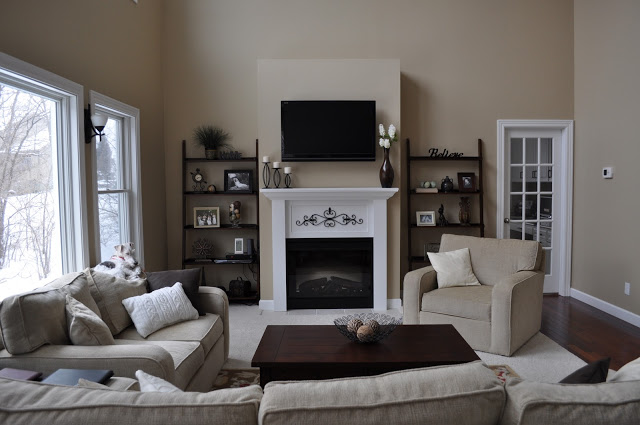
Our living room is one of my favorite rooms in our house and yet it gets very little blog love.  I think that’s because I haven’t changed anything in this room since I started blogging.  This post may be a slight repeat for those of you who were early readers.  Ok, just my mom. Nevermind.
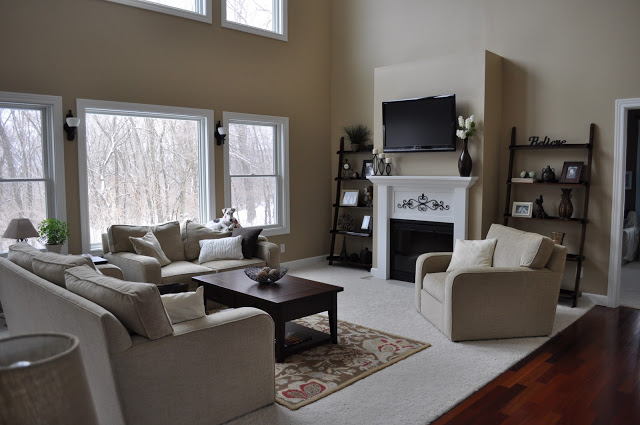
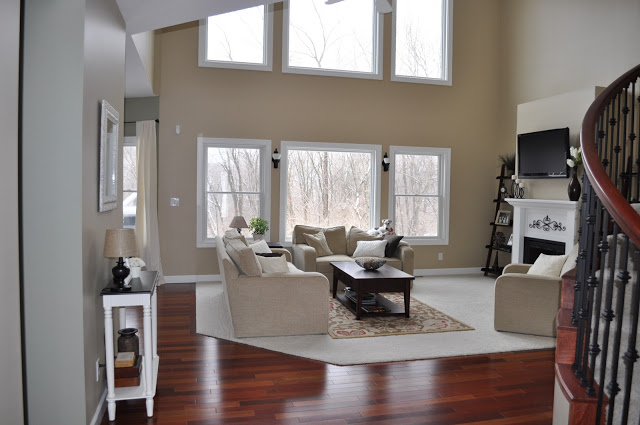
Room info

  • Wall color: Macademia  by Sherwin Williams
  • Furniture: Ethan Allen Retreat sofa, love seat, and chair
  • Shelves: JCPenney Leaning Shelf
  • Coffee table and end table: American Furniture
  • Rug: Pottery Barn rug bought at Tuesday Morning for over half off (BONUS!)
  • Accessories on shelves: thrift stores, Gordman's, gifts, TJMaxx, Marshall's
  • Dog: breeder from northern Iowa

We have someday plan to install built-ins.  I think we will leave this to the professionals (say what?) but you just never know.  I want cabinets on the bottom and shelves on the top.  Something fancy.  We also want to make the mantle more substantial.  I also wish I knew how to decorate a mantle with a tv above it.  It baffles me.

Is this room perfectly designed? No.  The furniture is matchy-matchy and the rug is probably a little too small but the furniture is super comfy and I love the rug. Comfort and love are more important than design “rules”.  Don’t you think?

Be sure to head on over to View Along the Way.  Let me know if you linked up so I check out your living room so this isn’t a creepy one way street. Actually don’t worry about being creepy.  I’m totally that person that looks into houses at night but I do it for non-creepy reasons.  I’m checking out paint colors and furniture…not naked people.  Although I did see naked people once.  I did stop for peeping after that viewing but I’m back at it again now.  True story.  Welcome new readers. Good-bye new readers.

**I’m also horribly behind on blogging.  I try super hard to comment back if someone comments here but I’m about two weeks behind on that…and I have about 5309 unread things in my Google Reader.  I will catch up. Pesky day job.**

Decorating With Family

Today’s post will explain why there was no post yesterday.  We were helping my parents make-over their bedroom.  They live in middle-of-nowhere Iowa…aka the land of slower than dial-up internet.  We did make pretty good progress over the week-end.  Just not on the blog front. 

Here is my parents’ bedroom before we arrived.  It has been some form of this for the past 6 years.  You know, when they moved in.

IMG_1697

My love for decorating is hereditary.  Can you tell?

My mom wanted a cottage look and a “warm” feeling.  My dad wanted to spend $0.00 and I was repeatedly told that I was not to touch the trim.  Why?  Because I may have asked him approximately 1 million times if we could paint the trim white and he’s horribly opposed.  Old people.

Here’s how we ended the week-end…(We had some trouble photographing the room.  The below picture makes the room seem he-giant and the wall color is giving Nate fits in editing.  Amateurs.)

Herrick Master Bedroom 089

Herrick Master Bedroom 091

Yes, Ike makes himself at home wherever he goes.  They are still waiting on white curtains.  The only size of curtains that they sell in the middle-of-nowhere is 84” which are not nearly tall enough.  They also need something above the bed.  I’m thinking a round mirror to balance out all of the square (I act like I know what I’m talking about). 

Everyone loves a good room breakdown so here it is.  The only thing we kept from the original room was the bed frame and mattress.  I did push hard for the bamboo sconces but they didn’t quite make the cut.

Wall Color:  Sea Salt by Sherwin Williams.  I like how this color changes throughout the day.  Sometimes greyish. Sometimes greenish. Sometimes blueish.

Bedding:  Purchased at TJMaxx. I don’t know the price or brand because Mom isn’t answering her texts. Get with it Mom. This is important stuff.

Headboard: Nate built it! (More details on that to come).  $50-$60

Nightstands: I taught my mom how to paint furniture and we got to work on the thrifted night stands. $18 and $15.  (Nightstands are hard to find.  I had a dream the night before we went looking for them that we finally found a matching pair after endless searching.  Some lady started yelling at me and I stepped away.  The nightstands then disappeared.) I inhale too much pill dust during the day.  We did not find a pair but they were very similar looking.  They were higher priced than I would normally pay but I get my patience from my mother and she wanted to complete this room.

Herrick Master Bedroom 076 Herrick Master Bedroom 077

Lamps:  I found them at my local Salvation Army.  They were originally dark brown.  We painted them coral.  $6 for the pair of bases.  $12 for the pair of lamp shades. 

Dresser: My mom purchased this from a co-worker.  It was originally made by a family member of the co-worker.  I love furniture with a story.  Mom wanted a punch of color so we went with Sherwin Williams Coral Reef. $25.

Herrick Master Bedroom 071

Floating shelves: Nate built the floating shelves thanks to easy to follow instructions from Ana White and Young House Love. $10 for the pair (there is a shelf on each side of the window).

Herrick Master Bedroom 084pn

What did I learn about helping someone else decorate?   It was hard because I have definite likes and dislikes but I need to remember that everyone has different tastes and there isn’t one right answer when it comes to decorating.  But maybe a better answer. Mine. Overall, it was a fun project.  Especially because we didn’t have to fork over any money for a fun make-over.

Have you helped a family member tackle a big project?  How’d it go? 

Linking up: Remodelaholic

Game Day

Tomorrow is a big day in the state of Iowa. 

It’s the Iowa Hawkeyes versus the Iowa State Cyclones football game.  This game is huge because we live in Iowa and there is nothing better to do than argue over who is going to win a football game.

The casa de Decor and the Dog is rooting for the Hawkeyes.

Ike has his game day gear on already…Hawkeye bandana and collar.  He’s confident the Hawks will pull off a victory.

Labor Day 083

We’ve been practicing our Hawkeye touchdown “high ten”…

Labor Day 103

We asked Ike if he’d rather be a Cyclone fan or would he rather be dead?  This was his response…

Labor Day 080

How are you spending your week-end?  Will you be watching football, teaching your dog funny tricks, or trying to get back the few minutes you spent reading this post? Go Hawks!

Two Out of Three

I decided this past week-end that I would use Pinterest for something other than a major time suck.  I decided to use it to help us meal plan.  We are not good meal planners during the summer.  There is always so much going on.  We don’t like to cook casseroles, pastas, etc. when it’s hot.  Oh yeah, and we’re lazy.

This past Sunday I got on Pinterest to start looking at all of the lovely recipes I had pinned. About 15 minutes later Nate asked me how my meal planning was going.  I asked if he thought a squirrel with spirit fingers was helpful…

image

He told me that it was not helpful unless I planned to eat that squirrel.  It’s amazing he hasn’t filed for divorce.  And how could you eat a squirrel with such spirit?

I then redirected myself back to my recipes board and picked out a few recipes to purchase ingredients for.  Today I will review two meals and a dessert found on Pinterest.

Recipe #1: Slow Baked Mac & Cheese 

image

We’ve had some pretty cool weather the past few days so we decided to bust out the ol’ Crock Pot.  This recipe looked delicious.  We, however, did not enjoy it.  The mac & cheese was very bland.  I am one of the world’s pickiest eaters so if I say something is bland…it’s bland.  The custard also curdled a little.  I’m thinking it’s because my noodles were too warm when I added them to the cold custard ingredients.  It didn’t curdle a lot and I don’t think that had any affect on the overall bland taste.

Ike, on the other hand, seemed to enjoy the mac & cheese…

Labor Day 060

(I made Nate eat this bowl because he was the bad parent photographing the dog instead of making him behave.  Ike isn’t allowed table food…unless Nate thinks it makes a funny picture.) 

We will be sticking with my grandma’s recipe for our Mac & Cheese needs.

Current score: 0-1

Recipe #2: Giant Chocolate Chip Cookie baked in a Cast Iron Skillet

image

Nate has this weird obsession with cast iron cookware.  I won’t argue though because this cookie was one of the most wonderfully delicious cookies I have ever eaten.  I would suggest you buy a cast iron skillet solely to make this cookie in.  Just the right amount of crisp to soft cookie ratio. 

Labor Day 062

Current score: 1-2

Recipe #3: Ranch House Pork Chops

image

We are suckers for comfort food.  It’s a really good thing that we decided to take up running.  I think. 

Nate and I both really liked this recipe.  We will be making it again.  We used instant mashed potatoes instead of making them from scratch.  (Yes, Mom.  I know this bothers you.  I apologize.)  The recipe called for 1 can of cream of chicken soup and 1 packet of dry ranch dressing.  I took the advice from some of the comments and used 2 cans of soup with 1 ranch packet and threw it in the Crock pot with some pork chops.  Supper was served 6 hours later.  Super easy and tasty.  (Side note #1: I didn’t take pictures of this because I think pictures of meat are disgusting.  Even the one above.  Side note #2: don’t eat the leftovers before running. Uggg.)

Current score: 2-3

Pretty decent odds Pinterest!

Have you tried any of those yummy looking recipes from Pinterest?  Any luck?  Do share!

Stay or Go

If you’ve been reading for awhile you know that I have been looking for a shower curtain for our guest bathroom.  I tried a white one.  I tried a black and white one. I tried a pink and grey striped one. (If I was a good blogger I’d have pictures of them…but trust me.  Not good.)

Now I am on shower curtain #4 (West Elm's Stripe Shower Curtain).  Should this decision be this difficult? No.  Third world problems are hard.

Today I would like your vote.  Should shower curtain #4 stay or go? 

Labor Day 140
Labor Day 144

I’m usually a big believer in decorating your house with things you love.  I think I just don’t love shower curtains.  They all look weird to me.  I’m leaning towards liking it but I’m just not sure.  I’d like to hear what you all think. 


I plan on purchasing new bath mats (I gave up on the runner idea because they are all too expensive for my liking) once I decide on a curtain.  (Nate and I also realized that the light bulbs in here cast off a really yellow glow so we will be switching them out soonish.)  Any other thoughts on decorating this space?  Do share.  There are no wrong answers. 

Feel free to comment with why you chose “stay” or “go”!

Volcanic Ash

Remember last week when I asked you what color I should paint our mudroom door?  I was surprised with the safe votes of black.

doorvote

I was originally deciding between red or keeping the door white. When I really thought about it, I didn’t really want to keep the door white because it gets dirty easily.  I was then leaning towards red.  And then I chickened out.  I’ve heard too many horror stories about painting doors red.

Later that day Nate tells me that he was thinking a charcoal color and he swears that he had the idea before you all commented with charcoal as a suggestion.  We’ll give him the benefit of the doubt.

We headed to Lowe’s and picked up a quart of Olympic’s Volcanic Ash.  We decided to try out their new One (primer and paint in one).  Why?  Because we’re suckers for new stuff. We were pleasantly surprised with the coverage.  Two coats and we were done.  There is hope for no VOC inexpensive paint. Hooray!

And now for the good stuff…

paint interior door
painted interior door

I liked the color so much that I decided to paint the other side too! (It's still drying in the picture.)

painted interior door

Ike was confused as to why we keep messing with his room.  I had to leave the door cracked while it dried…which allowed some flies to sneak in.  Ike is a fly hunter.  He had an amazing afternoon.

Thanks to all of your that suggested charcoal and thanks to the rest of you for keeping me entertained with survey results.   (I’m one of those freaks that fills out every survey that comes in the mail.)

Are you into colored doors?  I was always a white-door-only kind of girl before this…now I’m getting crazy ideas!

Stay-At-Home Dog Mom

We’re on day #2 of a five day week-end.  Life is good. 

Ike and I have decided that I am going to be a stay-at-home dog mom.  Who else thinks this is a brilliant plan?  We just need to get Nate on board. (Can you tell he’s the only rational one that lives in this house?)

Ike loved yesterday.  There was extra time to play with a Wubba…

September 007pn

September 010pn

Instead of cleaning the wood floors (It’s a never-ending battle to keep these floors clean.  Kind of like laundry.), Ike and I decided to take a nap.  All of that Wubba play made us sleepy….

September 014pn

September 028pn

September 039pn

How are you spending this holiday week-end?  We are actually going to take it pretty easy.  We are going to help Nate’s sister re-do her kitchen on Saturday but the rest of the week-end will be spent relaxing…and snuggling!

Mudroom Bench

Are you sick of our mudroom yet?  I didn’t think so.

Today we’ll share with you how we built our mudroom bench.  I find this stuff boring but it will be a good resource for us in the future and it will hopefully help some of you out as well. At least there are some pretty pictures.

Nate is going to make us look like fancy bloggers with his SketchUp designs.  I’m going to let him explain this one because all I did was paint the thing….

***

We first purchased two 4x8 sheets of 3/4" MDF particle board.  We only used one sheet plus a little bit of the second.  We had a fair amount left over to build a shelf and then some. 

First, we started with our cut list: 

- 4 - 15 1/2"x18"

- 40 1/2"x18"

- 3 - 18"x 2 1/2"

- 39 1/2"x 2 1/2"

- 22 1/2"x 18"

- 19"x 2 1/2"

- 14 3/4"x 2 1/2"

- 42 1/2"x 16 3/4"

- 24 1/16"x 16 3/4" 

We started by connecting the two sides to the back board.  We used some wood glue between the two pieces and then used 2" finish nails in a nail gun. 

How to build a mudroom bench DIY tutorial

We attached a small board to the front of the left hand board.  Then we attached the cross support.  We nailed the right side of the cross support.  On the left side we used a pocket hole jig (like we used for our

West Elm Headboard Copy

).  The jig was needed because there was nothing to nail into on the left side.

How to build a mudroom bench DIY tutorial

Moving on to the right side of the bench.  We built the right side the same way as we did the left side except the upper cross support needed pocket holes on both sides to attach to the side supports as there was nothing to nail it into.  Then we took the 14 3/4" x 2 1/2" piece and placed it in the top left side and nailed it in make sure the top had something to attach to. 

How to build a mudroom bench DIY tutorial

Next, we put the two sides together, making sure they were square (or whatever angle the corner is you are placing the bench into), then we nailed them together through the upper supports in both directions. 

How to build a mudroom bench DIY tutorial

Then we placed each top piece onto the bottoms and nailed down into the bottoms (after gluing, of course). 

How to build a mudroom bench DIY tutorial

We used a hand sander to smooth out the pieces that were placed together to ensure that were flush. We filled in all the nail holes and any gaps with wood filler.  We then sanded and repeated until the bench was smooth.  We then painted and placed the bench in the mudroom.

How to build a mudroom bench DIY tutorial

Now I can finally go watch Big Brother.  And Michelle wears 90’s soccer sandals too.  Don’t let her fool you.

***

Build a Mudroom Bench.jpg


Everyone thank Nate for writing that tutorial so willingly!!  Anyone have any questions?

Now for fun stuff, who’s watching HGTV Design Star.  I’m just getting caught up.  Who’s your favorite? 

Who’s watching Big Brother?  Who thinks this season is awful because they brought Rachel back?

Help the Indecisive

I’m nothing if not indecisive.  And I love a good survey.   And I’m tired of writing how-to posts.

How about you take a survey and help me make a decision that I keep wavering on? Ok!

What color should I paint the inside of the entry door to our garage (Not the bi-fold doors.  We’ll tackle those another day..unless you have an easy fix for us!)…

Black? Red? Yellow? Keep it white?

805111936pn
805111913pn

For those who have trouble visualizing things (Try not to be jealous of my Photoshop Skills. I only pretend to be a fancy blogger)…

805111936black
805111936red
805111936yellow

Note: These are not the exact colors I would use.  They are just the first that I clicked in Photoshop..again, I’m a fancy blogger.

What do think?


Feel free to leave a comment with why you picked the color that you did! Comments help make my work day more enjoyable.  Mommas, don't let your babies grow up to be pharmacists....

Board and Batten

I love moldings.  You know,  Craftsman style/old home goodness type moldings.  Our house has a bead board island and a few rooms with crown molding and that’s about as far as we get in the molding department.

When we were designing our house neither of us wanted a stand builder grade construction home.  What did we have the budget for?  A slight step above a standard builder grade construction home.  Moldings cost money.  Pharmacy school loans trump moldings.  Sad but true.  As my pharmacy school loans decrease, moldings in our house increase.  Is this enough math for you?  I thought so.  How about some a pretty pictures?

As I was wasting precious time on the ol’ Pinterest, I ran across this beauty…

How to Install Board and Batten DIY Tutorial

And that’s when I became obsessed with the idea of tall board and batten.  And then I did what any good wife would do, I put Nate to work to help me create this….

How to Install Board and Batten DIY Tutorial

(We really need to retake these photos.  They are quite distorted. I fired my photographer.  I will re-hire him if he makes me breakfast in bed….And doesn’t Ike look all sophisticated after his bath? He at least smells better.  Focus.)

How We Installed Board and Batten

(with a lack of pictures because I fired my photographer)

Step 1: Purchase Supplies

  • Liquid Nails
  • 1 x 4’s (for base and top molding)
    • We used primed MDF because we are lazy and don’t like to prime and the boards are straighter and more consistent.
    • 1 x 2’s (to go in between top and base molding)

Step 2: 

Remove everything from the room…luckily for us this only included a couple of dog dishes and some base molding (because it didn’t match the new board and batten)…

How to Install Board and Batten DIY Tutorial

Step 3:  Install new base molding (1x4’s)

Cut the boards to length. Dry fit. Add Liquid Nails (keeping away from edges to prevent oozing) and adhere to the wall.  This part is scary.  Nate kept telling me OVER and OVER, “You had better like this because this stuff isn’t coming down.”  He acts like I change my mind a lot…

Step 4:  Install 1x2’s

Cut 1x2s to desired length.  We decided to space them every 6 inches.  We marked the wall on the bottom and the top with a pencil every 6 inches (taking into account the width of the 1x2’s).  This helped us line the boards up vertically when installing them.  Nate applied the Liquid Nails (while wearing his 90’s soccer sandals and rocking a Justin Bieber hair cut) and adhered the board to the wall. 

How to Install Board and Batten DIY Tutorial

We then used painter’s tape to hold the boards into place.  Repeat across room.  I don’t know if you need to do this but it made us feel better.

How to Install Board and Batten DIY Tutorial

Ike is also rocking a furry ‘do. 

Step 5: Install top molding

This is where you cross your fingers that all of your 1x2 cuts are correctly.   Cut the top molding to width, add Liquid Nails, and adhere to wall.

How to Install Board and Batten DIY Tutorial

Step 6: Use caulk to fill in any gaps in the boards

Do this between the boards and also between the wall and the wood.

Step 7: Paint away. 

Painting is the worst part of the project.  Although caulking was a close second.

Step 8: Enjoy!

How to Install Board and Batten DIY Tutorial
How to Install Board and Batten.  Great tips!

And now some frequently asked questions: 

(by important people, like our moms…)

How long did this project take?

  • Installing board and batten:  1 to 1 1/2 hours
  • Caulking: 1/2 hour
  • Painting: 3  hours. Bleh. (Thanks Olympic, kindly send me one gallon your Olympic One to make up for your sad paint.  I’d like to become a fan.)

How did you decide how high to make the board and batten?

We’re not much on following rules.  We took my pretty Pinterest photo and guestimated the height in our mudroom.  I had originally planned on much lower molding but we are happy with the final result.

Why did you space the boards every six inches?

We just eye balled it.  Six inches looked good to both of us.  No magic math formula here.

Anyone else tackled any molding projects?  Or are you a lucky one that owns a pre-molded home?  Why is Pinterest such a magical place?

***Check out more more projects on our DIY page!

Photobucket Photobucket Photobucket PhotobucketPhotobucketPhotobucketfollow us in feedly