Favorite Project- A Little Paint

Today’s guest is Gloria from A Little Paint.  I started reading Gloria’s blog after she had commented here.  (A wise person once said that good things come to those who comment. (P.S. I’m the wise person.)) 

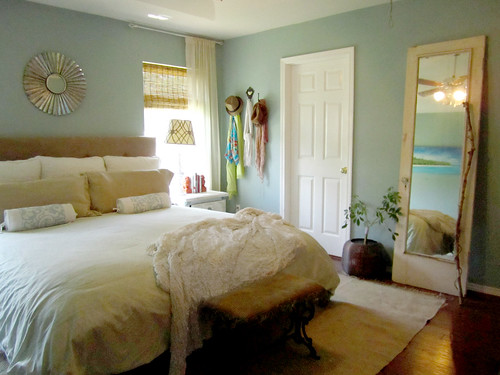
The original post I read on A Little Paint was about the ombre dresser she is going to share with you today.  But I was really impressed when I clicked on her house tour tab.  Look at this bedroom…darling…

IMG_0729

***

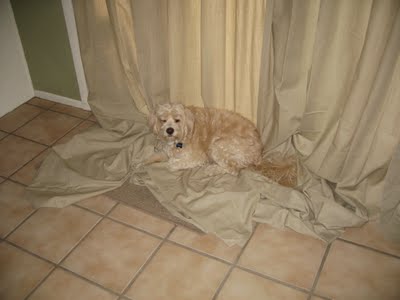
Hi! I'm Gloria from A Little Paint. I'm just getting into the swing of blogging and updating my house in Oklahoma. I am so honored to guest post here, because Michelle's house is amazing and I absolutely love her blog... and her dog. When she told me the theme was "Favorite Projects" I thought I couldn't be more perfect, I have at least a thousand. Yes, I'm one of those annoying people who is like Oh my gosh this is my favorite dessert, Oh THIS is my favorite, oh yeah definitely this cake is my favorite. So sometimes it's hard to pick one, but here goes my favorite project at the moment. It's my ombre armoire.

5567531691_a2bb2012a7_z

I bought this big guy on craigslist with no real purpose for it other than it was A) interesting B) cheap and C) something to do. This was somewhat of a whirlwind project for me. I have a tendency to buy furniture and let it sit around for weeks, months, even years agonizing, er waiting, on the perfect inspiration for it. Not this guy, I bought, painted and conquered all in a few short days.

2

It was a big brown box and needed some work. I sanded it down, and added some bun feet that I had laying around from a previously failed project. In my opinion, this is what truly changed the look and feel of this. It went from looking like a standing double coffin with mirrors to a much prettier piece of furniture that deserves to be appreciated.

3

The inspiration slapped me in the face as I was walking by it in the garage the day after I bought it. I wasn't even thinking or looking at it when it hit me. It was like a vision, a walking daydream and I knew right then and there that all of those pretty drawers needed to be ombre'd. I tried to set up a system since I didn't have a dark color that I could just add more white to. I went the wayyy difficult route of mixing each individual color. Sorry, this doesn't help much in the way of tutorial except for what NOT to do. I'm a go with the flow kind of person who does a lot of custom color mixing and just "eyeballing it".

4

Now that I've skipped the most interesting step of this project here are the drawer painted, and sexy legs on. I want to grab a pillow and blanket and sleep inside because I love it so much.

5

I kept the original hardware cause I love me some turquoise and brass. Plus hardware can be crazy expensive. Okay, so maybe that's my real reason, but I do like those handles.

Here are those pretty new feet I added for extra height. Now it doesn't have as much visual weight as it did before. Me likey. I bought these at Home Depot. They have a decent selection if you're impatient and don't want to order something off of the internet.

Here it happily sits in my studio. I get crazy amounts of storage out of it. There's tons of fabric, blank canvases, paint, spray paint, water colors, sketchbooks, paper. Basically, it's an artroom in a box and I couldn't be more pleased with it.

Originally, I planned to make it over and sell it. Now I could never do that. I mean, it's love and how do you sell love? I find myself walking into this room constantly just to see it again and admire it. That's how your home should make you feel. It doesn't matter if no one else likes this project as much as I do, it's part of my home and a perfect reflection of me!

***

Well put, Gloria!  I’m a big believer is surrounding yourself with things you love in your home. But I think she should sell the ombre dresser.  To me….

Be sure to stop by A Little Paint and check out Gloria’s charming house updates!

Favorite Project- A Kitchen Table for Two

Today's guest blogger is April from A Kitchen Table for Two.  I started reading April's blog after she was the lucky winner of our PetSmart giftcard giveaway.  April's dog, Teddy, is an excellent DIY helper..."Nah Mom, the curtains are the perfect length. No hemming needed."


Not only is her dog cute but April is also working on some fun DIY projects..on a budget of course!  April is now going to share with your her favorite project. 

***

Hello, Decor and the Dog readers!  I was so thrilled when Michelle asked me to guest post for her - don't you just love her blog?  I'm so thankful for my "blog-land" friends, and Michelle is definitely a kindred spirit... a professional with a love for DIY projects who loves her dog like most people love their kids (isn't Ike the cutest?!).  So, when she asked me to pop over and share a little somethin' with all of you, I jumped at the chance!

It's hard for me to choose a favorite project from our 1970's ranch home; we've done so much to it in the two years we've been living here!  We've removed the popcorn ceilings, done a few custom paint jobs, re-upholstered furniture, etc...  But the project with the most bang for our buck and the most incredible results has to be our kitchen overhaul, and the story starts a little like this...

My husband and I purchased out home in an older neighborhood that is close to downtown Tempe (a suburb of Phoenix, AZ)...


We loved the idea of living within a mile of our Alma Mater, ASU (GO DEVILS!), and having the home eventually become a rental property for college students.  This, of course, means no crazy-expensive remodeling projects, since college renters are characteristically party animals not the most careful.  So, when our nice little ranch home came with a kitchen that looked outdated (to say the least), we knew we needed to figure out an interim solution.  Hauling out the cabinetry and replacing it would cost over $10,000 (be still, my heart!!), and wasn't an option.  But paint - now THAT was something I could do. 

True Life Confession.... I have NO real "before" picture.  This is because I jumped into the project so fast, I didn't even think about it.  That is just a small taste of how crazy I truly am.  In my head, it went something like this... "Remodel my kitchen with a budget of $300? Sure, this will be easy and wonderful!! I'll start right now!  This very second!  To hell with pictures, I need a paintbrush, STAT!!" 

What I do have a is a picture of the beginning of the process.  This is after I removed the oak cabinet doors, taped everything off, and began sanding (and an gnome came in and deposited a bunch of crap on my counters because my kitchen would never look that dirty in real life *wink*)


Forgive the camera phone picture.  But it's truly frightening, no?  And doesn't fluorescent lighting just make everything look attractive?  Thanks, guy who invented it - all of our bleached out faces and tired, squinty eyes are forever in your debt.  

After a coat of primer, we were starting to look a bit more like a real kitchen...


Yes, I did leave everything inside my cabinet boxes.  And you should know that I declined to paint the inside of the cabinet boxes for one reason: I am lazy.  There's really no other excuse.  If you're going to judge me by the inside of my cabinet boxes, I guess you'd probably find out how ridiculous I can be anyway, so go right ahead.

I chose to do all of it by hand - sanding (DEATH!  Next time I WILL rent a hand sander!), priming, painting (used Purdy brushes and a foam roller), and replacing all of the hardware (we went with the Amerock line from Lowe's).  Although I guess you're not technically "replacing" hardware if there was nothing there to begin with.  After 2 weeks (procrastination and I became BFFs), 2 coats of primer, 2 coats of Behr paint in semi-gloss, and only $322, we had this...


Hallelujah!  Cue angels singing!  It turned out better than I could have EVER hoped.  Especially since it was my first real painting project.  All of my friends and most of my family Some people may call me crazy for attempting such a big project as my first, but I knew my crazed perfectionism (for everything but the insides of my cabinet boxes) would carry me through to the end.  Here's a few detail shots for ya...


My pantry doors are getting painted with chalkboard paint soon!

 
And a new stainless steel dishwasher is going to be my birthday present (4.5 months and counting!).


I LOVE how the farmhouse-pulls we chose look against the white cabinets and the (faux) butcher-block counters.


Doing the dishes has never been more pleasant!

Here's the final before and after presentation...


Thanks for letting me share my kitchen, Michelle!  It was quite the project, but we're very happy with the results!

***
What's not to love about an inexpensive kitchen make-over?? Paint is a beatiful thing.  And a dishwasher as a birthday gift?  Bet she would have never predicted that would be on the ol' birthday list a few years back!  Be sure to head over to A Kitchen Table for Two and see what April (and Ted) are up to!

Favorite Project- The Flipping Couple

Today's guest is Cindy from The Flipping Couple.  Cindy and her husband are fixing up a lovely home up in Minnie-sOta (that's how I like to say it).  An alternate title to this week on the blog could have been "Young Professionals That Are Obsessed with Their Furry Children and Making Their Homes Pretty on a Budget"....but "My Favorite Project" works too. 

***

Hi! This is Cindy from The Flipping Couple, which I write with my handsome hubs, Nick. When Michelle asked if we would be willing to write a guest post we were absolutely thrilled to do it! I've been drooling over her kitchen ever since I found her in the blogosphere and am completely impressed with her knack for decorating. 


Michelle asked us to write about a favorite project. Well, narrowing down a favorite project is tricky, but Nick and I agreed that painting the exterior of the house is definitely one of our favorites to date. 


See, our house was pretty ugly when we bought it. Curb appeal was definitely lacking. Or nonexistent. In fact, when giving people directions to our house I would refer to it as “the ugly little white house.” Endearing, right?


Last summer we pulled out the paintbrushes and decided to work a little magic on the exterior of the house. Picking paint colors actually didn’t prove to be as tricky as we thought it would be. Maybe because we had so much room for improvement.


We used Hirschfield’s Platinum Exterior paint. It came highly recommended by a friend who has had the stuff on his house for about 20 years and it still looks fantastic! The only downside of the paint was the price tag, but we’re hoping it’ll last us a good 20 years for us, too. Or at least until we move out of the house. Because while painting the exterior might be one of our favorite projects, it's not exactly one we want to repeat anytime soon!


I had no idea how much prep works goes into this kind of painting project. Turns out you have to clean the entire exterior of your house first. We used a power washer very carefully. Our house is stucco, and we've heard horror stories about water coming into the house and ruining the walls if you use too much pressure with a power washer. Since re-doing every wall in the house wasn't at the top of our priority list we tried to avoid that at all costs.


One preventative step was to caulk all the cracks in the stucco. Fortunately, we have very few, but there are several doors and windows that were filled in at some point in the past. The cracks around the border are pretty obvious, so we used caulk to fill those babies in.


Then came hours and hours of scraping and sanding, trying to get every surface as paint-ready as possible. And then. FINALLY, it was time to paint!


We used a sprayer for both of the main house colors. This was an absolute lifesaver. Had we painted by hand we would probably still be painting (now. a year later) and there's no possible way it would make it onto our "favorite project" list. Our stucco is very textured which makes it hard to get into all the cracks and crevices with a brush or roller. If you do paint stucco/brick by hand we recommend finding the thickest nap roller you can. It'll help a lot!


But really, we just recommend using a sprayer. So much easier. Especially handy if your friend's dad owns one and let's you borrow it for weeks on end. I had never seen one of these before, much less used one. Fortunately, it's pretty easy. You just set the suction hose into the bucket of paint and you're off and running. It does take quite a while to clean out, and you have to clean it promptly so dried paint doesn't wreak havoc on the machine. We quickly learned to factor clean-up time into our painting days.


We opted to go for a three-tone look. We used a dark base on the brick, a really warm caramely neutral for the stucco, and then added a pop of color for the trim.


About halfway through said trim I was thinking we should have left it white. Thanks to the sprayer we flew through the brick and stucco but the trim was painstakingly slow. By the time we were done we agreed it was definitely worth it in the end.


And in the end? A not-so-ugly, no-longer-white house.


Here's a little before and after action to save you the trouble of scrolling up and down (am I the only one too lazy to do that??)


We still have some projects to tackle to amp up the overall curb appeal (new door, new light, landscaping that grows) but we love what a coat of paint did for our house!

***
Now Cindy and Nick can tell people....look for the really pretty house that we painted ourselves!  Be sure to stop by The Flipping Couple to see what Cindy and Nick are destroying with a sledge hammer...it's pretty cool. Trust me.

Favorite Project- The Lil House That Could

Today’s “My Favorite Project” post is written by Rebecca over at The Lil House That Could

Lil, huh?

I enjoy Rebecca’s blog because her and her husband are also “fixing up” a new construction home. I use her as an example when Nate thinks I’m crazy for redoing something that we just installed less than 3 years ago.  Like carpeting on the stairs….let’s see if Rebecca can convince Nate that ripping up the carpet on our stairs would be a wonderfully fabulous decision….

***

Hey everyone! I'm Rebecca from The Lil House That Could. Though after finding Michelle's blog, I'm mad that I didn't name my blog The Casa and the Cats. Michelle is clearly more clever with blog naming :)

Anyway, I, like Michelle, have a new construction home. However, my husband and I bought with a major builder in a new development, so our experiences were a little different. Like the ridiculous costs of upgraded materials and the limited choices they had for standard materials. Case in point, the flooring options.

We added hardwood throughout most of our downstairs and decided we would carpet the entire upstairs. The problem was that the only "free" carpets the builder offered were gold, white, blue or pink. Seriously. We were on a very tight budget with our wedding just around the corner and decided to suck it up and go with the gold. After we moved in and painted our walls a greige color, the gold irked us even more.

 hallway_before1

 staircase_before2

Throw in the fact that my cats were slowly shredding the carpet seams and we decided it was time to give the carpet the boot. We removed the carpet in just the hallway and our master, since we don't really use our spare bedrooms and we could do those in stages. A contractor friend of ours did the work and it was a fraction of what the builder would have charged us!

 hallway_progress3

We matched the hardwoods exactly to the ones the builder installed throughout our downstairs- Bruce wide plank oak floors in cherry. We decided that while we were at it, we'd match the baseboards to the thicker ones downstairs.

 new_baseboard4

After these changes, we felt like our upstairs hallway/entryway were missing something. One random Saturday we decided to install some chair railing. We had no clue what we were doing, but I think it worked out okay :)

 chair_rail_15

 chair_rail_26

 chair_rail_38

 chair_rail_49

Our plan is to match the wainscoting we have in our formal living room and dining rooms, which open to the entryway. We're working in slow stages with full time jobs and graduate school, so the walls have been primed and waiting for some paint for a couple of months. After that we'll add the picture frame portion of the molding.

 primed_110

 primed_211

 primed_312

Once all of our trim work is up, we would like to add gallery walls in the upstairs hallway, down the stairs and along the entryway walls. Here is my inspiration, from Sandra at Sawdust and Paper Scraps.

  SawdustPaperScraps_Stairway13

We've already begun collecting some frames to gear up. I cannot wait to get some frames on the wall! In fact, I can't wait so much that we recently started painting the trim we have so far with a semi-gloss paint.

 painting_walls14

Hopefully, our entryway/hallway makeover will be complete soon and summer will quit interrupting us. Though that's not really a bad thing, now is it? :)

Thanks so much for having me, Michelle!

***

Okay, so Nate isn’t completely on board yet but we’re getting closer….thanks, Rebecca! Be sure to head over to The Lil House That Could!

**Stop by The Mustard Ceiling and share your blog at the Mix and Mingle Party! Who doesn’t need more blogs to read/people to read your blog?**

Favorite Project- His and Hers

As I mentioned on Friday, this week I will be handing over the posting to some fabulous bloggers.  I asked these ladies to share with you their favorite project.  I'm sure you all know that my favorite project is our West Elm Window Headboard that beautifies our bedroom and gives our blog so much love.  I was curious what other bloggers would choose as their favorite project.

Today I am happy to introduce you to Erin from His and Hers.  I honestly don't remember how I started reading Erin's blog but I stick around because her and her husband are tackling some unique DIY projects..and Erin cracks me up.  You can't help but like a girl that makes a pillow to celebrate her husband's profession..as a pharmacist...


***
Hey everyone! I'm thrilled to be guest posting on Decor and the Dog today. Thanks, Michelle, for asking me! :)

My husband and I bought our first home in February, therefore entering into a never-ending series of projects, projects and more projects. And I love it! (Rick does, too, especially when I feed him doughnuts before sweetly asking him if he thinks the drippy plaster finish can be scraped off of the ceiling.)

Michelle asked me to share a favorite project, but I couldn't decide, and nobody was feeding me doughnuts at the time as a source of persuasion, so I narrowed it down to a few and have prepared a lengthy dissertation on why they are my favorites, complete with references and proper citation. Are you ready?

1. Revamped bathroom light fixtures--courtesy of applesauce jars. This is actually our most recent DIY project, and was inspired by a trip to my neighbors' recycling bin. I used to do that a lot, and my husband used to pretend he didn't know me a lot. Waiting for Rick to put on a disguise before we could go for a walk got old, so I've since moved on to bigger and better hobbies like crocheting socks, interpretive dance, and doing U-turns on my way to work to pick pretty bottles out of non-neighbors' recycling.


2. Our DIY storage ottoman--which we built and upholstered ourselves for less than $50. It's a great place for storing things, like your neighbors' recycling and the crocheted socks that you gave your husband and he pretended to lose.


3. Lastly, I want to be sentimental and share the framed lyrics I made for Rick for our recent 3 year anniversary. He puts up with a lot as a result of my project-driven mindset, and it was only right that I make something nice for him. I made three different frames with different lyrics in them, but the one below hails from "True Love's Kiss" of the movie Enchanted, which I practically have memorized. (Yes, I am that 25 year-old. Disney rocks my crocheted socks.) Rick loves it when I break into song in the middle of the yard. I say it gives the neighbors one more reason to not find it odd at all when they spy my feet sticking out of their recycling bins.


So there you have it. Some of our favorite projects. But oops--I forgot about those references and proper citations. If you're feeling jilted, I'll gladly send you my last graduate research paper. Not only is it super thrilling, but it also can be used as a fabulous weapon against intruders and as a stylish door stop. Who knew getting your Masters degree could hold so much benefit for the home?

P.S. I don't actually crochet socks.

***
Be sure to stop by His and Hers to check out all of Erin's creative projects!


Stroll Down Memory Lane-Brick

It’s time to take another stroll down memory lane and check out where we were on our house building process 3 years ago…

3 Years Ago This Week:  We installed the brick on the front of the house…


We chose Alliance brick in Pearl.  The brick is a mortar-less brick system.  We’re working on a post about why we chose this brick/how we installed it to share with you soon!  (Long story: coming soon. Short story: We wanted to install the brick ourselves but we aren’t experienced brick layers so we opted for the mortar-less system.)  Today, you get pictures…


I don’t remember for sure what is going on in the picture above but it probably has to do with Nate’s dad explaining to me that I needed to carry a large pile of bricks from one side of the yard to the other.  It was an evil game Nate and his dad would play with me.  I’m still not sure the bricks actually needed to be moved…notice how I appear to be paying close attention…


There you have it.  The week our house got mortar-less brick.
 
Who’s going to lose sleep this week-end waiting for the brick post??? Try to hang in there.  It’s going to be at least a week because next week I am inviting some awesome bloggers over to share their favorite projects with you!! Get excited!


French Toast and Berry Butter

I have a new obsession.  It’s called The Pioneer Woman.  I just recently discovered her site.  Yes, I have been living in a cave…or Iowa.  We’re a little behind on cool stuff here…

One of the first posts I read was a recipe for berry butter…

image

It looked delicious.  I knew I had Nate had to make this for us.  Actually, I made the butter.  Nate made the French toast.  We are a dynamic kitchen duo (that’s for my brother…he hates when I write cheesy crap).

We followed the recipe exactly.  And it was delicious.  And pretty.  You could totally trick people into thinking you slaved away on a beautiful breakfast with this recipe…and it’s easy.  I mean, I made the pretty butter.  I almost didn’t post this so my secret wouldn’t be out…

Nate usually makes French toast with the whole egg but he just used the yolk (as suggested) and now we won’t go back.  No crusty, eggy tasting French toast for us.  Bring on the cholesterol. 

Lost Grove Lake 100

Although our final product isn’t quite as pretty as Pioneer Woman’s, it was still quite tasty…

Lost Grove Lake 105

She suggested adding powdered sugar and we might try that next time…only because we like our sugar.  Sugar. Sugar. Sugar.

What’s your favorite French toast topping?  I am usually a strictly peanut butter and syrup girl but this recipe is giving my peanut butter a run for it’s money!

And on a totally unrelated note…who’s watching Big Brother?  Do you like when they bring previous contestants back?  I’m not a fan but I’ll keep watching…

Anddddddd my blog buddy, Mindy, over at Finding Silver Linings has just opened an Etsy site full of cute brooches and headbands….and she is having a giveaway….enter here!!

Decapitating St. Joseph

Who wants to hear a funny story that summarizes how awesome I am?

Remember our first house

We wanted to sell it so we didn’t have to pay for it and our new house…even though two mortgages did sound really fun…

This lovely home was on the market for 2 or 3 months with no lookers.  I was stressing out…because that’s what I do best. I then heard about a centuries-old tradition claiming that burying a statue of St. Joseph in the yard helps homes sell faster.  Bury a statue and sell your home.  Sounds like it will totally work.  I’m in.  What could go wrong?

I set off to the nearest Christian store to look for my statue.  $12 and he was mine.

I get home and excitedly open the package…bring on the closing!  I then accidently drop St. Joseph onto the counter.  His head breaks off….and rolls under the stove…seriously.  I wish I was making this up.

I start crying hysterically.  I call Nate and freak him out.  I’m so hysterical that he thinks I was in a car wreck or Ike ran away.  Nope, I just ruined the sale of our home…forever….and St. Joseph’s head is still under the stove. This can’t be good.

Nate gets home. He retrieves St. Joseph’s head and suggests that I superglue it back on…(I was also really good with a camera back in the day…)

Good as new right? I buried him according to the “directions”. Our home didn’t sell for another 7 months. 

I meant to dig him back up before we moved…but I forgot.  I wonder how freaked out the new owners will be to find a saint with a super glued head wrapped in sock.

Does burying St. Joseph help you sell your house?  Well, ours sold…but not quickly (but how quick is quick in the housing market?).  Maybe we should add some clause for extra months of ownership for mishandling the saint?

What crazy things have you done to sell a home?

Kitchen Similarities

You learn a lot about your personal tastes when you build two houses.  You learn what you like and what you don’t like.  I think this is best demonstrated in our kitchens.

Meet our old kitchen….

Kind of looks like our current kitchen’s…less attractive step-sister??

007

As you can tell, we used a lot of the same elements in our current kitchen that we used in our first kitchen….white cabinets, stainless steel appliances, kitchen island, green wall color, and wood floors.  We liked most of the features of our first kitchen so we used it as inspiration in our second.

Some people might call using the same elements “boring.”  We call it “doing what works” with a little upgrading.

We did upgrade to granite countertops (versus laminate), toned down the wall color, and added more cabinets.  Our current cabinets have crown molding to fancy them up.  The bar height island allows for additional seating.  The floors are a darker cherry versus the honey oak.

Do you think just “upgrading” a kitchen is boring or are you a fan of doing what works?  Do you have any “clones” from a first house to second?

Why We Built

Every Friday I have been sharing with you our house building process that occurred 3 years ago (check out the progress here).  I have had some people ask why we built…and here’s your answer.  It’s lengthy.  I apologize.  Our scenario is definitely different than most who build a house.

Why we built our current house begins with why we built our first house.  Meet house #1…

We built house number one because we had a small budget with a limited number of options due to location (we wanted to build somewhere between Iowa City (so I could finish pharmacy school) and the Quad Cities (where Nate was working)).  Our options were less than desirable. The houses that were available were at the top of our price range and needed a lot of work.  We were okay with doing the work.  We just wouldn’t have had to money to do so.  We also knew that we needed something that would hopefully sell easily in around 2 years once I graduated from pharmacy school.  Renting would have been an option but we wanted the added equity in owning something.

Nate’s dad suggested that maybe we should look into building a house.  We both thought he was crazy. There is no way we could afford to do that.  We couldn’t even afford a house with a working bathroom or electrical system.  After doing a lot of calculations we decided it was something we could pull off using Nate’s young 20-something body and his dad’s previous house building experience.  (Interesting fact: growing up Nate always lived in new houses.  Two of which were built by his dad.)

Luckily we built in a county that allowed Nate and his dad to all of the work on the house without the use of a contractors or professionals (plumbers, electricians).  They did all of the work on house #1 except for the foundation walls, the roof, the drywall, and the heating/cooling. That means Nate and his dad (with the help of various other family members) poured the basement floor, framed the house, did all of the plumbing and electrical, cabinet installation, floor installation, etc.  Nate’s mom and I painted, kept the boys fed/hydrated, and carried boards from one end of the lot to the other (girl jobs suck).  All of this hard work allowed us to stay within our goal budget and have a new home.

 Why did we build house #2?

After house #1 we swore we would never build again.  Ever. Done. House building was stupid.

Nearing the end of pharmacy school, we started searching for houses in the Quad Cities.  We again ran into the problem where the houses we liked/could afford would need more work that we would be able to pay for…and, weirdly, I think we were both itching to build another house.

2008 was the last year you could build a house in Iowa without the use of a contractor.  Contractor = lots of $$$.  We banked on the sale of our first house, purchased a lot, and got to work building house #2…

009

House #2 is obviously larger than house number #1 which means we weren’t able to frame the house ourselves but we still did a lot of the work (which you can read about here).

The profit we made from the sale of house #1 left us with the down payment for house #2.  By doing a lot of the building work on these two homes, we now own a home that is valued at ~$140,000 more than our mortgage payment.

This post kind of makes building a house sound all super and wonderful.  The finished product is.  Getting there…not so much.  Picking out floor plans, light fixtures, and paint colors is fun.  So fun.  Some people thinking picking out every detail in a new home is super stressful.  We LOVED those decisions. Spending every free moment covered in saw dust and plumbing goo..not so much fun.  Nate and his dad have spent over a year of their lives on these houses. When building our current house we would all go to work from 8-5, eat supper, and then head over and work on the house until about 10.  Every night for about 4-5 months.  Plus all day on the week-end…every week-end.  Nate’s dad enjoys it.  Nate and I are still deciding.

There you have it.  The reason we built our house.  Will be build another one?  We won’t say never (we’ve done that once) but we are both very content with our house and would love to stay in it for many, many more years!

Any specific building related questions you have for us?