How to Make a Chair Pretty Again

If you’ve been wondering how I did this....


….you are in luck today!
(That’s my nod to St. Patrick’s day….weak…).

On a side note….Nate refuses to wear green today.  Mainly because he knows it irritates me.  We go through this every St. Patrick's day...husbands.


Maybe I’ll change the font to green to honor the occasion….

Here we go with the chair make-over....

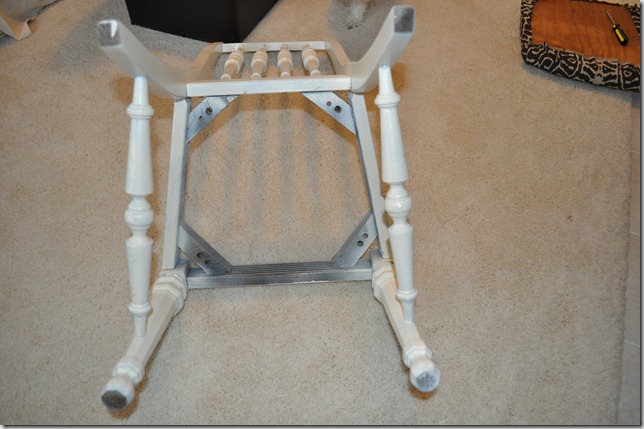
Step 1: Flip the chair over and unscrew the seat cushion…I forgot to take a picture of this during the before….baby blog steps…
March2011 021

You now have 2 pieces..the chair and cushion…
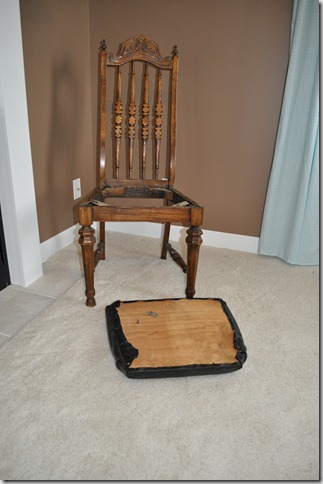
March2011 001

Step 2: Remove the lovely fabric from cushion.  This involves removing/loosening 100 staples or tiny upholstery nails.

I usually don’t bring these nasty chairs into my house until I’m done with them because I don’t know what is living in them…
but I was living on the edge with this one…I figured vinyl was safe….and I had an investigator checking for any problems...

March2011 013 - Copy

Step 3:  Use the nasty old fabric as a template for your new cover.  Cut fabric.

Step 4: Staple new fabric onto cushion.  Try not to staple the dog...
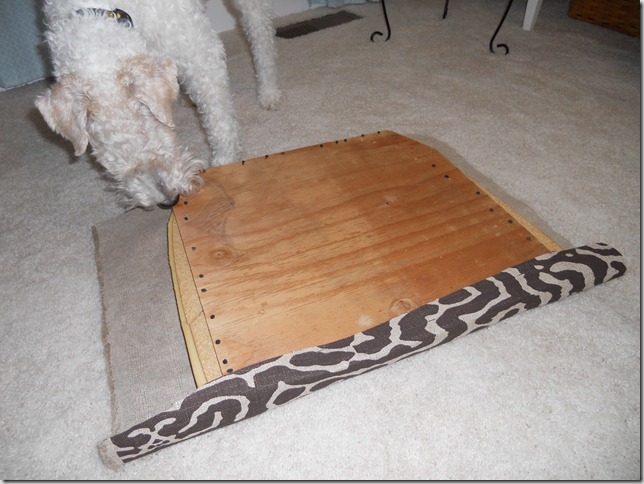
March2011 014

Step 5: Clean, sand, prime, and paint the chair. (Read more detailed instructions here.)

I spray painted this chair because it had a lot of nooks and crannies. This was the first furniture piece that I used spray paint on.

After sanding, I started with the first coat of Kilz primer. 
I'm not sure if I didn't sand enough or if I was too impatient with the primer but it ran...A LOT.  I let it dry, sanded down the drips, and started over.

I learned that it’s important to do a nice, thin, even coat…then check a few blogs, do some laundry, take a nap, and then do another nice, even coat…or two. 
Patience is a virtue...one that I do not possess.  So this was hard.

Spray painting is nice though because each step is quick.  I have the attention span of a gerbil so this project ended up being perfect for me. 

After the primer, I did 2 coats of spray paint and let the chair dry.
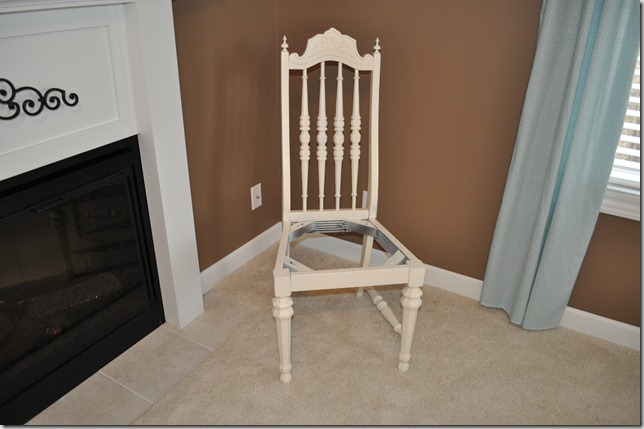

March2011 020

Step 6: Screw the cushion back onto the chair and you’re done. 

I told you it was easy. 

Any questions???

More importantly, do you have a significant other/family member/friend who is also a fun hater on this day of green?

Bench Cover

Nate's mom gave us this bench....

Unfortunately it didn't really go with the rest of our bedroom...


She really does have good taste.  I swear.

I debated on how to cover the bench.  It sat in my sewing room for several months.  I just couldn't decide what to do with it.

I thought about reupholstering it but then I came up with the idea for a cover.  I like easy. 
Covers are easy....if you don't end up in a battle with your sewing machine....stupid sewing machine.

I ordered this fabric from amazon.  Grey fabric is incredibly hard to find.

The bench is 53" wide, 18" tall, and 18" deep.

I cut three 54"x19" rectangles (top, front panel, back panel) and two 19"x19" squares (side pieces).


I then sewed the pieces together.  I'm not great at sewing so there will be not be a detailed "how to". I used what little common sense that I have to sew the pieces together.  I have no idea what my seam allowance was.  I was just trying to keep my line straight while still making the cover fit the bench. I just "Make it work!" (love Tim Gunn)


My sewing machine and I had a disagreement after I had finished sewing the sides together. 
I still needed to hem the bottom edges but just couldn't handle the fight...so it sat unhemmed in our bedroom for about a month...because I'm awesome.

I finally got around to waging war on my sewing machine hemming it this week-end and we now have a pretty bench cover...

A bench cover that fits in a little better....


What do you think?  Should I take the cover off and leave that beautiful floral pattern?
On an unrelated note, does anyone have a tailored bed skirt that they like? Do share!

How to Upholster a Headboard

 Remember this headboard from our master bedroom?

How to Upholster a Headboard

We decided it needed a face lift before making its' home in our guest bedroom.

Making this king upholstered headboard was a super easy project.

Neither of us was digging the curve so Nate sawed it off.  The sawing took about 5 minutes and left us with this...

How to Upholster a Headboard Tutorial DIY

(Please ignore our disaster of a storage room....now you're looking closer...stop....)

Since this was a re-upholster job, we just needed to staple on the fabric. 

If you are starting from scratch you will need a plain old piece of plywood cut to the appropriate size (our king size headboard was 49" x 80"). 

From there, staple some batting onto the plywood and you are caught up with us!

I then headed to the fabric store.  I think this was the longest part of the process because it's such a big decision....and I get lost in fabric stores.  Half of the time I forget why I'm even there....

Our headboard was 49" x 80" (fits a king size bed).  The fabric on the spool was 58" wide so I purchased 2.5 yards to make sure I had enough fabric to wrap on the sides.  The upholestery fabric was 50% off so my total was $23.00.

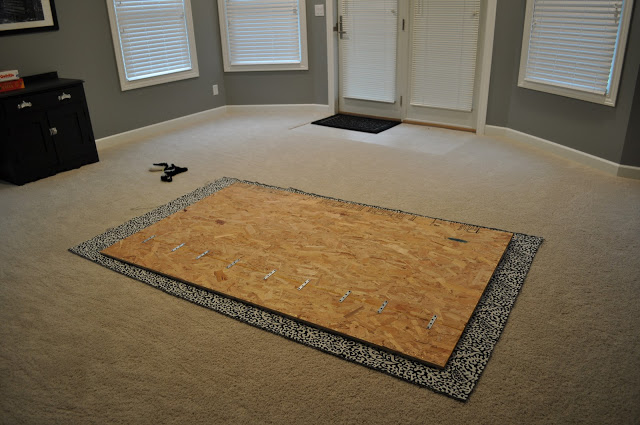
We placed the fabric on the floor and then layed the plywood on top.

How to Upholster a Headboard Tutorial DIY

We centered the fabric and then started stapling away.  Ike is a great supervisor.

How to Upholster a Headboard Tutorial DIY

We started in the center at the top of the headboard and then worked our way to the outsides.  The corners were the only slightly tricky part of this project.  We just had to make sure they were nice and tight.

How to Upholster a Headboard Tutorial DIY

We pulled, tightened, and stapled our way around the headboard (took about 10 minutes max) and ended with this....

How to Upholster a Headboard Tutorial DIY

And here it is living in our guest bedroom....

How to Upholster a Headboard Tutorial DIY

How to Upholster a Headboard Tutorial DIY

You can attach the plywood to the bed.  We're lazy and leaned it against the wall.  You can't tell either way. Seriously.


Have you been wanting to upholster a headboard? What's holding you back? It's easy.....trust me. See more room photos here!

Be sure to check out our other headboard projects here!

Make your own upholstered headboard

Under-the-Stairs Storage

This is what the area under our staircase in our basement storage room looked like.  GIANT disaster. Disgusting.


After Nate got frustrated when trying to locate a specific paint color, he got clever and figured out an inexpensive shelving system.

Here's what he used:
  • 6 shelving brackets
  • 8 foot piece of 1x12"
  • 1 hour of time

He hung the brackets (making sure they were level, of course).  He cut the 1x12" to the appropriate lengths and then set them on top of the brackets.  He then screwed the board to the bracket and Wah-Lah...


Inexpensive storage.  Not super pretty but it is now organized and more functional!  And that's all the really matters, right?

If only I wasn't such a messy painter....

DIY Window Headboard Tutorial {West Elm Inspired}

Here is our tutorial on how we built our West Elm Inspired window headboard (see post here for cost and time breakdown). 

Window Headboard, Twin, White

West Elm Window Headboard

Feel free to ask questions if we forget anything!

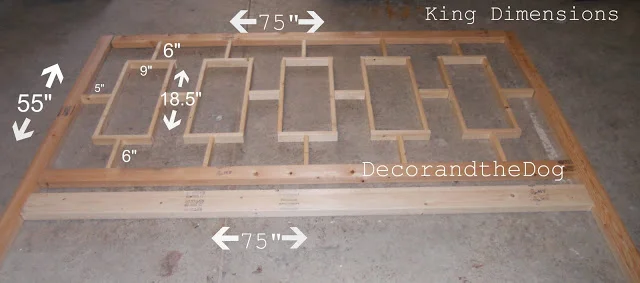
Here is the plan.  It is for a king sized bed. (Click  here for queen dimensions.) It is weak...some day I might be a fancy blogger...but until then...you get this...

How to build a headboard, DIY, West Elm Inspired, Tutorial

1. Buy your supplies.

*affiliate links

How to build a headboard, DIY, West Elm Inspired, Tutorial

2. Cut the lumber.  You will need:

  • Using 2x4: cut to 75" (horizontal support on very bottom)
  • Using 2x3:
    • cut 2 - 75" pieces (top and bottom horizontal of headboard)
    • cut 2 - 55" pieces (side pieces)
    • Using your 1x2s cut:
      • ten 9" pieces (horizontal part of "window")
      • ten 18.5" pieces (vertical part of "window")
        • (the picture shows 20" but this takes into account the other pieces)
        • ten 6" pieces (for top and bottom of "window")
        • six 5" pieces (in between windows)

3. Lay out lumber in shape of the headboard as a dry fit. Put the good sides of the lumber (the sides you want to show) face down. Mark the back sides so you know which side to drill the pocket hole into:

How to build a headboard, DIY, West Elm Inspired, Tutorial

4. Drill pocket holes using jig:

How to build a headboard, DIY, West Elm Inspired, Tutorial

5. Screw headboard together.  This is where math and a right angle are handy.  I, obviously, was not involved in this step.  I was doing useful things...like lamp shopping.

6. Sand. We used our Rockwell Sonicrafter Sander.

7. Prime.  We used FastPrime2.  It was in our basement. It works.  I applied it with a brush and a mini-roller.  It took FOREVER because there are A LOT of corners.  It won't look pretty after the prime...don't get discouraged.

(Also, this project would be better done in the spring/fall..instead of the dead of winter...so you don't have to paint in your mudroom...you live and you learn.)

How to build a headboard, DIY, West Elm Inspired, Tutorial

8. 2 coats of paint.  We used Olympic Zero VOC Premium white, semi-gloss.  This paint is great.  It doesn't smell, is good for the enviroment, covers well...and did I mention it doesn't smell.

9. Attach to your bed frame using bolts, nuts, and washers (we used some we dug up in our basement) that are long enough to go through the wood and attach to your bed frame.

10. Enjoy your inexpensive headboard!

Like this project?  Be sure to check out our building projects here.  Don't forget to check out our other DIY projects here!  Make the matching bedframe with this tutorial!

How to build a headboard, DIY, West Elm Inspired, Tutorial
Build Your Own Window Headboard.  West Elm Inspired.jpg
Photobucket Photobucket Photobucket Photobucket PhotobucketPhotobucketfollow us in feedly

West Elm Window Headboard Copy Cat

Our copy cat headboard is complete!

Here was our inspiration image...

Window Headboard
West Elm Window Headboard
And here is our much less expensive version (it's sad our new bedding isn't here yet but I couldn't wait to post the final product, so excuse the mattress pad photo. :P)....


Clicking "CHECKOUT" on the West Elm site would have been MUCH easier but our version was MUCH cheaper and more rewarding.

West Elm wanted $299.00 plus $60.00 shipping.

Our cost: $57.06 Here's the break down:
  • Lumber: $18.40
    • One 2x4x8'
    • Four 2x3x8'
    • Five 1x2x8' (we purchased 1 extra)
  • Paint: $10.97 (Olympic Zero VOC in white, semi-gloss)
  • Pocket hole screws: $3.98 (#100 1 1/4")
  • Pocket hole jig: $19.98
  • We already had/borrowed: the primer, miter saw, clamps, rollers, 90 degree angle, screw driver

How long did it take?  Long enough. :P

Cutting wood/laying out pattern: 1 hour
Drilling pocket holes: 1 hour
Screwing together: 1 hour
Sanding: 1/2 hour
Priming: 1 1/2 hours
2 coats of paint: 1 hour for each coat (I'm a slow painter and there were A LOT of corners.)

Plans and how-to to follow!!

Master Bath

Our master bath was an after thought.  Sad, but true. 

We love the floor plan but the finishes were given little thought.  The room was one of our last rooms to make decisions in and by that point we just really didn't care and picked whatever was the least expensive but still seemed ok. 

The mirrors were no exception.  Hello, contractor mirrors. Yuck. 

So we made a change!  We painted some trim black and stuck it to the mirror with some silicone based adhesive caulk. Easy! 

Let's take a look at how the bathroom started..(I SWORE we took "before" pictures but they are nowhere to be found)....

So here it is from long ago...


 And here it is today...


Nate's side is getting no love in this blog post....


Differences from the original picture:
  • The trim around the mirror.
  • Cabinet hardware which was originally nickle and then we spray painted black.
  • New faucets.  Maybe I'll post about this some other day...
And my favorite part of the bathroom....the claw foot tub that we had refinished...


The master bath is pretty much finished....oh wait, nothing is finished at our house! 

My mom recently asked me if I could just be happy and content with something in our house...
and the answer was and still is "no"..........maybe someday.....maybe...but what fun would that be......