
Board and Batten
/I love moldings. You know, Craftsman style/old home goodness type moldings. Our house has a bead board island and a few rooms with crown molding and that’s about as far as we get in the molding department.
When we were designing our house neither of us wanted a stand builder grade construction home. What did we have the budget for? A slight step above a standard builder grade construction home. Moldings cost money. Pharmacy school loans trump moldings. Sad but true. As my pharmacy school loans decrease, moldings in our house increase. Is this enough math for you? I thought so. How about some a pretty pictures?
As I was wasting precious time on the ol’ Pinterest, I ran across this beauty…

And that’s when I became obsessed with the idea of tall board and batten. And then I did what any good wife would do, I put Nate to work to help me create this….

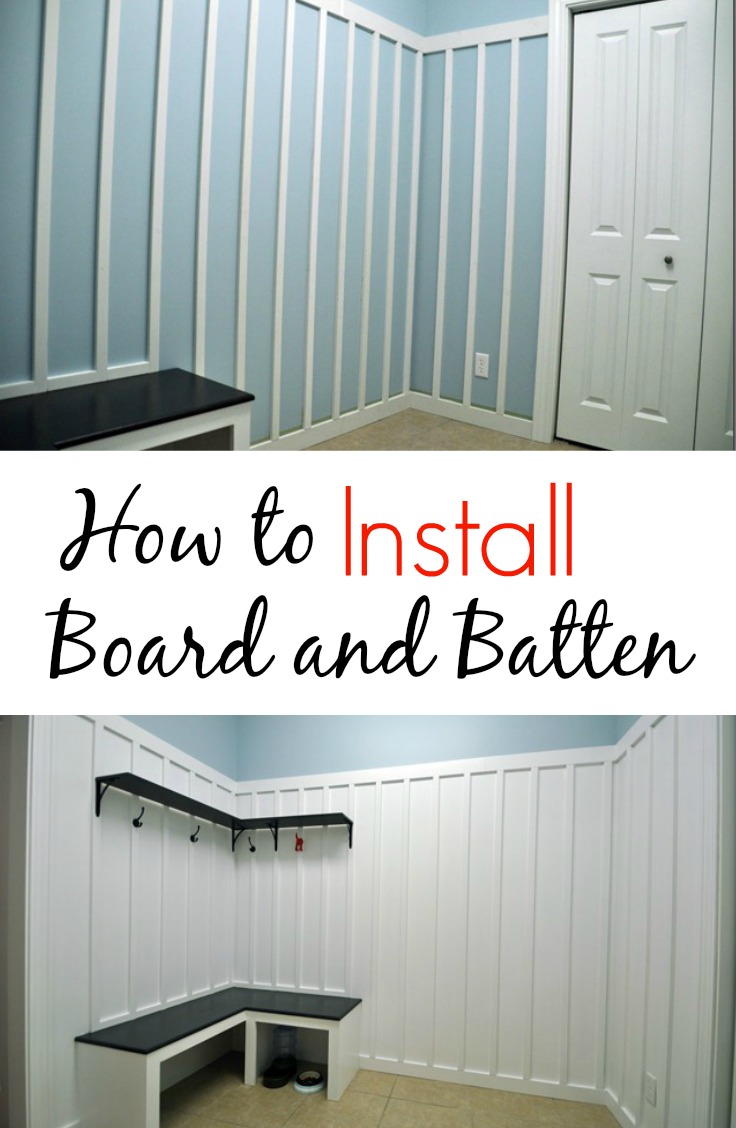
(We really need to retake these photos. They are quite distorted. I fired my photographer. I will re-hire him if he makes me breakfast in bed….And doesn’t Ike look all sophisticated after his bath? He at least smells better. Focus.)
How We Installed Board and Batten
(with a lack of pictures because I fired my photographer)
Step 1: Purchase Supplies
- Liquid Nails
- 1 x 4’s (for base and top molding)
- We used primed MDF because we are lazy and don’t like to prime and the boards are straighter and more consistent.
- 1 x 2’s (to go in between top and base molding)
Step 2:
Remove everything from the room…luckily for us this only included a couple of dog dishes and some base molding (because it didn’t match the new board and batten)…

Step 3: Install new base molding (1x4’s)
Cut the boards to length. Dry fit. Add Liquid Nails (keeping away from edges to prevent oozing) and adhere to the wall. This part is scary. Nate kept telling me OVER and OVER, “You had better like this because this stuff isn’t coming down.” He acts like I change my mind a lot…
Step 4: Install 1x2’s
Cut 1x2s to desired length. We decided to space them every 6 inches. We marked the wall on the bottom and the top with a pencil every 6 inches (taking into account the width of the 1x2’s). This helped us line the boards up vertically when installing them. Nate applied the Liquid Nails (while wearing his 90’s soccer sandals and rocking a Justin Bieber hair cut) and adhered the board to the wall.

We then used painter’s tape to hold the boards into place. Repeat across room. I don’t know if you need to do this but it made us feel better.


Ike is also rocking a furry ‘do.
Step 5: Install top molding
This is where you cross your fingers that all of your 1x2 cuts are correctly. Cut the top molding to width, add Liquid Nails, and adhere to wall.


Step 6: Use caulk to fill in any gaps in the boards
Do this between the boards and also between the wall and the wood.
Step 7: Paint away.
Painting is the worst part of the project. Although caulking was a close second.
Step 8: Enjoy!

And now some frequently asked questions:
(by important people, like our moms…)
How long did this project take?
- Installing board and batten: 1 to 1 1/2 hours
- Caulking: 1/2 hour
- Painting: 3 hours. Bleh. (Thanks Olympic, kindly send me one gallon your Olympic One to make up for your sad paint. I’d like to become a fan.)
How did you decide how high to make the board and batten?
We’re not much on following rules. We took my pretty Pinterest photo and guestimated the height in our mudroom. I had originally planned on much lower molding but we are happy with the final result.
Why did you space the boards every six inches?
We just eye balled it. Six inches looked good to both of us. No magic math formula here.
Anyone else tackled any molding projects? Or are you a lucky one that owns a pre-molded home? Why is Pinterest such a magical place?
***Check out more more projects on our DIY page!


