Then and Now-Kitchen and Dining Room

As most of you know, it’s hard to move quickly on house projects….they take time and money.

We have a set budget and keeping our budget is extremely important to us. 

We pick and choose projects each month based on what else is going on that month. 

For example, we don’t take on larger projects during months when we know we are going on vacation or need new clothes, etc.  When I go crazy and order a West Elm comforter, I can’t order West Elm curtains in the same month. 

It’s not that we don’t have the money, we just choose to be smart about our purchases.  There are things that we feel deserve the extra splurge (the comforter we sleep with every night) and there are things that we know we can spend less money on (a thrift store dresser that is more for looks). 

Due to our cheap frugal ways, decorating our house has been a fairly slow process.  It most definitely has not happened over night....just like Rome wasn't built in a day...all things take time...(I love cheesy sayings like that...)

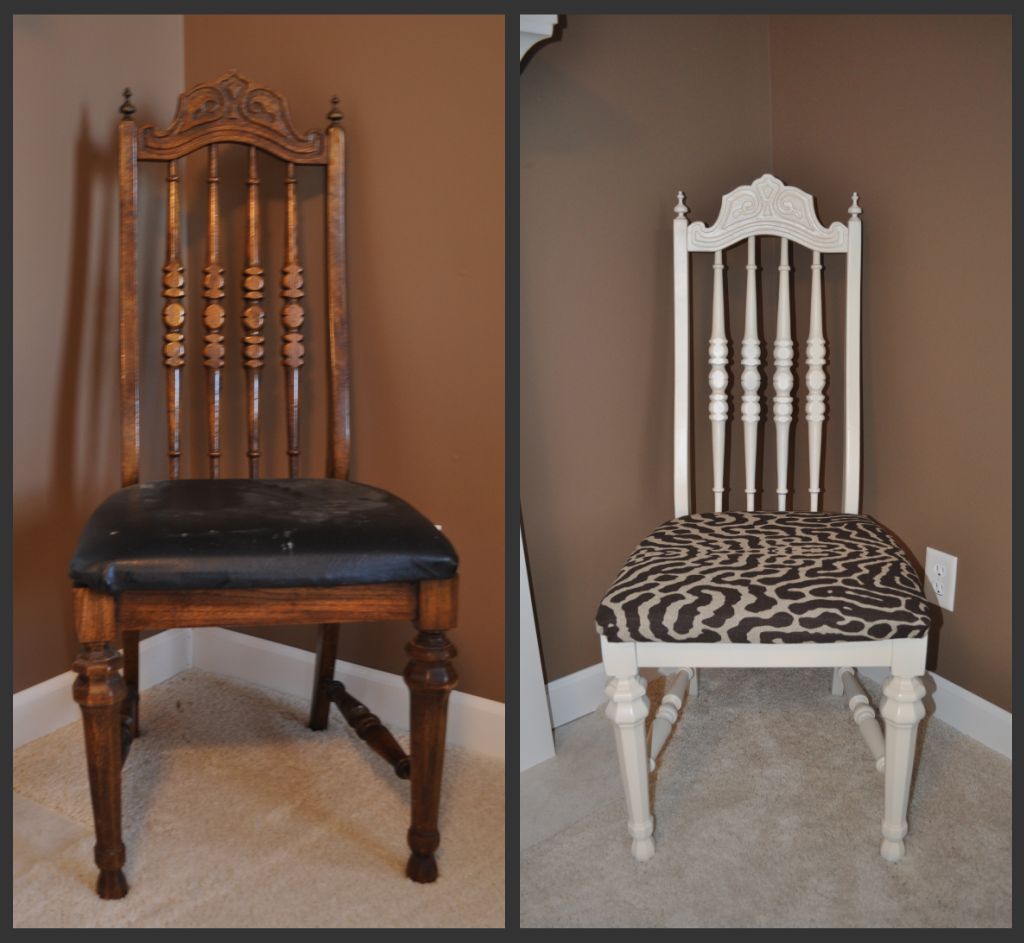
This week I will show you the various stages of our house.  I’d call it “Before and After” but none of our rooms are complete so I feel that “Then and Now” is more fitting.

I’ll recap some rooms for our new readers and show some new-to-the-blog progress photos later in the week.

kitchenthenandnow

In the kitchen we added crown molding to the cabinets, a temporary picture backsplash, and bead board on the island.  This room took us about a year and is probably the closest to done.  We do plan to add a backsplash…..if we can ever make a final decision on what material to use.

diningroomthenandnow

Our dining room sat empty for an entire year after we moved in.  It’s the first room you see as you enter our front door.  We told people it was our meditation room.  We decided to purchase a table and chair set (darn matchy-matchy old self) after a year of living in the house.  We hung curtains (Target bargains) a few months after that.  I found the hutch at the Salvation Army last June.  I am still looking for a few others items to place on the top of the hutch and have been pondering chair covers.  We are eventually going to add crown molding as well.

Tomorrow I’ll show you the progress of our master suite and guest bedroom.

Do you have a decorating budget?  Do you want to learn more about how we budget? (I won’t bore you otherwise…) 

Do you have a meditation room? :)

Blonde Going Grey

Remember this Blonde dresser

29th Birthday 051

It went grey…

March2011 024

Olympic’s Zero VOC Mountaintop and Silver Charm to be exact.  I really like the Zero VOC for painting furniture.  The paint doesn’t smell…which is nice when you are putting the dresser in a bedroom…or when you are painting with some kind of viral infection that has taken over your lungs...(On a side note, when a Lowe’s employee tries to tell you that Valspar paint is low VOC and doesn’t really have a smell….don’t believe her.  It’s one of the strongest smelling paints.  Lesson learned.)

It always takes me a little bit to get used to something new living in our house.  It always feels like a stranger has moved in with us…but it’s growing on me.  I am, however, not completely sold on the top drawer handles.  I don’t love them but I don’t hate them.  I’m giving them some time.

March2011 021
March2011 029

It’s hard changing from a matchy-matchy decorating style to a more eclectic style.  I know it’s still a little matchy being grey and all but I still feel like it doesn’t “match”…baby steps. 

I had considered maybe a green or a plum but that’s just not really our style…and that’s ok.  Not everyone can be bold and daring.

Now to figure out what to add to the top of the dresser.  We are pretty minimalist people and don’t have a lot of “stuff” which means I will need to purchase some things.  I’m thinking a lamp, a fan, and maybe some frames.  Luckily I am indecisive...which will allow the paint to fully dry before I place anything on it.

What are your thoughts?  What do you think of the handles? When will my West Elm curtains arrive so I can "finish" this room???  So many unanswered questions!

(Read about my furniture painting process here!)

Before + After dresser update.jpg

Time Flies

We should have started this blog while we were building our house…but we didn’t.
 
I’m not sure why.  Must have been the whole moving in with Nate’s parents, graduating from pharmacy school and studying for boards, Nate finishing up tax season, starting a new job, and spending every waking second either at our jobs or working on the house. Guess that’s why…

In order to document our house building process, I am going to occasionally update you on where we were 3 years ago and what things look like now.  (We did do a decent job of photographing the process!)

This is what our house lot looked like exactly 3 years ago...

House 053

And here is the same view this morning….

March2011 002

Crazy how time flies!! 

It’s also crazy what I will do for this blog….like photograph our house in my pajamas.  Luckily we live in Iowa and only the 1 car passed….and luckily I didn’t know them….

Dog Litter

As you learned on Tuesday, Ike is litter trained.

Had you heard of litter training your dog before Tuesday’s post?  We hadn't heard of it until Nate’s sister tried it with her maltipoo…and it worked.

Today Ike and I will answer some common questions we get from friends and co-workers when they hear about this litter training business…get it, business…

014

They make litter for dogs?:  Yes.  We use SecondNature by Purina. They make special dog litter boxes as well. (You can visit their website here for even more information.)

Where do you buy the litter/litter box?:  We get ours at PetSmart.  It’s about $20 for a bag that lasts about 2-3 weeks.

Is it like cat litter?:  No.  The litter is big pellets of paper and wood pulp products.

Does it smell?:  The litter has kind of a pine smell to it.  It’s definitely not strong though.  It doesn’t smell like cat litter does.  The box will smell if we don’t clean it out regularly..but that’s common sense. 

How often do you clean it?:  We clean his #2 out (I can’t believe I’m actually posting about dog crap..what is this blog coming to?) right away (with a poo bag). Otherwise we clean it out about every other day.  We use a cat litter scoop to clean out any wet areas.

Was it easy to train him?:  Yes. He had very little accidents as a puppy.  We kept him confined to our kitchen area and took him to the box about every 15 minutes.  He caught on in only a few days.

What are the pros of litter training your dog?: 
  • We are lazy so not having to take the dog outside is awesome.
  • He doesn’t have to go outside and get all muddy, snowy, etc. 
  • Did I mention that we are lazy.  In the morning we let him out of his cage (Nate is mean and won't let him sleep in the bed)...and he heads on down to use the facilities while we get ready for work.
  • He has one in his exercise pen that he stays in while we are at work.  We don’t have to worry about rushing home to make sure the poor dog doesn’t have an accident.  This makes him pretty self sufficient.
What are the cons of litter training your dog?: 
  • Sometimes he gets lazy and doesn’t like to go all of the way in the box…which leaves us with a mess. 
  • We have to lug a litter box when we travel.  (We do have a spare at my parents’ house). 
  • He doesn’t know how to tell us that he has to go if we are somewhere besides home.
    • Ike would like to take this time to apologize to his grandmother for last night's rug incident...Sorry!!
  • There is an ugly dog litter box in our mudroom.
Would you recommend litter training?:  Absolutely.  Best invention ever for dogs under $25 pounds!!

Any other questions?  We’ll answer them all!!

Curtain Woes

Remember my master bedroom curtain drama?  I went from curtains to roman shades and back to curtains again.  (Read about it here.) (Take a tour of our master bedroom here.)

After searching for every grey/silver/platinum curtain ever made (Seriously. I wish I was joking.), I narrowed the selection down to these 3 options…all from West Elm…

curtain collage

I bit the bullet back in February and ordered option B (even though I am still madly in love with C….I just could not bring myself to spend over half of my monthly budget on curtains….just couldn’t do it….but they are so very pretty…). But I think know option B will look equally as fabulous for about half of the cost.

Why aren’t these babies hanging yet??? 

Back in February they were on back order until March 9th.  Fine. Whatever.

On March 10th I clicked on my order history to find out that they were on further back order until March 29th…..this is like moving Christmas morning…or my birthday….come on West Elm!!  Don’t do this to a girl with no patience!!!

As March 29th “back order day” draws near , I have this horrible fear that I am going to wait this long and the grey is going to be all wrong in our bedroom. 

Does anyone else have panic attacks about curtains? 

Have you waited for something that was on back order for what seemed like a lifetime?  How’d it turn out?

House Tour- Mudroom

You caught a sneak peak our mudroom in a previous post.
Here’s the full tour….small spaces are so hard to photograph…
008
View from hallway
 
005
View from garage

007
View looking towards hallway

Amazingly boring, right? 

Don’t worry.  I have plans.  They involve my father-in-law, some tools, and some lumber…maybe some coat hooks and storage baskets.  I just need to finalize some ideas…if you’ve been reading long enough you know that I’m nothing but indecisive!

And because I feel bad lying to you…I hate when bloggers do that…this is what our mudroom actually looks like…

009

It houses a lovely dog litter box. 

Yes, Ike is litter trained.  I can think of no possible way to make this attractive but trust me, it’s worth the ugliness to not have to take the dog outside to do his business in an Iowa blizzard.

There you have it.  The truth.  I feel so much better.

Anyone have any great mudroom inspiration photos?

Anyone have any clever ways to help me out with this litter box situation?  The one major problem is that he won’t use it if there is anything in his way to get to it….he’s lazy…

Mulch Island

Sounds pretty exotic, right?

We have been having some pretty wonderful spring-like weather here in Iowa.

Nate and I have both come down with a pretty bad case of spring fever. 

We can’t wait to get back to working on our yard.  We’re weirdos that like playing in dirt and mulch.

This is the hot mess of a side yard that we started with…

Park_View_House_006

Pretty, huh??

Nate whacked out all of the undergrowth (tiny trees, weeds, more weeds, etc) while I hauled the nastiness down to the tree line.  Why do I always get the awesome jobs???

Which left us with this….

May 036
May_006
May_009

Definitely an improvement but there was obviously still some work to be done.

We wanted to create a “mulch island.” 

Nate edged around the perimeter with a square shovel to help keep the mulch in the “island”.

He then sprayed the weeds in the “island”.  (I prefer to keep things as chemical free as possible but Nate likes a pretty yard and that involves chemicals.  I’m dealing.  He has his weed killer.  I have my spray paint.)

We then went to a local nursery and purchased a truck load of mulch which we spread throughout the island.  It took a couple of truck loads.  We then realized it was actually less expensive and more convenient to have it delivered.  Lesson learned.

We planted some plants in the “island” (most were free from my parents..score!) and we ended last summer with this…

May_053
May_054

We’re excited to freshen up the mulch and see if all of our plants survived!

We’re also excited to work on some other areas of the yard as well…which we will definitely keep you posted on!

Check out more DIY ideas on our Projects page!

Update Your Landscape With Mulch

Anyone else have spring fever and itching to get back out in the yard???

Decorating With the Dog- Tip #2

When deciding on the best fabric choice…it’s best to sleep on it…

March2011 024

Read Tip #1 here!

***Ike and I would like to thank the following blogs for their nice "shout outs" to our newbie blog...
NewlyWoodwards, Relatively Unique, and DDZine.  Thank you so much for sharing our little spot in the blogosphere with your readers!!  Seeing our blog mentioned in your posts made us smile...a lot...both of us.***

Enjoy your week-end!!

How to Make a Chair Pretty Again

If you’ve been wondering how I did this....


….you are in luck today!
(That’s my nod to St. Patrick’s day….weak…).

On a side note….Nate refuses to wear green today.  Mainly because he knows it irritates me.  We go through this every St. Patrick's day...husbands.


Maybe I’ll change the font to green to honor the occasion….

Here we go with the chair make-over....

Step 1: Flip the chair over and unscrew the seat cushion…I forgot to take a picture of this during the before….baby blog steps…

March2011 021

You now have 2 pieces..the chair and cushion…

March2011 001

Step 2: Remove the lovely fabric from cushion.  This involves removing/loosening 100 staples or tiny upholstery nails.

I usually don’t bring these nasty chairs into my house until I’m done with them because I don’t know what is living in them…
but I was living on the edge with this one…I figured vinyl was safe….and I had an investigator checking for any problems...

March2011 013 - Copy

Step 3:  Use the nasty old fabric as a template for your new cover.  Cut fabric.

Step 4: Staple new fabric onto cushion.  Try not to staple the dog...

March2011 014

Step 5: Clean, sand, prime, and paint the chair. (Read more detailed instructions here.)

I spray painted this chair because it had a lot of nooks and crannies. This was the first furniture piece that I used spray paint on.

After sanding, I started with the first coat of Kilz primer. 
I'm not sure if I didn't sand enough or if I was too impatient with the primer but it ran...A LOT.  I let it dry, sanded down the drips, and started over.

I learned that it’s important to do a nice, thin, even coat…then check a few blogs, do some laundry, take a nap, and then do another nice, even coat…or two. 
Patience is a virtue...one that I do not possess.  So this was hard.

Spray painting is nice though because each step is quick.  I have the attention span of a gerbil so this project ended up being perfect for me. 

After the primer, I did 2 coats of spray paint and let the chair dry.


March2011 020

Step 6: Screw the cushion back onto the chair and you’re done. 

I told you it was easy. 

Any questions???

More importantly, do you have a significant other/family member/friend who is also a fun hater on this day of green?