Then and Now-Kitchen and Dining Room

As most of you know, it’s hard to move quickly on house projects….they take time and money.

We have a set budget and keeping our budget is extremely important to us. 

We pick and choose projects each month based on what else is going on that month. 

For example, we don’t take on larger projects during months when we know we are going on vacation or need new clothes, etc.  When I go crazy and order a West Elm comforter, I can’t order West Elm curtains in the same month. 

It’s not that we don’t have the money, we just choose to be smart about our purchases.  There are things that we feel deserve the extra splurge (the comforter we sleep with every night) and there are things that we know we can spend less money on (a thrift store dresser that is more for looks). 

Due to our cheap frugal ways, decorating our house has been a fairly slow process.  It most definitely has not happened over night....just like Rome wasn't built in a day...all things take time...(I love cheesy sayings like that...)

This week I will show you the various stages of our house.  I’d call it “Before and After” but none of our rooms are complete so I feel that “Then and Now” is more fitting.

I’ll recap some rooms for our new readers and show some new-to-the-blog progress photos later in the week.
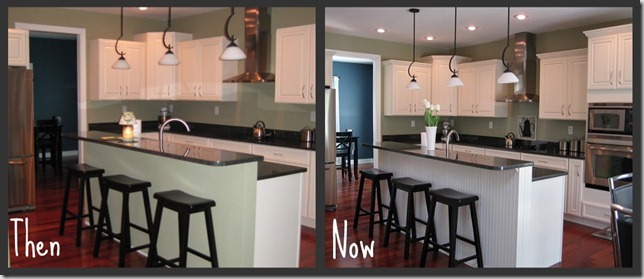
kitchenthenandnow

In the kitchen we added crown molding to the cabinets, a temporary picture backsplash, and bead board on the island.  This room took us about a year and is probably the closest to done.  We do plan to add a backsplash…..if we can ever make a final decision on what material to use.
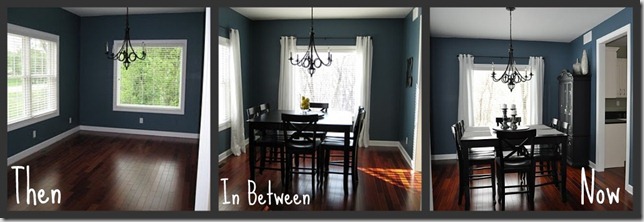
diningroomthenandnow

Our dining room sat empty for an entire year after we moved in.  It’s the first room you see as you enter our front door.  We told people it was our meditation room.  We decided to purchase a table and chair set (darn matchy-matchy old self) after a year of living in the house.  We hung curtains (Target bargains) a few months after that.  I found the hutch at the Salvation Army last June.  I am still looking for a few others items to place on the top of the hutch and have been pondering chair covers.  We are eventually going to add crown molding as well.

Tomorrow I’ll show you the progress of our master suite and guest bedroom.

Do you have a decorating budget?  Do you want to learn more about how we budget? (I won’t bore you otherwise…) 

Do you have a meditation room? :)

Good-bye Reindeer

I was cleaning our dining room the other night and realized that I still have my Pottery Barn Reindeer plates on display. Nice. 

At least I caught it by Valentine's Day...although the Cupid plate in the middle may actually work.....


The plates are cheesy but I love them.  Nothing says Christmas like cheesy.

Any Christmas decorations still hanging around your place?  I hope this is the last of mine...

Not Your Grandma's Hutch

Time to share my favorite "Before and After"

I found this hutch at our local Salvation Army and I knew I could not pass it up!  It was the perfect size for our dining room.  It was sturdy and I loved the curves.  I didn't love the wood. 

How to Paint Furniture | Decor and the Dog

Nothing a litle paint can't fix.  Is there anything that paint can't fix??....

How to Paint Furniture | Decor and the Dog

I never thought I'd own china (a wedding gift), let alone a hutch to put it in.  Every day I realize something else in life that keeps adding to my oldness factor....

I used Valspar's Lincoln Cottage Black on the outside and Glidden's Granite Grey on the inside.  I used the grey on the inside for contrast.  I didn't want the hutch to turn into a giant black hole.

I didn't take any step-by-step photos (I'm working on it)....but here are the basic steps that I use to paint furniture...there are about 100 different ways but this is what I find works best for me.


Step 1:

Clean the piece and remove any hardware.  I buy junk furniture which is usually full of cob webs and dust and grossness.  I take some damp papertowels or an old rag and clean it REALLY well.


Step 2:

  I usually go from stained wood to paint so I usually do a light sanding with whatever sand paper I can find laying around.  Don't sand too hard or you can possibly scratch the wood.  For this hutch, I borrowed a hand sander.


Step 3:

Clean off all of the sanding grit.  Again, I just use papertowels for this.  Some people use tacky cloths but papertowels have worked well for me.


Step 4:

Prime.  I use Zinnser Fast Prime 2 and I apply it with small roller brushes.  The primer usually dries within in an hour.  This step doesn't have to look pretty....just get a nice thin, even coat. 


Step 5:

After the primer has dried, you are ready to paint.  I have used a variety of paints and finishes.  I also usually do 2 coats just to make sure the piece is covered well.  I use a smaller roller brush for this step as well.


Step 6:

Replace the hardware.  You can also give it a coat of poly but I find this takes the piece FOREVER to dry and I'm too anxious to put it to use. :P  I do generally wait about a week before I set anything on a newly painted piece.

There you have it! Piece of Cake!

Be sure to check out our DIY projects on our "DIY/Decorate It" page!

How to Paint Furniture | Decor and the Dog

Dining Room Evolution

Remodelaholic
Our dining room has evolved quite nicely (along with Nate's photography skills)...


During construction...
That dry wall dust still gives me nightmares.


Who needs curtains? Or a place to sit. 
This was our "meditation room" for about a year.  I wish I was joking...


Curtains hung high and a bar height dining room table start to give the room a little life!


All decked out for Christmas!

Dining room today!


View more house tour pictures here!
Linking up to: Houseography,