Royal Design Studio Stencil Giveaway

Happy Friday!  Who's pumped for the weekend?  We're headed to the land of slow internet to visit my family.  I always enjoy a nice little break from civilization.

Today we have a slight change in our regularly schedule programming.  Last week I shared my newly stenciled craft room where I used the Royal Design Studio chevron wall stencil.

Decor and the Dog Craft Room 1.jpg

Today Royal Design Studio is offering a stencil giveaway!   There are so many great options to choose from!

Royal Design Studio Stencil Giveaway.jpg
Nate and I generally aren't that couple that tells the other what they can and can't do.  But there are a few things we have agreed on.  I'm not allowed to wallpaper. He's not allowed to sky dive.  Deal.
 
Luckily, stenciling is basically like wallpaper.  It's not extremely difficult.  Time consuming, yes.  Difficult, no.  Overall, you get the same effect but you can easily paint over it.   I said our powder room was the last room I would stencil.  And then the craft room happened.  Wonder which room will be my next victim?
  • PRIZE: One stencil $50 or less with free shipping included!
  • TO ENTER (required):  Enter via Rafflecopter below.  If you have trouble commenting, try using a different browser.  (Sorry!  Squarespace has no other fixes for me. Womp, womp.)
  • GIVEAWAY CLOSES: September 19, 2013 11:59PM
  • NUMBER OF WINNERS: One
  • OTHER STUFF: U.S. Residents only. The winner will be selected using Rafflecopter and announced on Monday, September 23rd.  Good luck!


Photobucket Photobucket Photobucket Photobucket PhotobucketPhotobucketfollow us in feedly

How To Drill Into Tile

On Monday, we revealed our master bathroom updates. 

DSC_0032.JPG

Today we'd like to share with you our tips on how to drill into tile.  Well, I don't actually want to share it because it's boring and I only like sharing fun and pretty things.  I guess this blog should be useful for something now and then though, right?

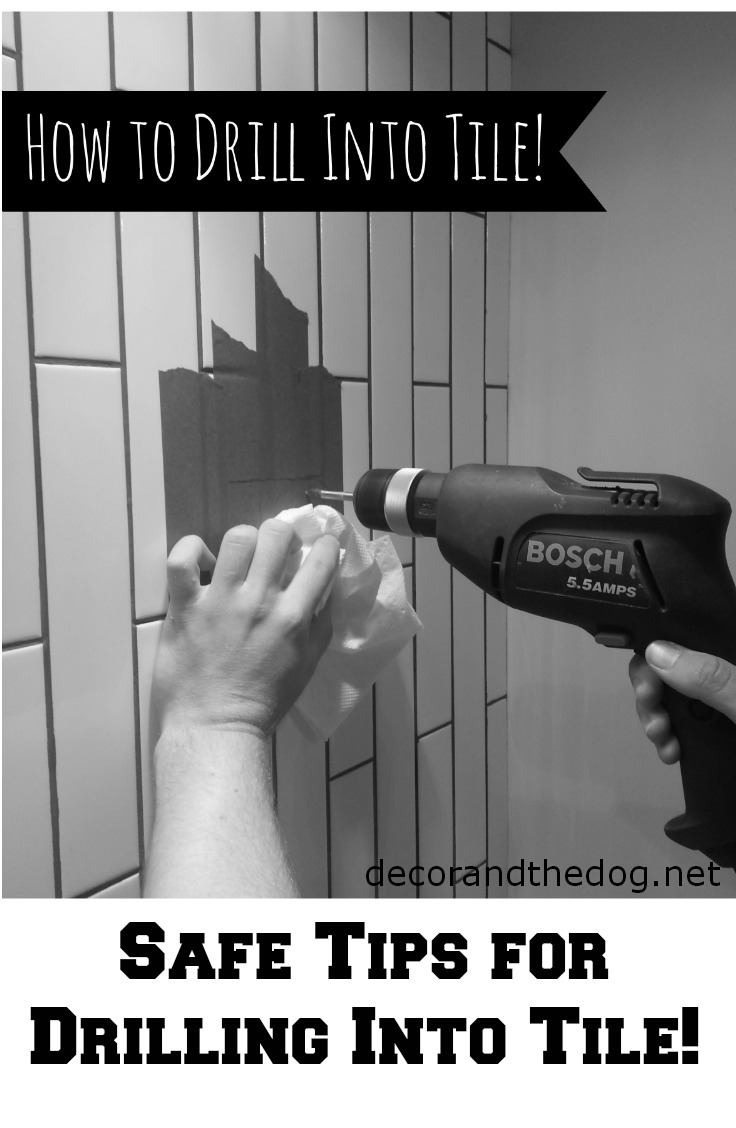
How to drill into tile.  Safe Tips for drilling into tile

We installed the tile onto the wall.  We then needed to hang the mirrors.  The only way to hang the mirrors was to drill through our precious tile.  The thought of breaking/chipping/ruining our pretty new walls was terrifying.  Did we really need mirrors in a bathroom?  Turns out we did.  We sucked it up, did some research, some drilling and then stared longingly into our beautifully hung mirrors.

Tip #1

 Choose the correct drill bit.  

Regular drill bits aren't strong enough to drill through tile.  Tile is made to be strong and hold up to a beating but these qualities make it hard to drill into.

We chose a carbide-tipped masonry drill bit.  These bits are made to drill through very tough surfaces.

We purchased our bit at Menard's for ~$8.00


carbide-tipped drill bit.jpg

Tip #2

Prep the area you are going to drill into.  

We used painter's tape to mark the spot where we were going to drill.  

How to Drill Through Tile.jpg

The painter's tape helps mark the spot but it's also very important because it helps prevent the drill from slipping.   It's hard to drill into tile because the drill bit likes to hop around on the tile instead of drilling into it.  The tape gives the bit some traction.

Tip #3

Let the drill do the work.  

Use light pressure on the drill.  It's tempting to want to drill fast.  Drilling through tile takes patience. It took about 5-10 minutes for each hole drilled. 

How To Drill Into Tile.jpg

Tip #4

Keep the drill bit cool.

The drill bit will get hot.  It's important to keep it cool so it doesn't break.  The easiest way to do this is to periodically dip it into water. 

You now have holes that are ready for hanging your mirror! 


DSC_0019edit.jpg

Have you experienced the fear of drilling through tile?  Who just looked at the pretty pictures? ;) 

Photobucket Photobucket Photobucket Photobucket PhotobucketPhotobucketfollow us in feedly

Master Bathroom Reveal

Our master bathroom is finally done!  Ike is pretty excited about it. 

Master Bathroom reveal {the tile shop, subway tile, polished nickel finishes}

As you may remember, The Tile Shop offered us some free tile.  We said "Are you sure?" followed by "Yes, please!".  We previously purchased the tile for our kitchen backsplash from The Tile Shop.  We love their selection and customer service so we were excited to partner with them!

 The addition of tile walls quickly spiraled into new lights, new mirrors, new faucets, new towel hooks, new cabinet hardware and crown molding.  The poor bathroom didn't see it coming.  (I don't think Nate did either.)

We weren't completely happy with this bathroom since building it.  It never felt like us. It never felt fancy like a master bathroom should. It never felt finished. Probably because it wasn't.  There were pieces of trim missing, the cabinets weren't finished, etc.  Tiling the walls was the extra motivation that we needed to complete this room. 

Our bathroom is now a great reflection of our style.  Which I think we've decided is modern farmhouse.  That's a thing, right?  

Master Bathroom reveal {the tile shop, subway tile, polished nickel finishes}

We used the 2x12 in Imperial Bianco Gloss tile with charcoal unsanded grout.  Nate wanted to install the tiles vertically.  I wasn't sure at first.  We taped some tiles to the wall to get an idea of how it would look.  We both liked it so we went for it. 

We each have our own sink area which is usually awesome.  It's not quite as awesome when you decide to tile the walls behind the sinks.  Double the work is never fun.  First world problems are hard.  

This side is mine. I love the amount of cabinets and counter space.

Master Bathroom reveal {the tile shop, subway tile, polished nickel finishes}

This side is Nate's.  He gets less counter space because it takes less to make him pretty.  (I have to put fluff stuff like this in here because he's still mad grumbling at having to install crown molding.  Crown molding that he really likes.)  The cabinet tower holds towels and also functions as our medicine cabinet.


Master Bathroom reveal {the tile shop, subway tile, polished nickel finishes}

The area next to towels is our walk-in shower.   Another favorite feature of this room.  Don't ask Nate about installing crown molding around that shower.  It's a touchy subject.  But doesn't it look pretty?

Master Bathroom reveal {the tile shop, subway tile, polished nickel finishes}

As a reminder, this is what we started with. 

bathbefore.jpg
bathbefore2.jpg

We would like to thank The Tile Shop for supplying us with the tile to kick off this project.  We would also like to think Pfister for supplying our beautiful faucets.  You've made Ike's day! 

Master Bathroom reveal {the tile shop, subway tile, polished nickel finishes}

Sources: 

We'll be back Wednesday with tips for drilling into tile!  Friday we'll cover how we changed up the hardware. 

Like this post?  Check out our home tour and diy page for more ideas!

Who's happy we finally finished this bathroom?   Is there anything better than a smiling Ike?

Photobucket Photobucket Photobucket Photobucket PhotobucketPhotobucketfollow us in feedly